Managing an online store can be complex and lead to mistakes. Fortunately, today’s CMSs simplify this process as much as possible, but it’s natural to have something get out of our control.
When deciding on the retail price of a product in WooCommerce, it’s important to consider the profit margin. And to determine the profit generated from a sale, you must remember that product’s default cost.
Unfortunately, this process needs to be done manually, comparing online cost data with the supplier’s data. The more complex the process, the larger the chance of errors.
In this guide, we will explain the importance of knowing the original cost of the products you sell, when this information can be useful, and how to easily add it to your products in WooCommerce.
Table of contents
Why it’s important to know the cost of goods
There are several reasons why it is important to have this information available at all times, but there are four main ones:
- Calculate Profit Accurately – The product costs (and therefore the total value of an order) can be confusing for a seller. You might make decisions based on a higher profit margin than is actually the case. But why bother with an Excel file, for example, when you can have all the details on WooCommerce?
- Track profits by product – Use a plugin that allows you to track the profits generated by each product individually. This level of detail is essential for identifying which products contribute significantly to your store’s success and which ones need additional marketing or promotion strategies.
- Predict profit margins – This point may seem similar to the previous one, but it’s more specific: knowing exactly how much gross profit each product has can help you apply business strategies, create promos and discounts, and even advertising campaigns. There is no point in offering a discount that completely wipes out your profit margin and, perhaps, finding it out later.
- Manage inventory more effectively – A plugin that integrates inventory cost into the WooCommerce dashboard helps sellers manage stock more effectively. By knowing how much it costs to restock a product, you can avoid under or overstocking, minimize waste, and maximize product availability.
Of course, there are other benefits, however, these alone justify the use of a dedicated tool, as we will see below.
Use a WooCommerce plugin
One of the great advantages of WooCommerce is that you can add features that are missing in its basic structure by using a simple plugin. Even the feature shown in this article can be added with one click using the YITH Cost of Goods for WooCommerce plugin.
This plugin adds a field to the product creation process that allows you to specify the cost of supplying the product. This information is not shown to customers, it is viewed directly in the admin panel so you always know how much you are earning and why.
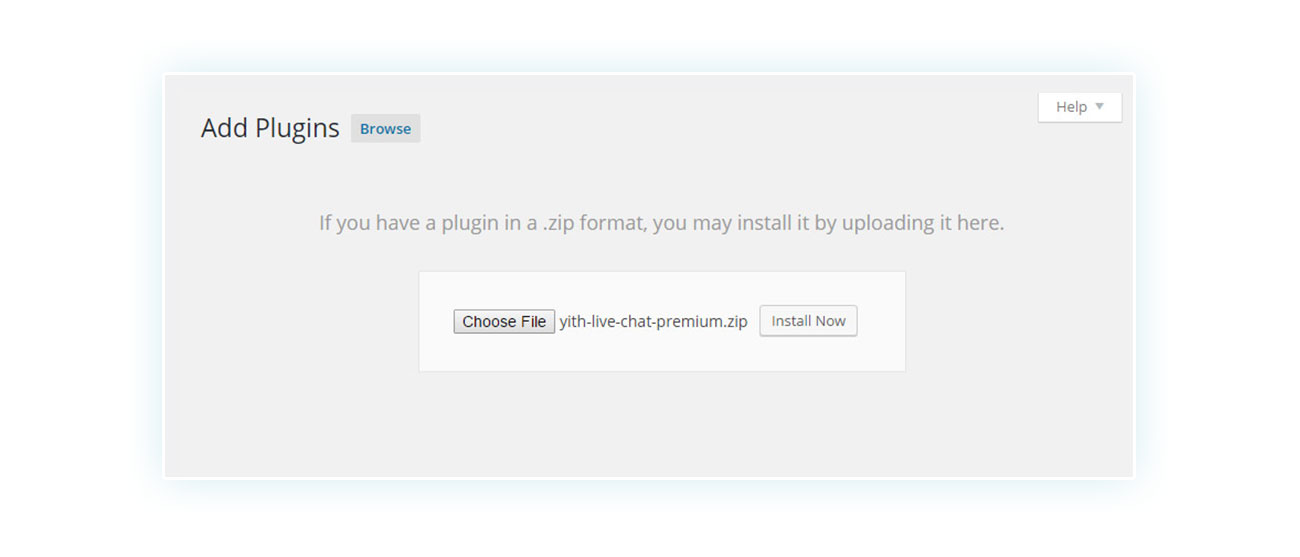
To use this plugin, all you have to do first is purchase it and then download it. You will get a compressed folder: DO NOT EXTRACT THE FILES. You have to upload the entire folder to WordPress.
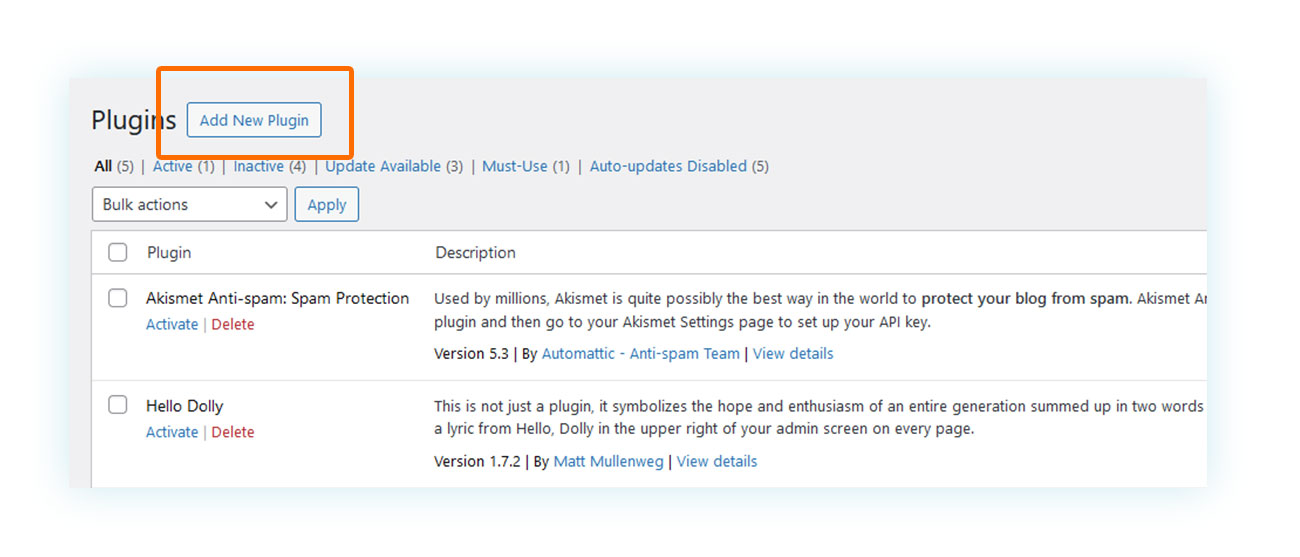
To do this, go to your side menu and click on Plugins. You will get a page with all the plugins on it and you will have to click “Add New Plugin” at the top:
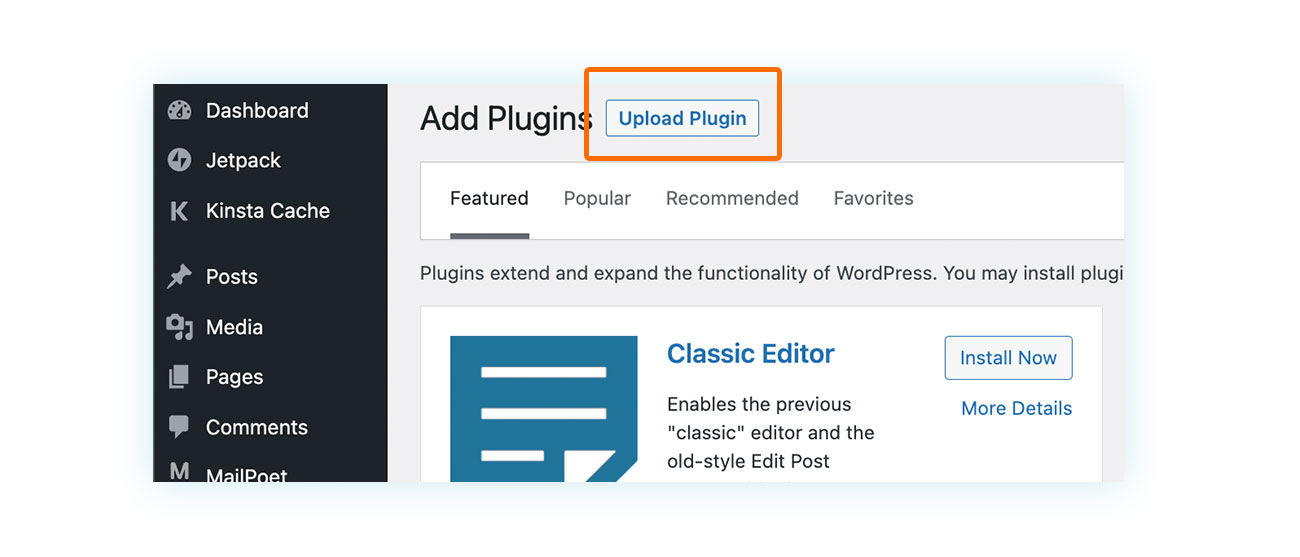
Then, you will get to a new page and you will need to click on “Upload Plugin”:
You can simply drag and drop the folder you just got to load the plugin:
Once it is loaded and activated, you can start taking advantage of its features. The plugin is so simple to use that you have already done the “hard” part. Now, let’s see how Cost of Goods for WooCommerce works.
YITH Cost of Goods for WooCommerce
Once you activate Cost of Goods, you will notice it’s one of the most intuitive plugins out there. All you need to do after activation is create your simple or variable products (or edit existing ones).
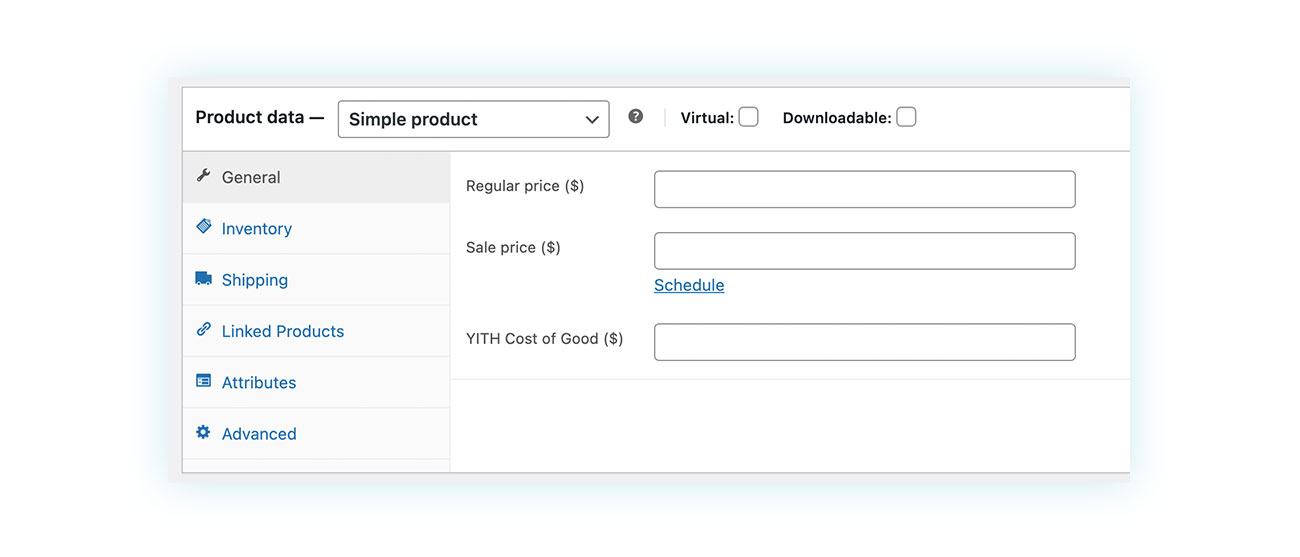
How to enter the product cost
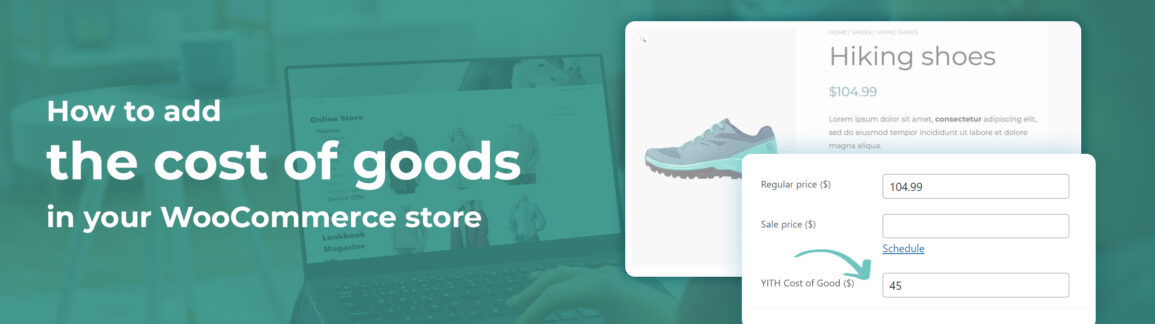
On the product creation page, in the Product Data section, you will find a new field called “YITH Cost of Good ($)”:
In this field, you will add cost of supplying the product. Let’s take a specific example: you have a T-shirt that you sell for $10, but it costs you $5 to get it from your supplier. Here is how you will have to fill in the field in this case:
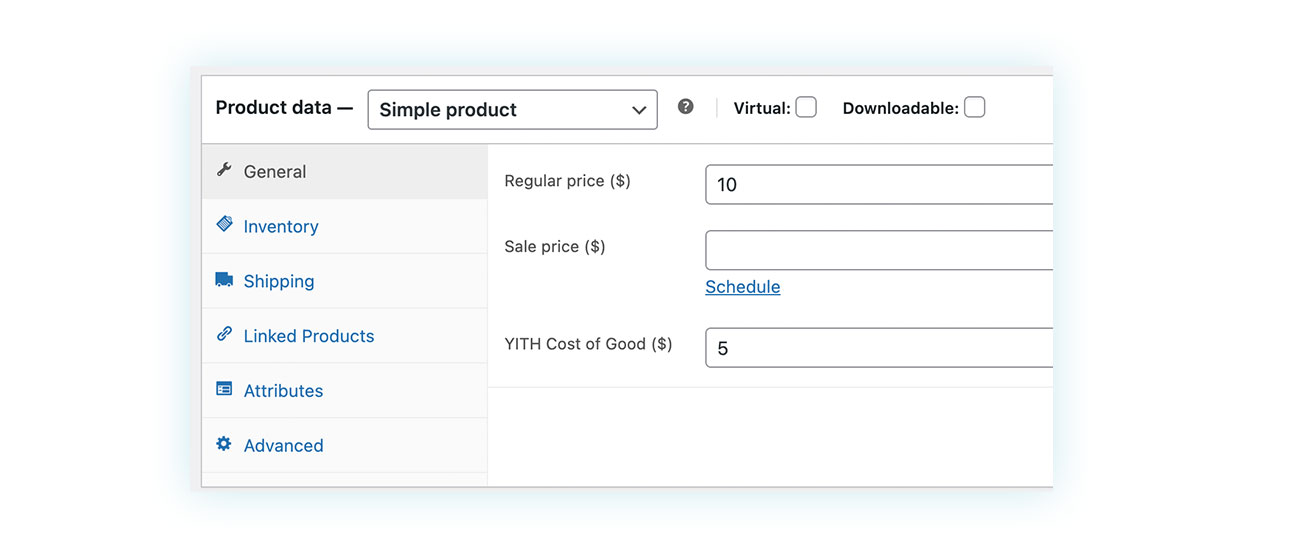
And that’s it! By pressing a couple of keys, you have added the product cost and now the plugin will use this to calculate your sales profit.
How to calculate sales profit
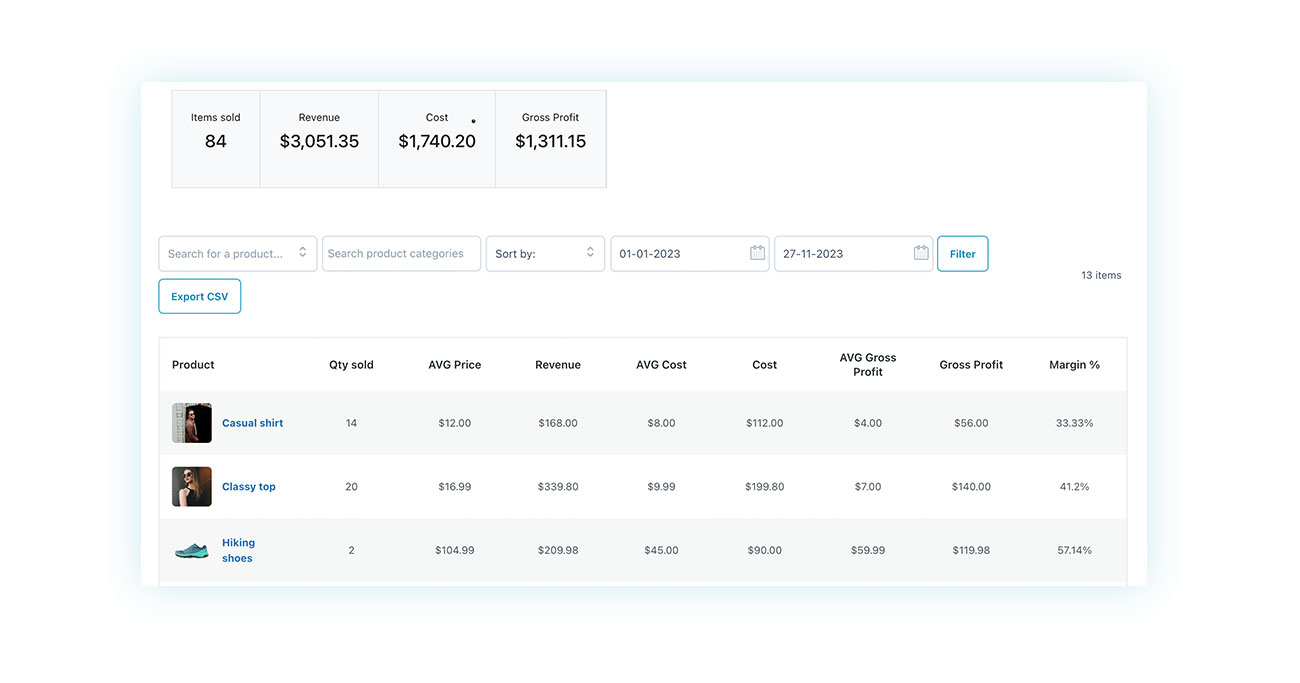
The plugin also does the sales profit calculation automatically. To find this information, you just have to go to YITH > Cost of Goods and you will get a complete overview of the different products:
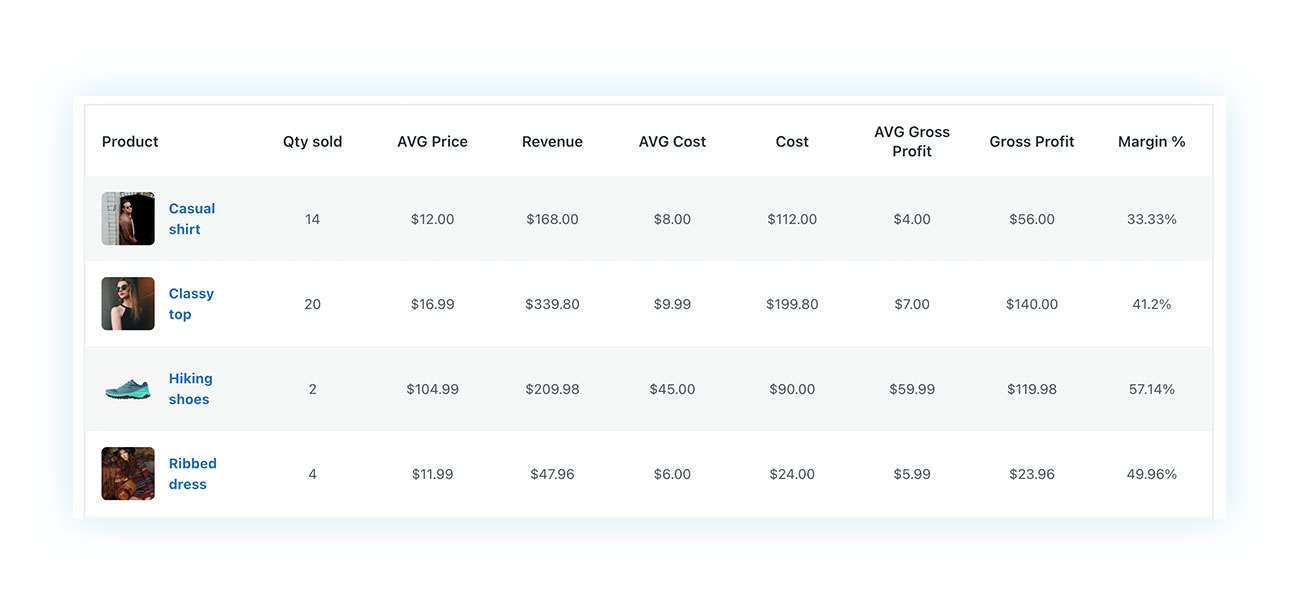
These include:
- Quantity sold – Number of units of each product sold on the site.
- Average price – Average price consumers pay for a product.
- Revenue – Total amount received from orders. This is the gross amount, as the cost of each item has not yet been deducted.
- Average Cost – Average cost you paid for this particular product.
- Cost – Total amount you paid to the supplier.
- Average Gross Profit – Net amount earned for each product sold.
- Gross Profit – Total net amount received by subtracting Cost from Revenue.
So if you want to keep an eye on your total sales profit, all you need to do is look at Gross Profit.
How to calculate the potential profit
The last column in this report shows the margin expressed as a percentage. This tells you how much margin you are actually making on each product.
For example, the product “Casual shirt” in the table above has a selling price of $12 and a cost of $8. So the net profit on each sale is $4.
At this point, the product calculates the percentage of 4 from the purchase price of 12, which results in 33.33%.
The percentage is very handy for getting a more direct view of the profit you are making and you can easily compare it to other products’ margin percentage.
In fact, if two products have the same $5 profit, but one has a lower margin, you might consider raising the price of that product.
Let’s take two products as an example:
- Product A – Price of $10, cost of $5. Gross profit per unit of $5, with a margin of 50%.
- Product B – Price of $50, cost of $45. Gross profit per unit is still $5, but the margin has dropped to just 10%.
An extremely low margin can be counterproductive, as it means a higher risk of approval and less freedom to use promotional techniques.
But this is just one example of how you can use this kind of information.
Include tax and shipping costs
If you want to get an even more complete view of your sales and profit reports, you may want to include other costs that may apply in your online store like shipping cost. To do this, go to YITH > Cost of Goods > Settings:
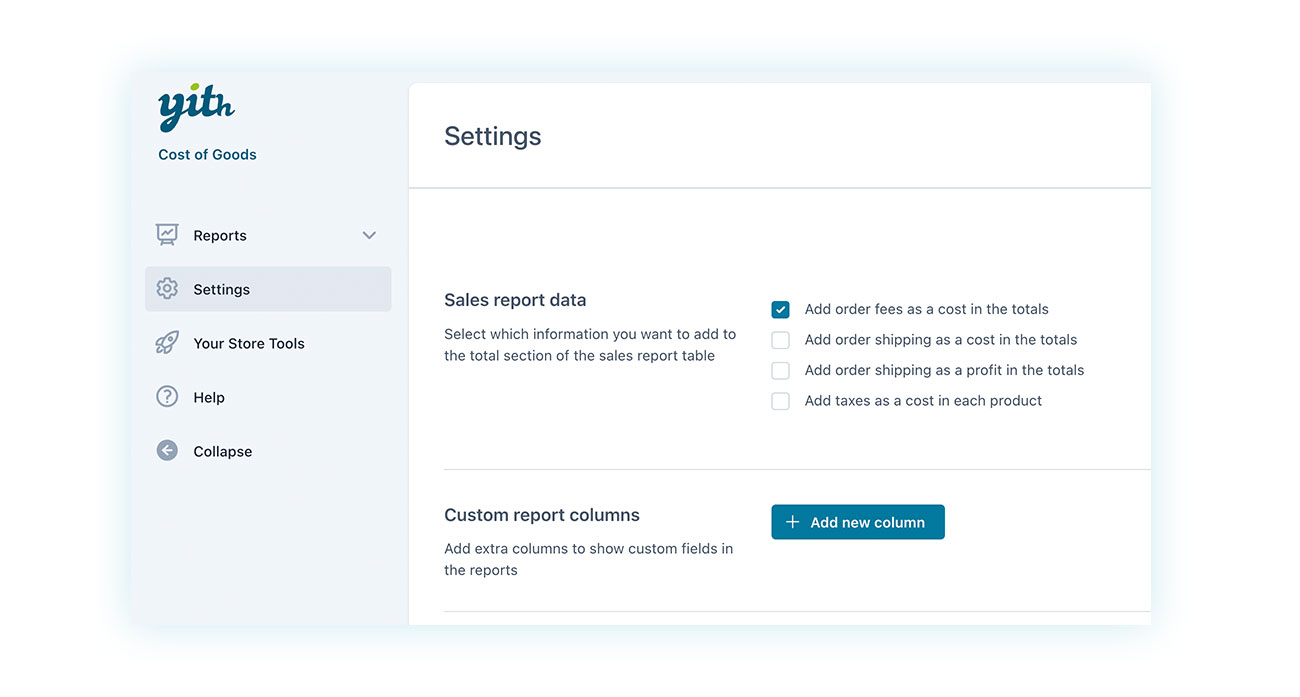
Here, you can decide to:
- Include order fees in the COST of each product.
- Include shipping in the COST of each product (based on shipping zones).
- Include shipping as a PROFIT for each product.
- Include taxes in the COST of each product.
This will allow you to have an even more complete view of your store and the average profit it generates.
Keep an eye on the stock reports
Watching sales only can give you a limited perspective of your store’s business. In fact, the products that are still in stock represent a potential revenue that should be kept in mind. Luckily, you can see this with the plugin by going to YITH > Cost of Goods > Report > Stock Report:
In this case, less information is shown but you can still see individual and total cost, as well as individual and total profit.
Conclusion
Some functions are only introduced with plugins but are universally considered necessary for an e-commerce store to work well. One of them is the ability to track the cost of products for sale. Luckily, you can easily add this function to your store with YITH Cost of Goods for WooCommerce. It will take just a few clicks to install and set it up.
Don’t risk getting confused. Get a complete and updated overview of your business, you just have to make the decision, download the plugin, and install it!