Gift cards are a modern addition to the business world, but they’re becoming more and more important for the growth of online stores.
The gift card industry is not only doing well but growing constantly. In 2020, worldwide gift card sales reached $300 billion, and it’s expected to reach $2 trillion by 2027.
The reasons why this type of product is succeeding and what benefits it can bring for your eCommerce are clear and can be summarized in three aspects:
- Holidays and birthdays – Gift cards are great for occasions like birthdays, Christmas, anniversaries, and graduations. They can increase your sales by allowing customers to buy them for their loved ones. Since most shopping carts are abandoned before purchase, gift cards can speed up the process and improve conversions.
- More customers – By selling gift cards, you can increase the number of customers per order. The first customer will buy the gift card while the second one will use it later, thus attracting new customers and reducing promotion costs while increasing future sales.
- Increased cart value – Most customers don’t use up the entire balance of their gift card when making a purchase. This can actually benefit the seller in two ways: the customer might add more items to their cart and pay the difference, or they might leave some credit unused on their account.
Gift certificates are successful for a lot of reasons, but listing all of them would be repetitive. Instead, let’s dive into how to add this fantastic feature to WooCommerce and make your customers happy!
Table of contents
A step-by-step guide to creating gift cards in WooCommerce
WooCommerce is a great tool that lets you add advanced eCommerce features to your website. One of these features is the ability to create WooCommerce gift cards, which you can easily do by using the WooCommerce Gift Cards plugin. In this guide, we will go over how the plugin works and how to create different types of gift cards.
This plugin is perfect for creating gift cards in WooCommerce. It comes in both a free and a premium version to cover all types of users.
The free version has some great features — you can make as many physical and virtual cards as you like and pick from multiple image galleries. You can also add fields to enter the recipient’s name and a customized message.
And, of course, the premium version of this tool has more features that can help you achieve your goals. With it, you can add several recipients, set a specific date and time for delivery, set an expiration date, and more.
Now, let’s finally see how we can set up YITH WooCommerce Gift Cards.
Gift card plugin configuration
A/N: If you prefer watching a video on setting up the plugin and creating gift cards, you can check out a detailed video tutorial here.
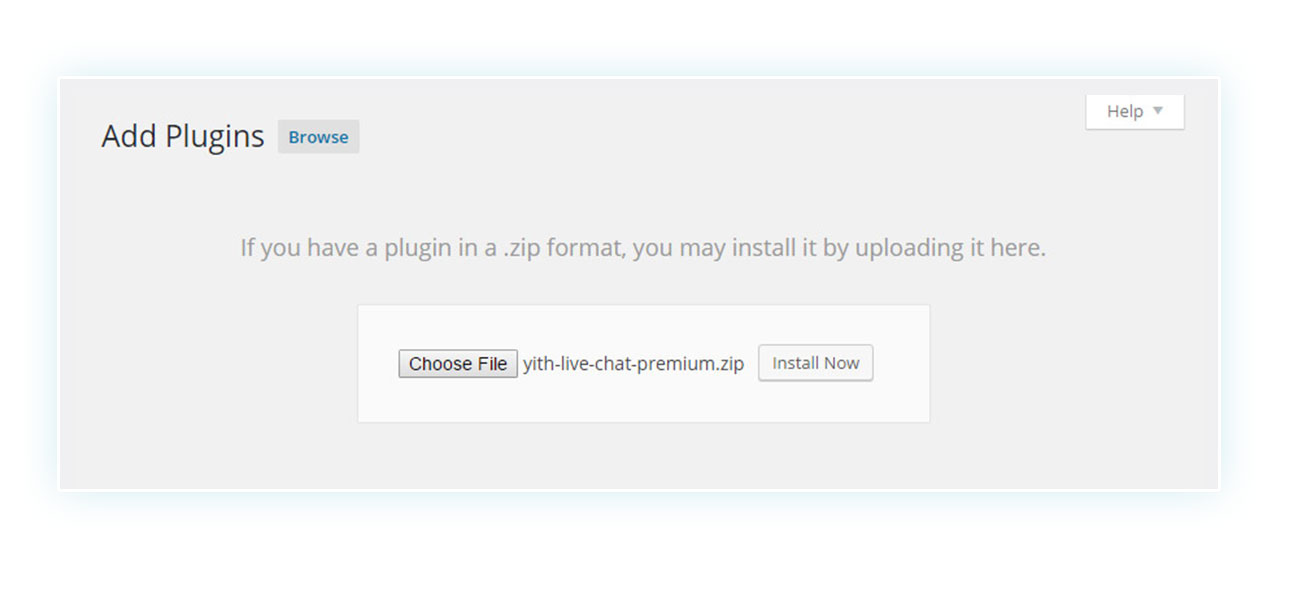
To create gift cards to sell on your WooCommerce store, you first need to get, install, and activate the plugin. To start, go to Plugins > Add New:
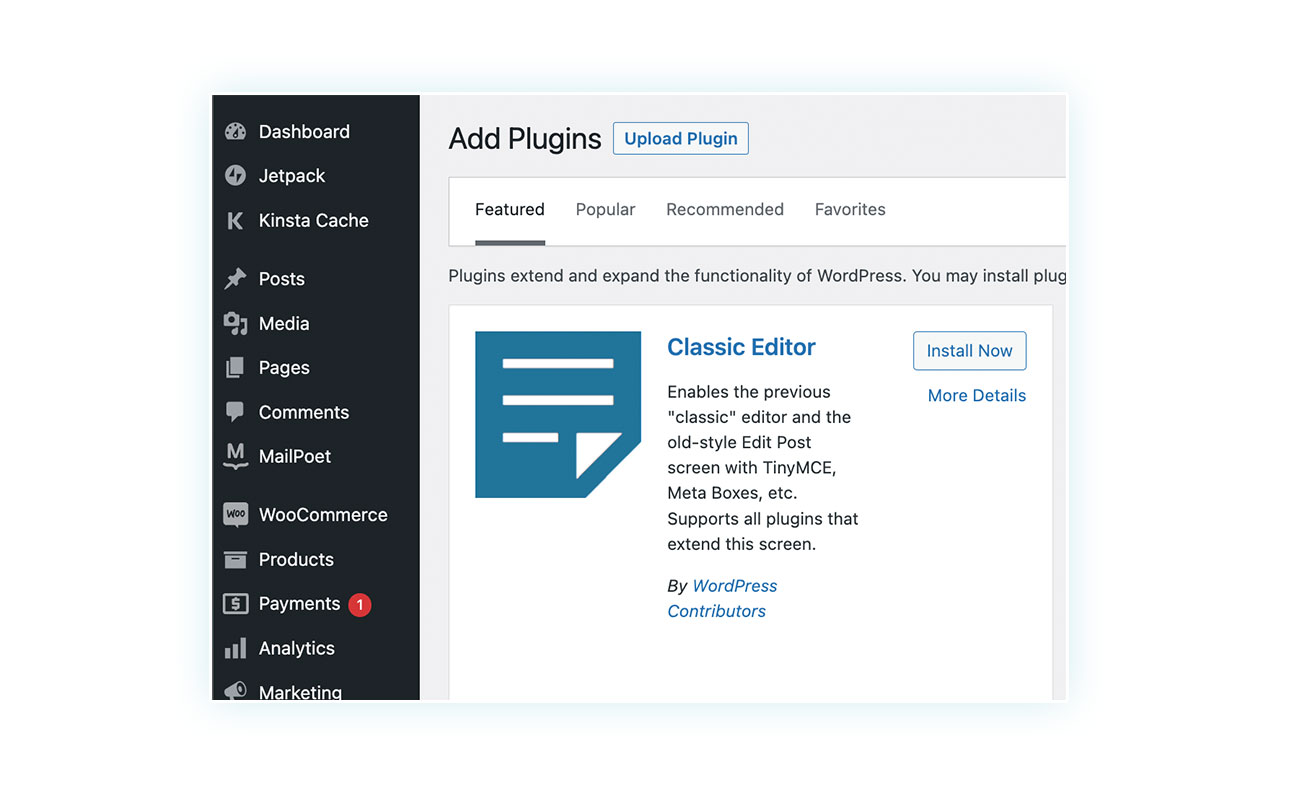
To access the upload section, simply click on “Upload Plugin” at the top:
After installing and activating the plugin, go ahead and check out the YITH > Gift Cards section to get familiar with the plugin dashboard and its main settings:
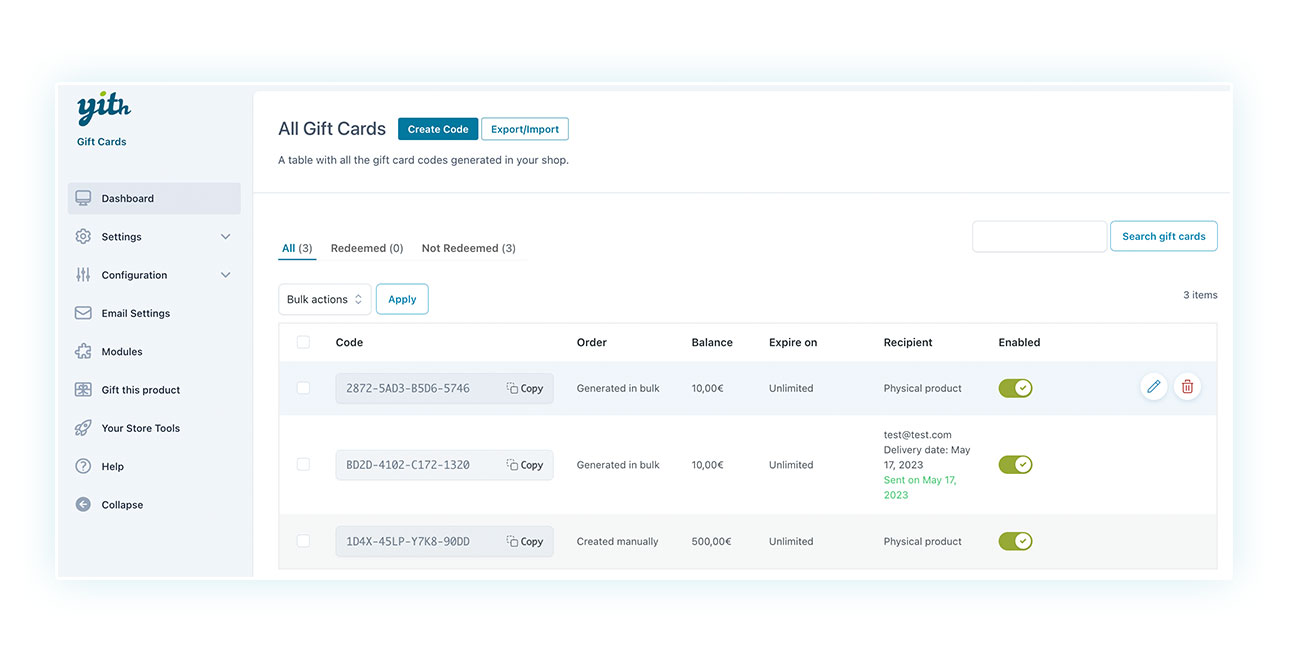
The plugin has multiple features organized in different tabs, and the first tab you’ll see is called “Dashboard”. In this section, you can find a list of gift card codes available on your website. These codes can be either generated manually by you or automatically after your customers buy a gift card.
After creating and selling your “Gift card” products, a code will be generated for each purchase. You can check this “Dashboard” section to find it and you can modify the code however you want to make it work for you.
If you want to create and sell gift cards on your own or as part of a promotional campaign, you can do so manually. Additionally, you can import and export them as needed.
To do this, just click on the “Create Code” button above and a new window will pop up:
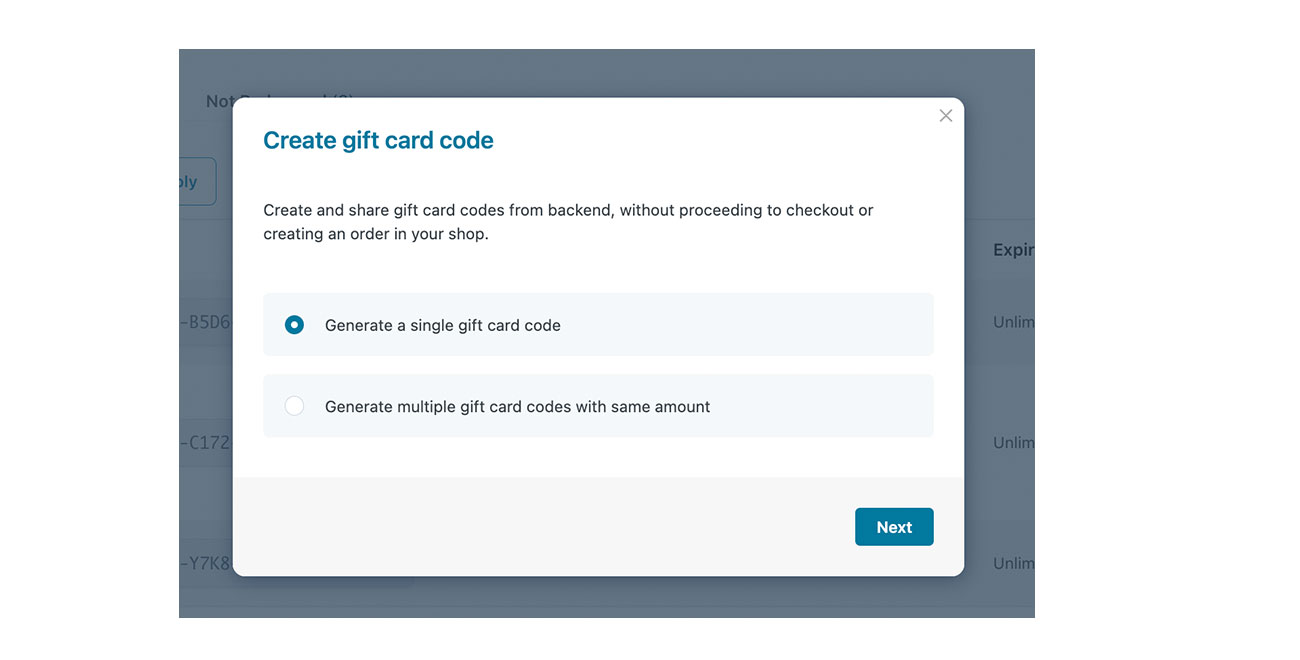
Here you can decide if you want to generate a single code (in case you just need one discount code) or multiple codes with the same value (in case of a large-scale promotion, for example).
In any case, this is a “secondary” feature of the plugin (although very useful for selling physical gift cards), as most sellers are more interested in creating gift cards to sell in their stores and have them automatically delivered to the recipients.
Before seeing how to create such a product, it is important to know the general settings of gift cards. In the next section, you will be able to choose the general behavior of the gift cards in your online store.
To get there, click on Settings > General — you’ll see four different sections there, and the first one is all about the general settings.
Here, you can choose the date format (important for your store location) and decide if a gift card can be used to buy another one.
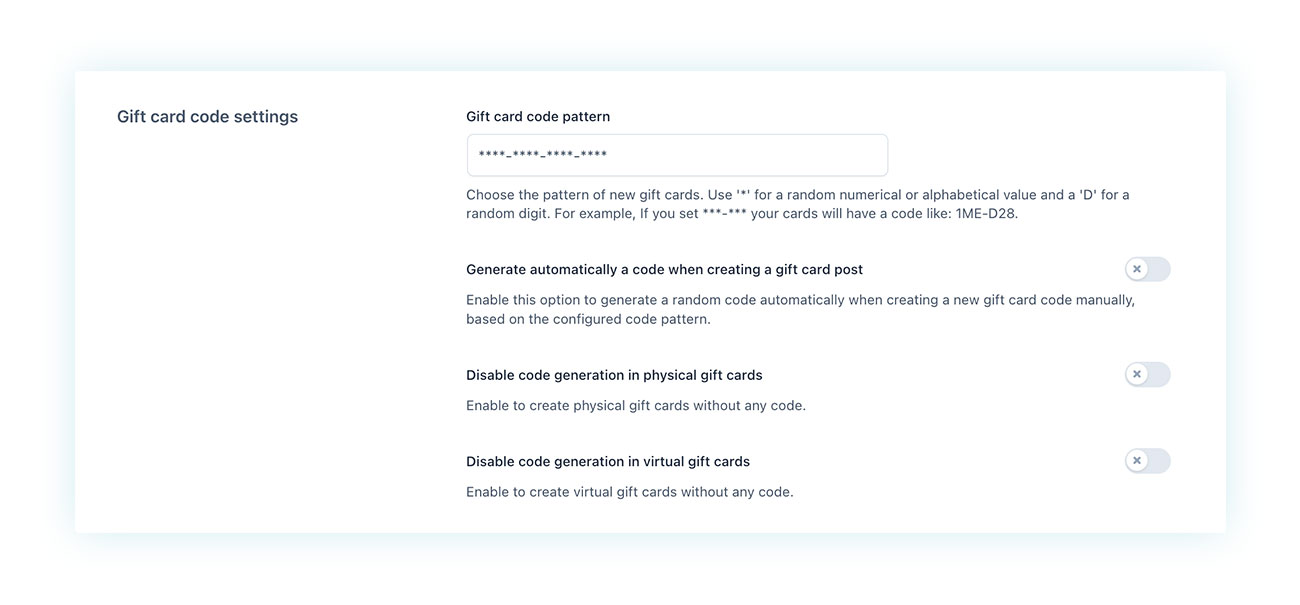
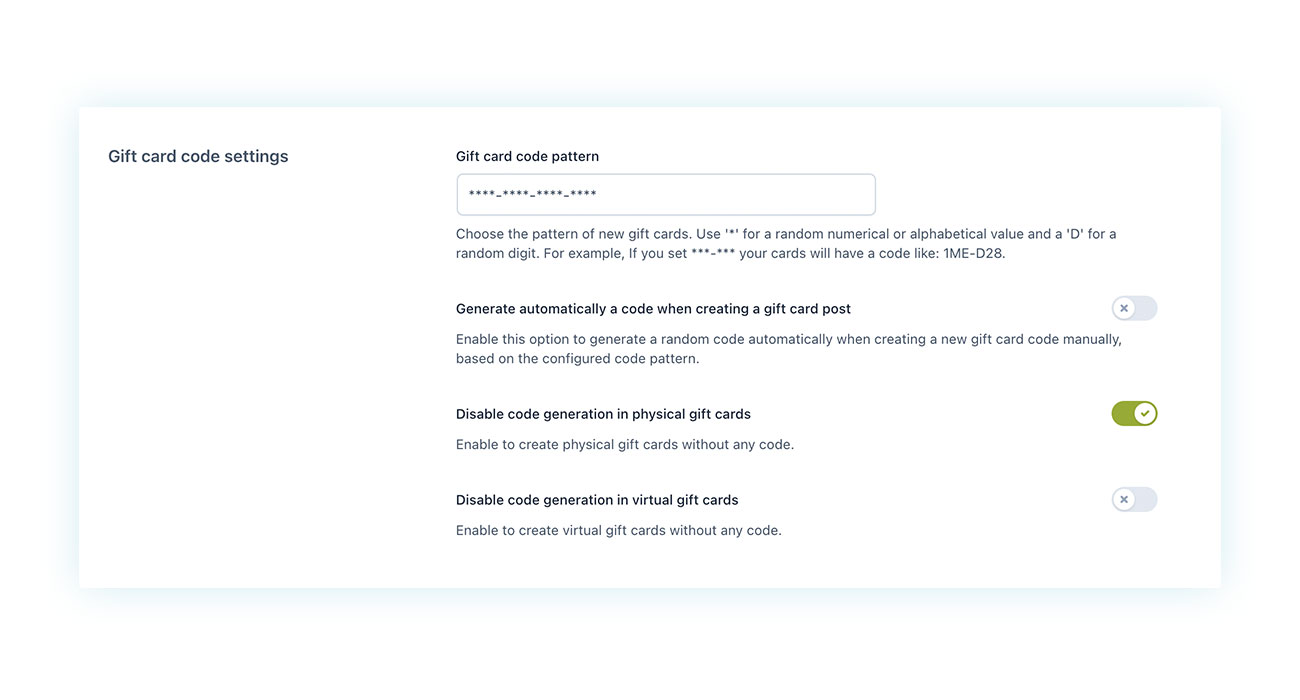
In the section below, you’ll see options for the codes linked to the gift cards. These include the code pattern and how it’s generated for both physical and virtual gift cards, which we’ll explore later.
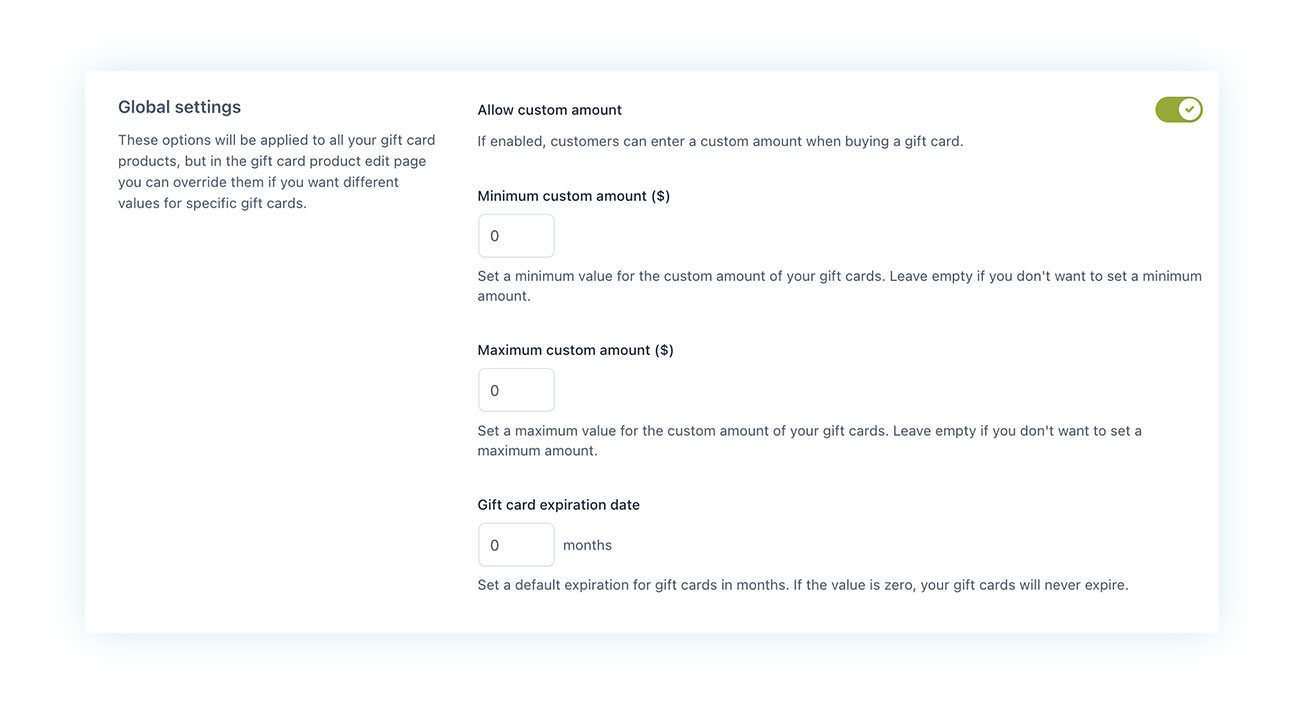
The third section has the global gift card settings and it’s where you can set a minimum and maximum amount, choose if customers can enter their own custom amounts, and set an expiration.
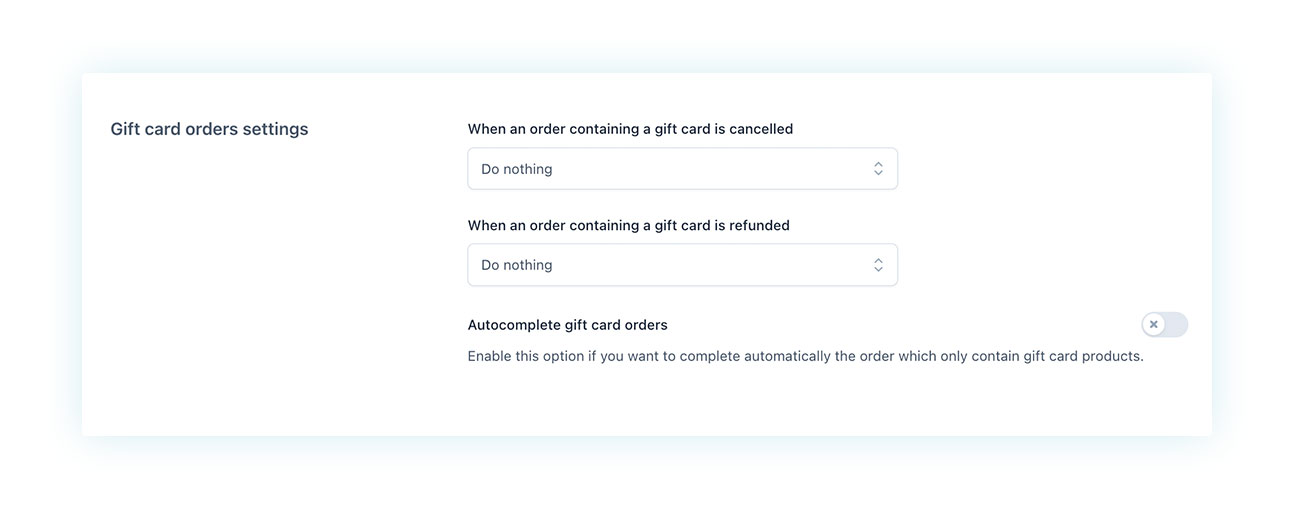
Lastly, there are options to choose how gift cards will act depending on the order status they’re in.
It’s important to check these settings because they’ll usually apply to all gift cards. However, some of these may be overridden for individual gift cards.
Gift card creation in WooCommerce
Creating a “gift card” product is incredibly easy thanks to the fact that the plugin makes use of the features already present in WooCommerce.
To simplify the process, we are including a few easy-to-follow images. First, create the product on WooCommerce as usual. Next, head over to Products > Add New and enter the necessary details, including title and description.

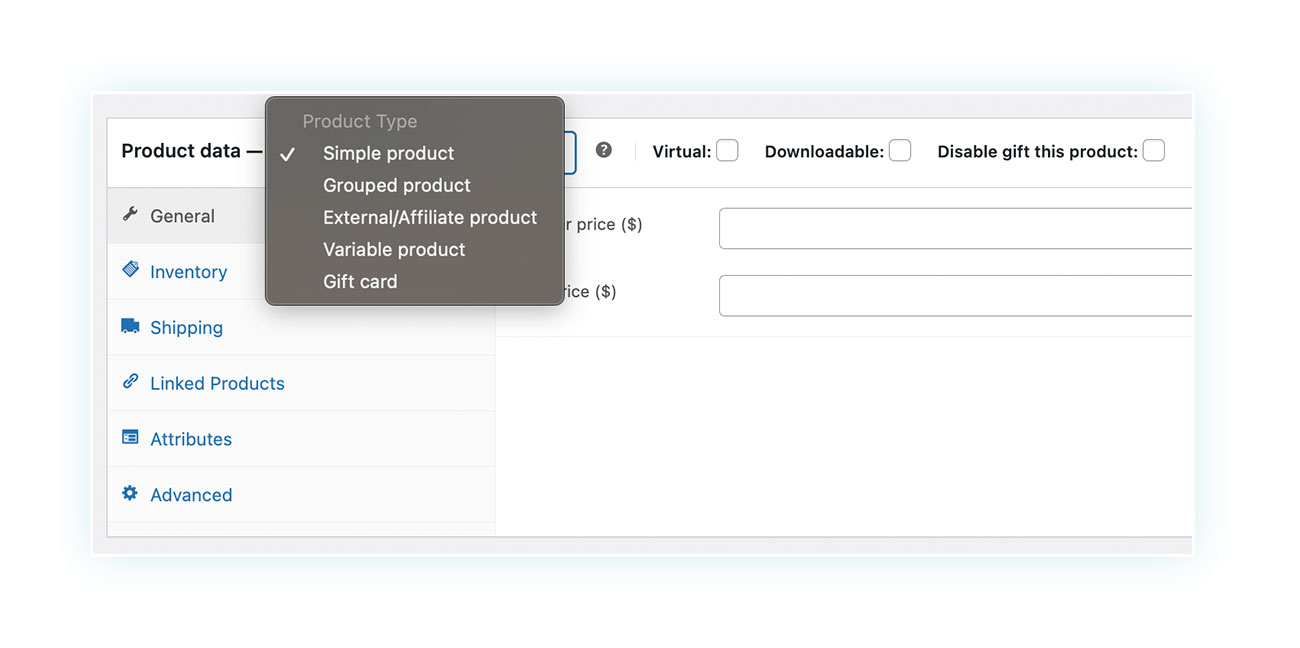
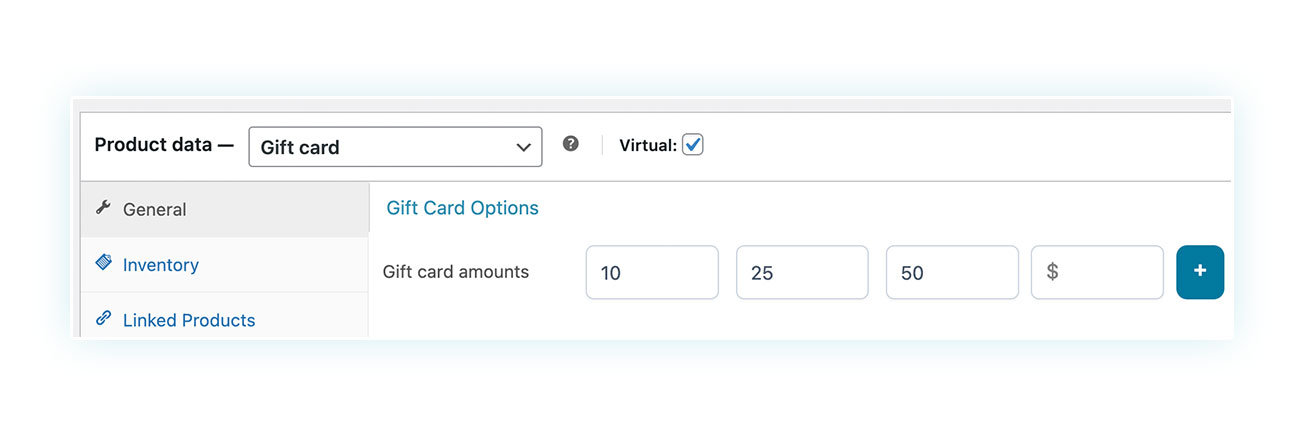
Here is the turning point in the product creation: go over to the “Product data” section and select “Gift card” as the product type:
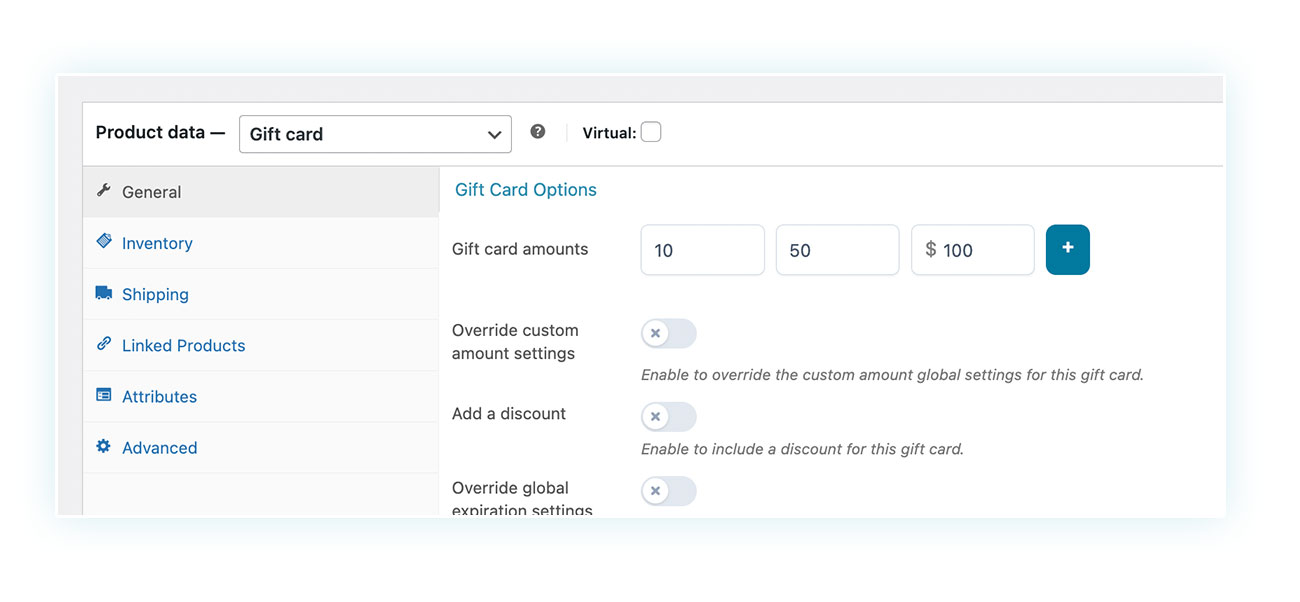
Then, you’ll find the key options for this gift card:
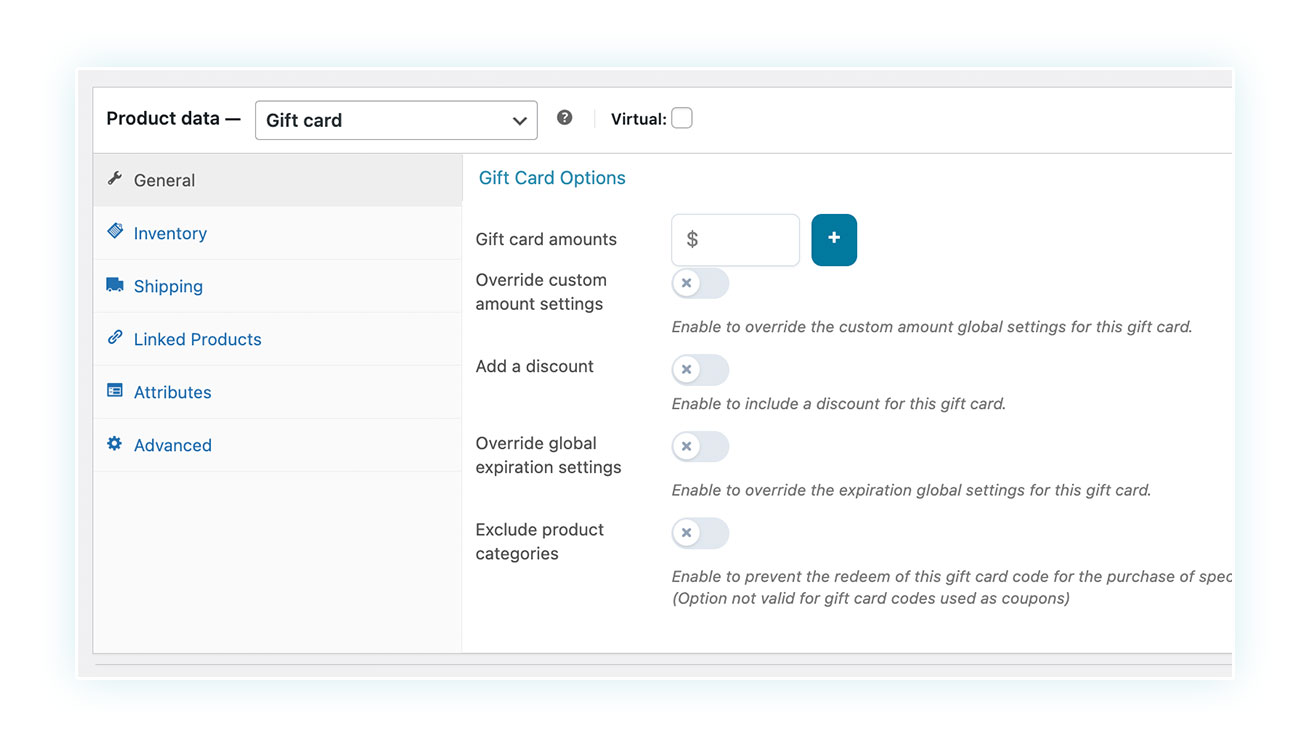
You can choose the gift card value by clicking on the light blue “+” symbol. This allows you to offer different amounts for customers to choose from:
In the plugin settings, you can configure the global gift card behavior. However, if you want a specific gift card to behave differently, you can make changes in this section. You can:
- Change the custom amount settings by enabling the “Allow custom amount” option. This will allow you to set the minimum and maximum custom amounts.
- Add a discount.
- Override global expiration settings by entering a specific expiration date.
- Exclude product categories, useful to prevent gift cards from being used on certain categories.
Once the product is fully configured, it only needs an image. You can add it while creating the gift card or let the general rule apply images to gift cards.
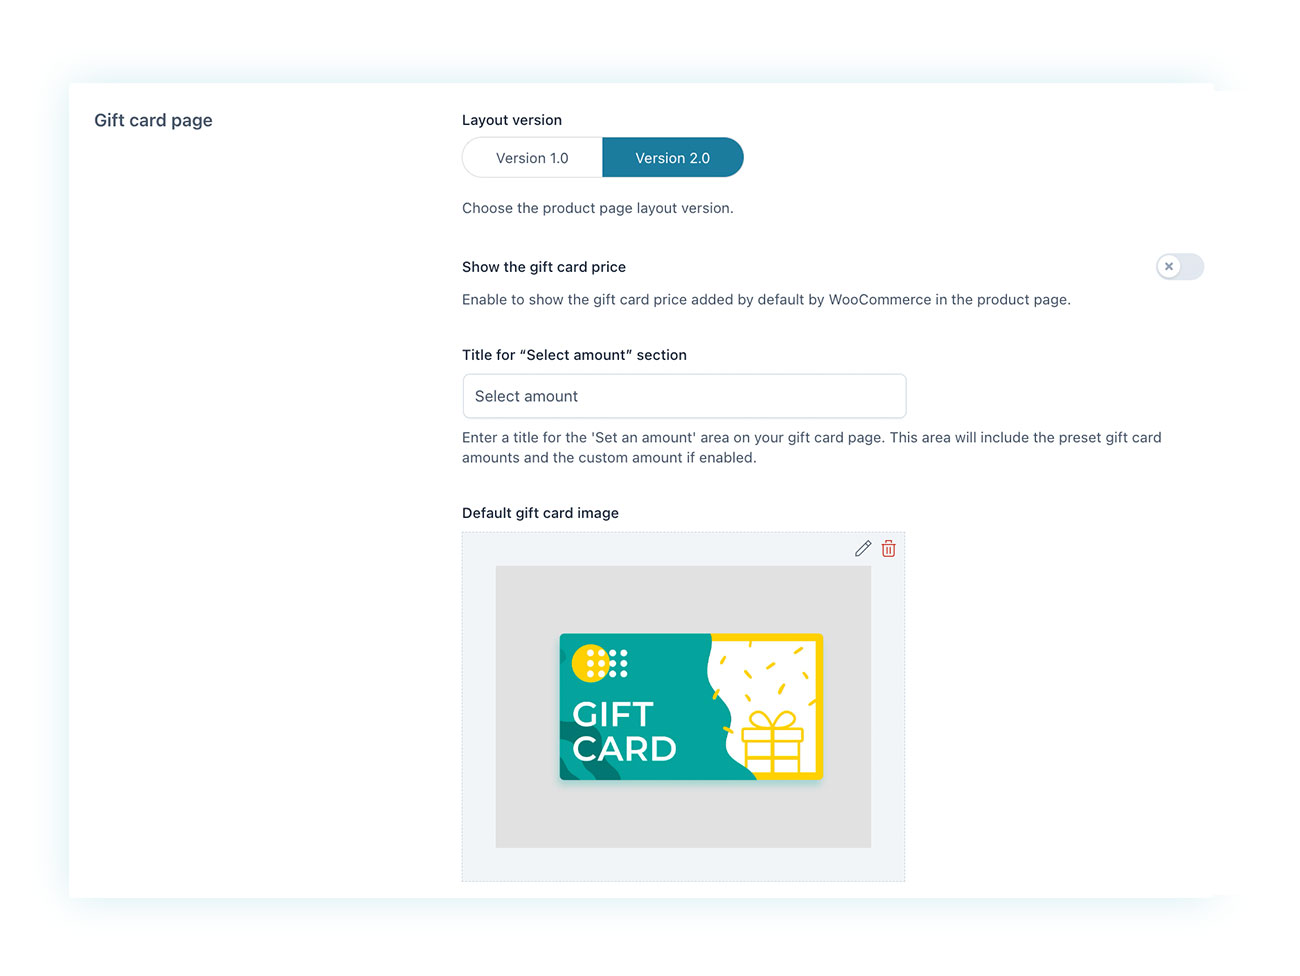
To change the image used by the plugin, go to the control panel and navigate to YITH > Gift Cards > Settings > Style:
Difference between a virtual and a physical gift card
You can create two types of gift cards: physical and virtual.
In the first case, we are talking about a gift card that will be physically shipped to the customer (or its recipient) and will contain the discount code that can then be used in the store.
In the second scenario, we’re referring to digital gift cards that will be emailed to the customer in PDF format. The customer can choose to print it out and have it delivered if they prefer.
These two gift card types are different from each other not only in how they are delivered but also in some settings that we need to consider while creating the product.
That being said, let’s take a quick look at how you can create both virtual and physical gift cards.
How to create a virtual gift card
A/N: If you prefer watching a video on creating a virtual gift card, check out this detailed video here.
Creating a virtual gift card is really easy once you know how to create a physical one.
Simply go back to the “Product data” section and check the “Virtual” box located next to the product type:
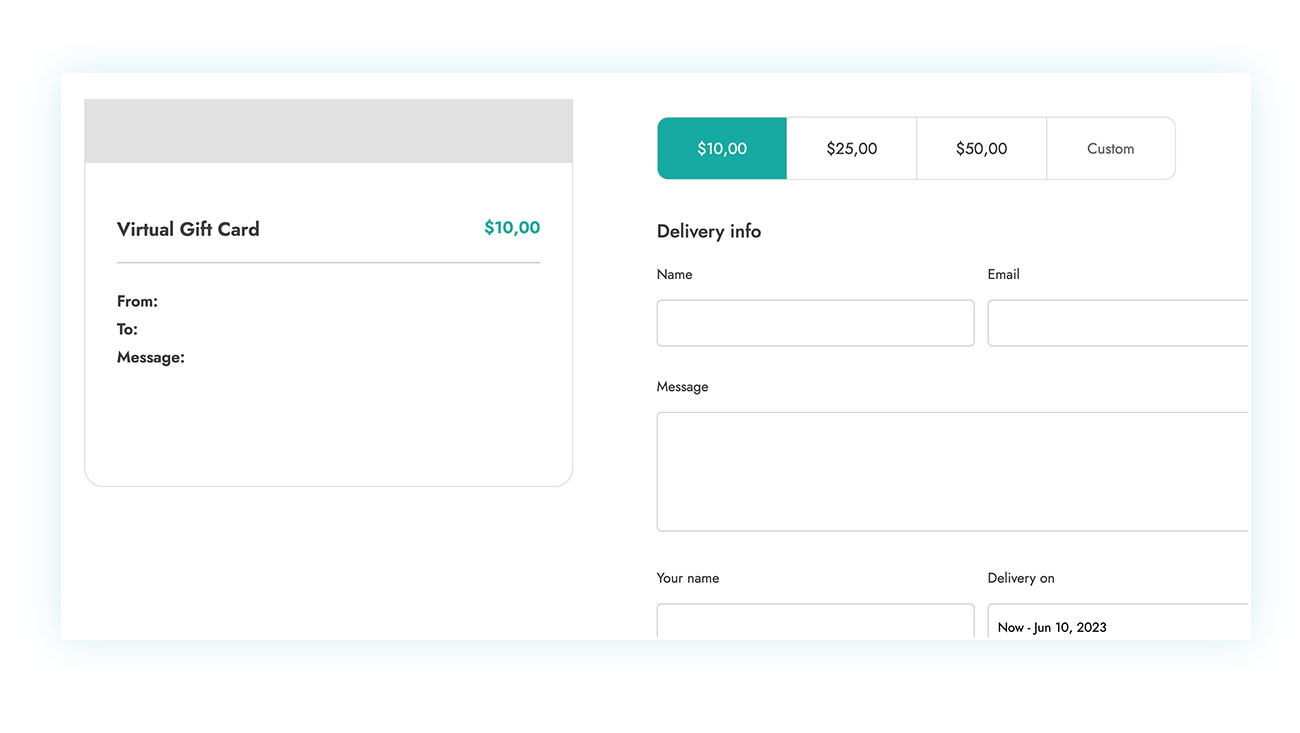
That’s it! Everything else is identical to what we went over before. When finished, the product will allow users to enter the recipient’s details:
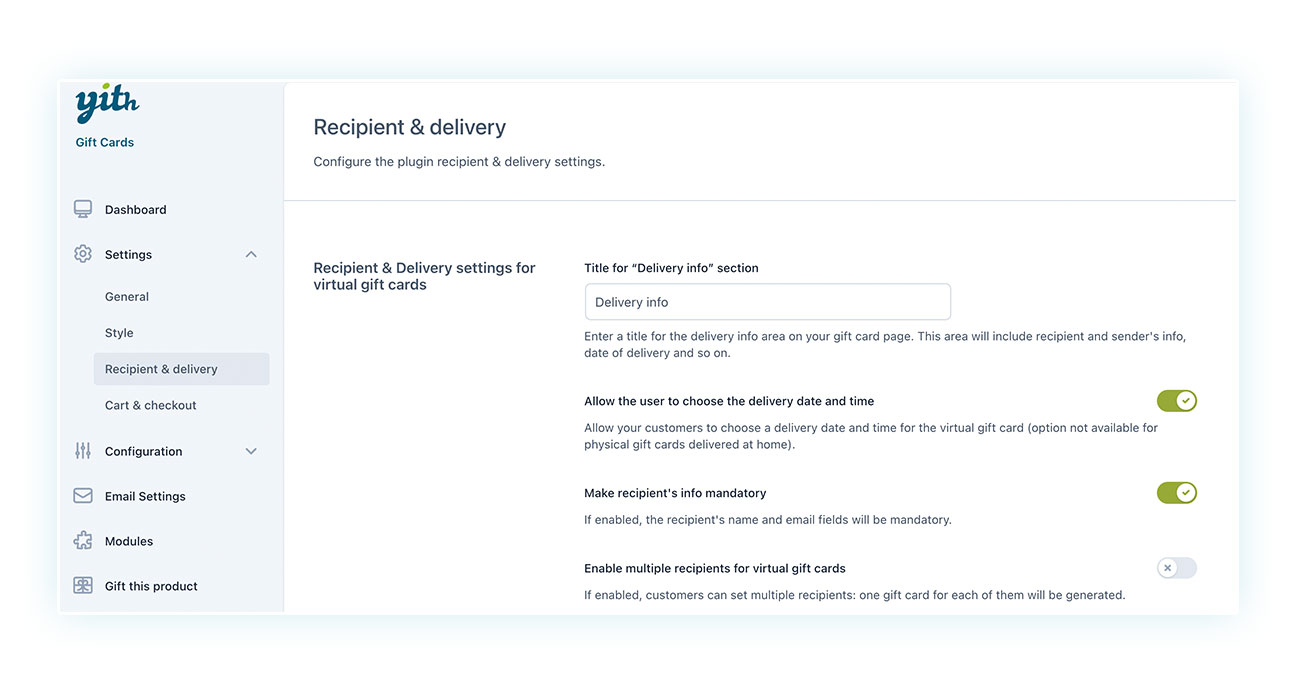
To modify the fields and their corresponding rules, head over to YITH > Gift Cards > Settings > Recipient & Delivery:
How to create a physical gift card
A/N: If you prefer watching a video on creating a physical gift card, check out this detailed video here.
When it comes to physical gift cards, the process is exactly as mentioned above, but it’s essential to note two possible scenarios.
On the one hand, you might already have pre-printed gift cards with their own coupon codes, on the other hand, you might have blank gift cards where you can enter the code generated by WooCommerce.
In the second scenario, you just have to assign the code to the gift card after purchase. However, in the first case, we’ll need to adjust the plugin settings.
To stop generating codes for physical gift cards, go to YITH > Gift Cards > Settings > General:
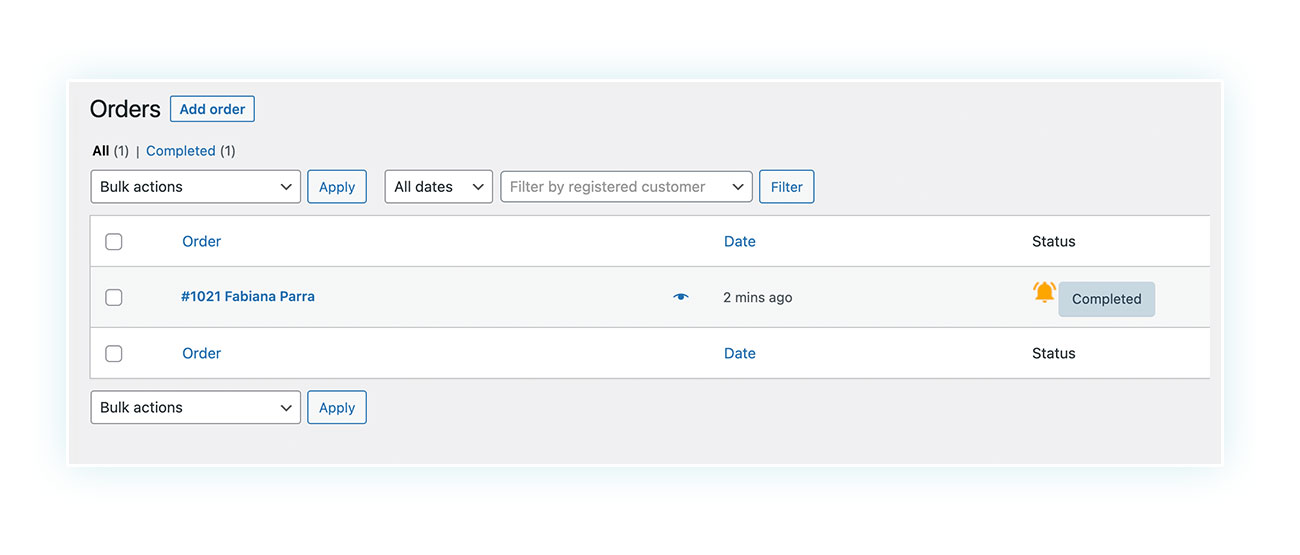
You can create a basic product and let customers buy it. Then, you’ll have to manually assign the pre-printed code to the card after the purchase.
To get this done, just head over to WooCommerce > Orders and choose the order without a code, which is identified by a bell icon:
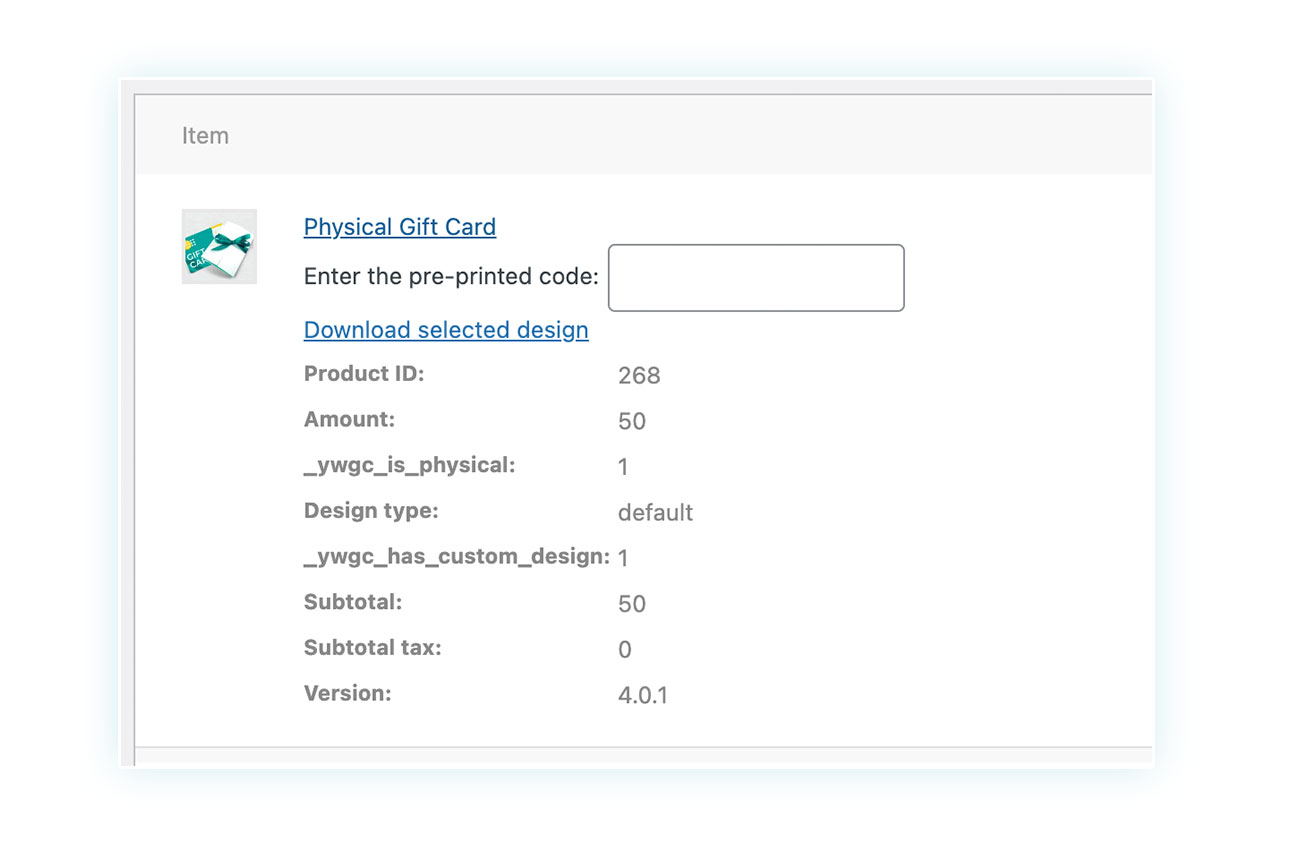
And in the “Product” section, you can enter the code:
Customization of the gift card (amount, design, etc.)
When it comes to gift cards, it’s really great if customers can customize them at the time of purchase. This means they can make their gift extra special and personal.
For example, when you allow users to enter a custom amount, you can increase your conversion rate by attracting customers who don’t want to be limited by a set price range.
It’s also crucial to provide varied images for gift cards. A birthday card needs different themed images than a Christmas or a graduation card, for instance. If you stick to a standard image, it can affect your final sales.
To offer a gallery of images to customize the gift cards, follow the steps below.
How to create an image gallery for gift cards
A/N: If you prefer watching a video on creating an image gallery, check out this detailed video here.
Here are a few easy steps to guide you through creating an image gallery.
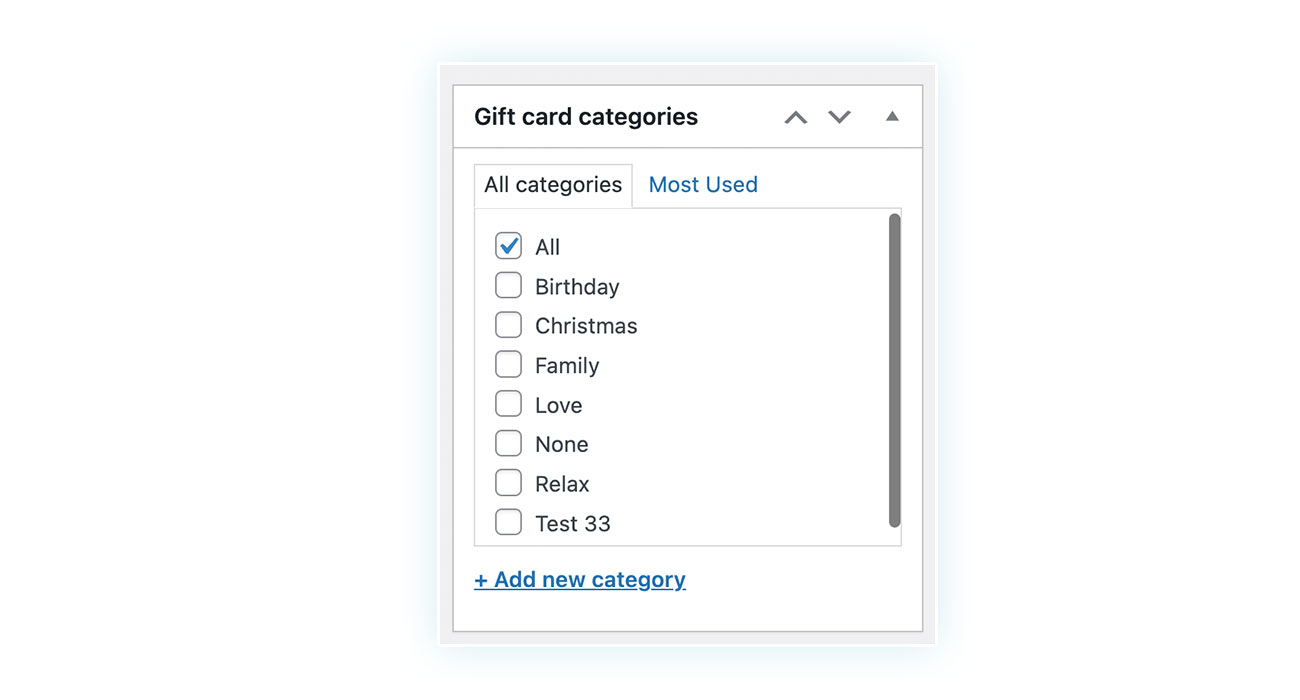
First, you need to configure gift card categories by going over to YITH > Gift Cards > Settings > Gift card categories:
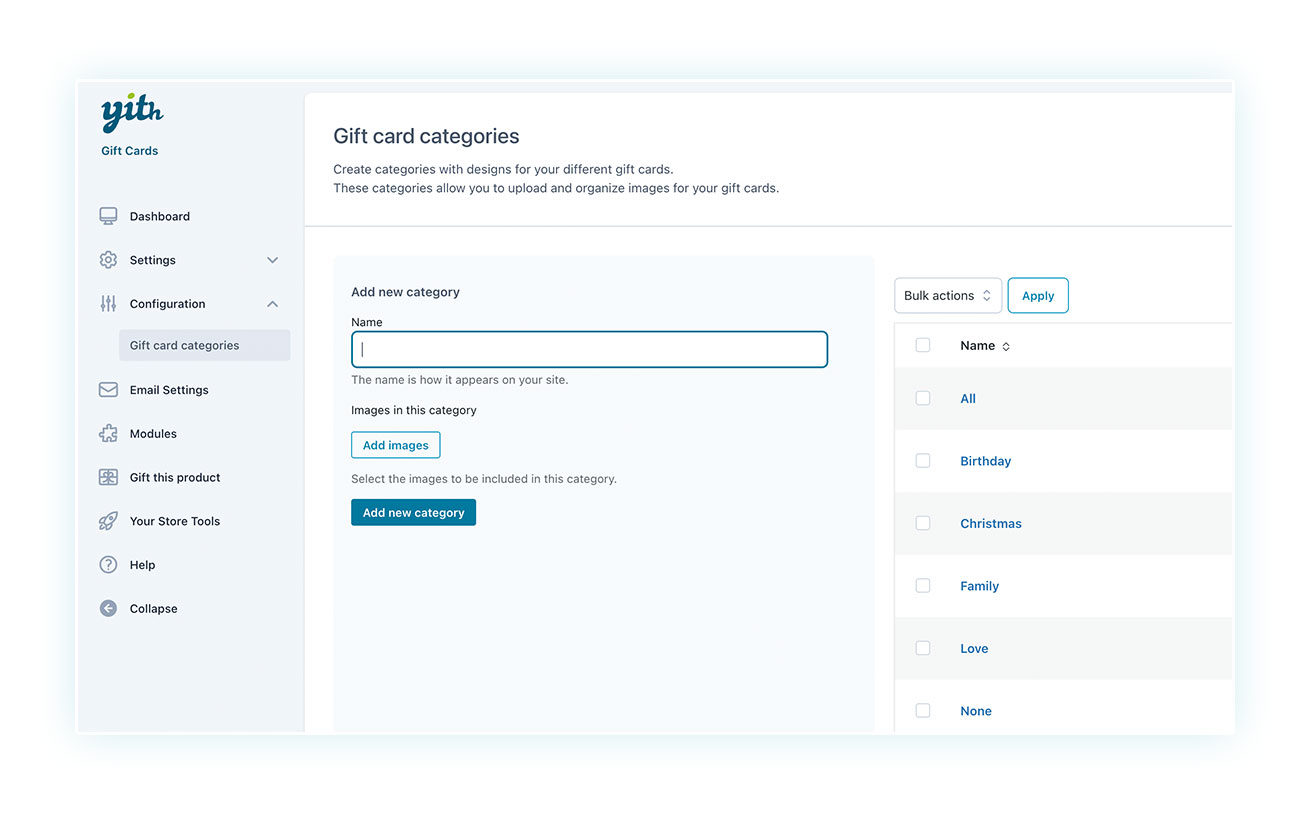
Each gallery of images corresponds to a category, and you can assign multiple categories to each product. Take a look at the example above, where we have categories for common gift-giving occasions like birthdays, Christmas, family, love, and more.
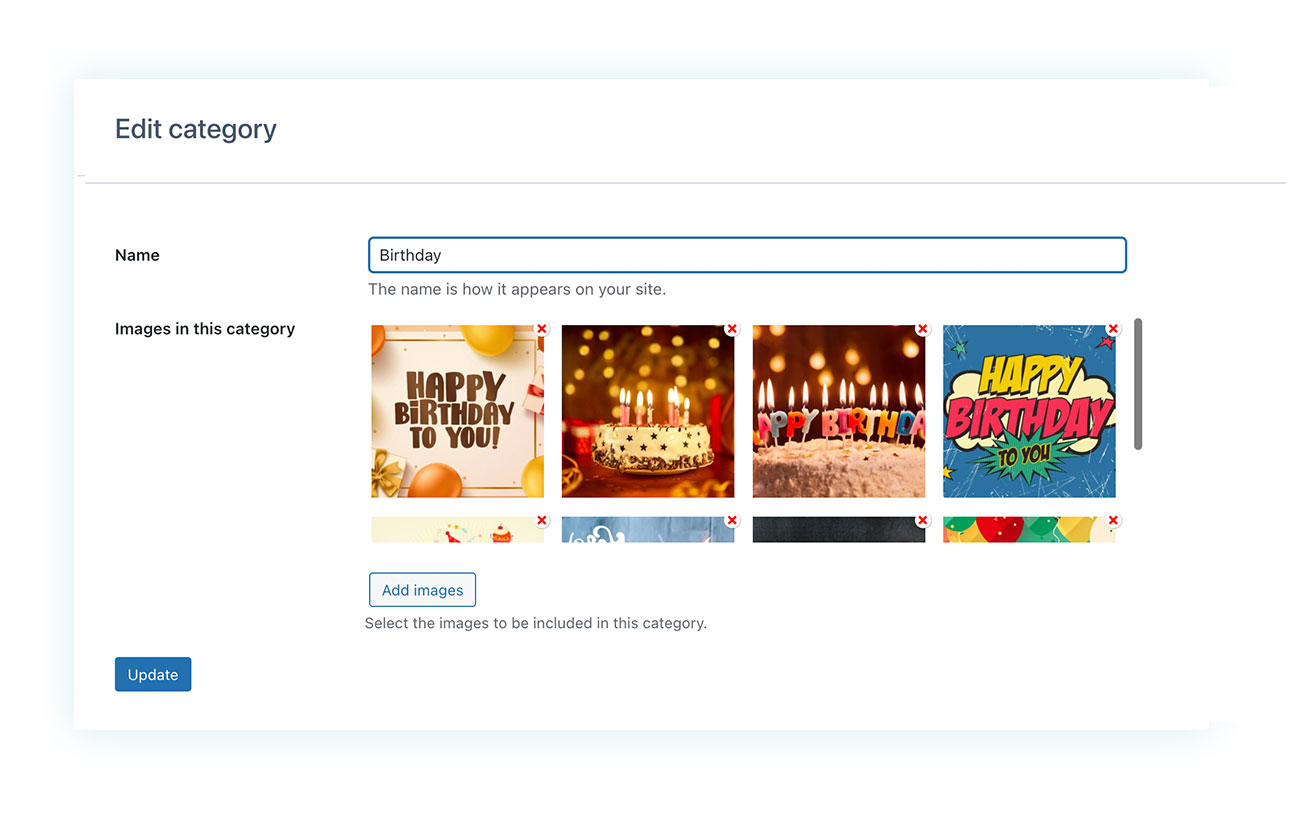
Creating a new gallery is a piece of cake: just type in a name on the left, choose the pictures you want to include, and click on “Add new category.”
And don’t worry, adding more images to a category that you’ve already created is also really simple — just click on the category name and you’ll be able to add new images:
After creating the image gallery, just link it to the “Gift card” product that’s up for sale. Simply open the product edit page and scroll down to the bottom right:
When the product is configured as a “Gift Card” type, a new section labeled “Gift card categories” will appear. There, you can decide if you want to offer a single gallery (if you’re creating a themed gift card) or multiple galleries to give your customers more choices.
Conclusion
If you’re looking to bring in more customers and boost your sales, consider offering gift cards in your shop. They’re a popular tool that can help you attract new customers and increase your average sales value. Plus, it’s an easy way to promote your store and make it more appealing to potential customers.