Congratulations on building your first eCommerce store with WordPress and WooCommerce! Now, it’s time to make sure your customers can receive the products they purchase.
We previously went over the process of configuring a WooCommerce store broadly, but now we want to focus on the shipping settings.
In this article, we’ll show you how to set up WooCommerce shipping, as well as some plugins that can help you provide advanced shipping options.
Table of contents
- How to organize shipping for an eCommerce store?
- How to add shipping methods on WooCommerce
- What are shipping classes on WooCommerce?
- How to charge shipping by weight in WooCommerce?
- How to make multiple shipments with WooCommerce?
- How is the shipping cost of a package calculated?
- How to handle shipment tracking in WooCommerce?
- Other WooCommerce shipping plugins
- Conclusion on WooCommerce shipping
How to organize shipping for an eCommerce store?
When it comes to organizing WooCommerce shipping, there are two elements that must be taken into consideration:
- The shipping methods offered within the WooCommerce store (this includes their management and their application).
- The actual shipping of the orders.
It is up to you and your team to take care of shipping the orders, but choosing from the different types of shipping methods requires a comprehensive analysis of all of the aspects connected to the dispatch of the item that has been sold.
Don’t worry! It is normal to feel lost at first, as with every broad subject. That is why we will start by showing you how to configure shipping directly from a WooCommerce store.
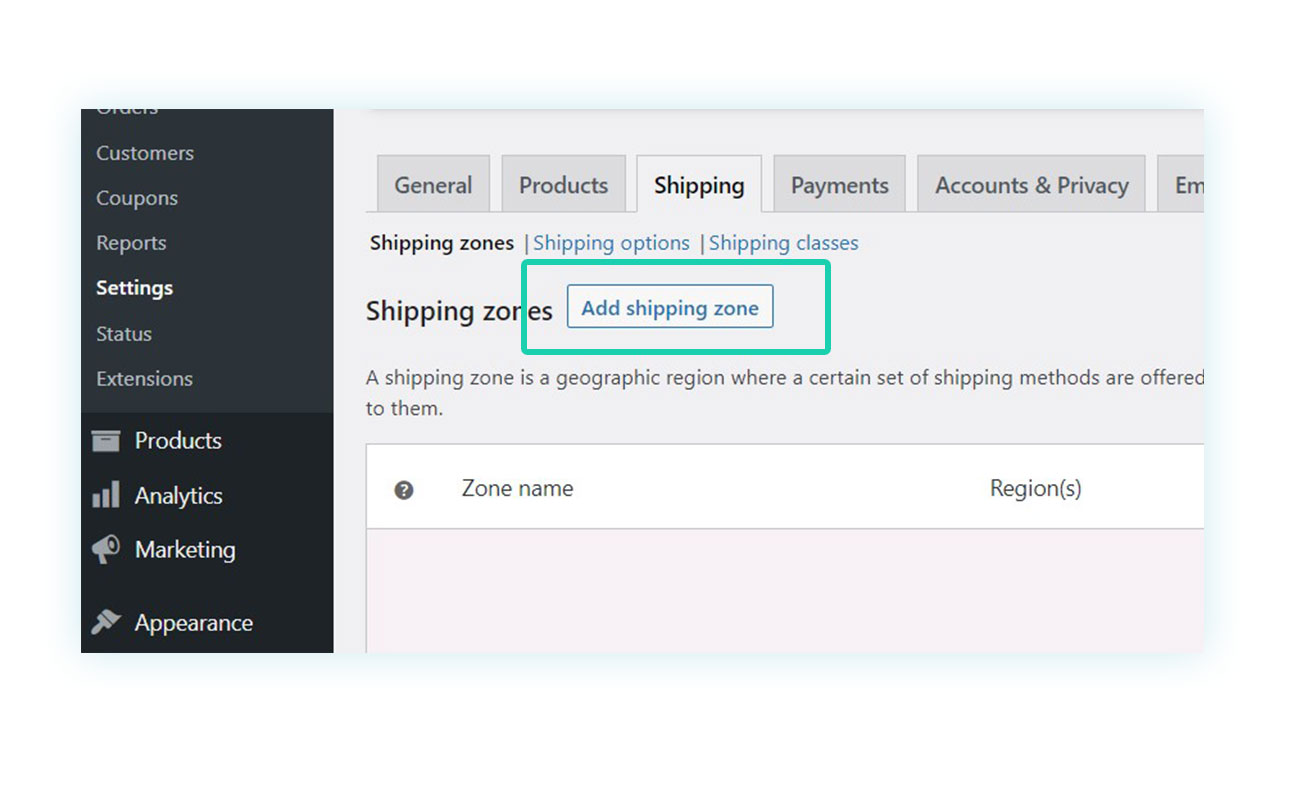
Let’s see how to create and configure WooCommerce shipping zones.
Shipping zones allow you to define different shipping methods based on customer location. For instance, if your shop is located in the United States (i.e. Florida), you could create a shipping zone for the local area and another one specifically for domestic shipping across the country.
To create a shipping zone, go to WooCommerce > Settings > Shipping > Shipping zones and click on “Add shipping zone“. You will be able to create shipping zones by selecting the area covered by specific countries or by using postal codes (ZIP codes).
Now that you have an existing shipping zone, the next step is to add the shipping methods.
How to add shipping methods on WooCommerce
After you have created your WooCommerce shipping zone, simply click on it to access the shipping methods section and start configuring them.
There are only three alternatives within the default WooCommerce shipping methods: flat rate, free shipping, and local pickup (using additional plugins you could get more shipping features, as we’ll see later on).
To add shipping costs, click on “Add shipping method” and select “Flat rate”, or you can choose “Free shipping” instead.
WooCommerce, costs, and free shipping
Offering free shipping is a great way to attract customers to your WooCommerce store, especially since Amazon has made it a part of its premium program. Of course, not all online stores offer free shipping, but if you do, it’s important to know how to properly implement it.
To add it, select “Free shipping” from the drop-down menu that appears after clicking on “Add shipping method” and choose the settings that best fit your needs.
You may be wondering, what kind of configuration does WooCommerce offer? It basically allows you to determine in which cases the shipping method is applied.
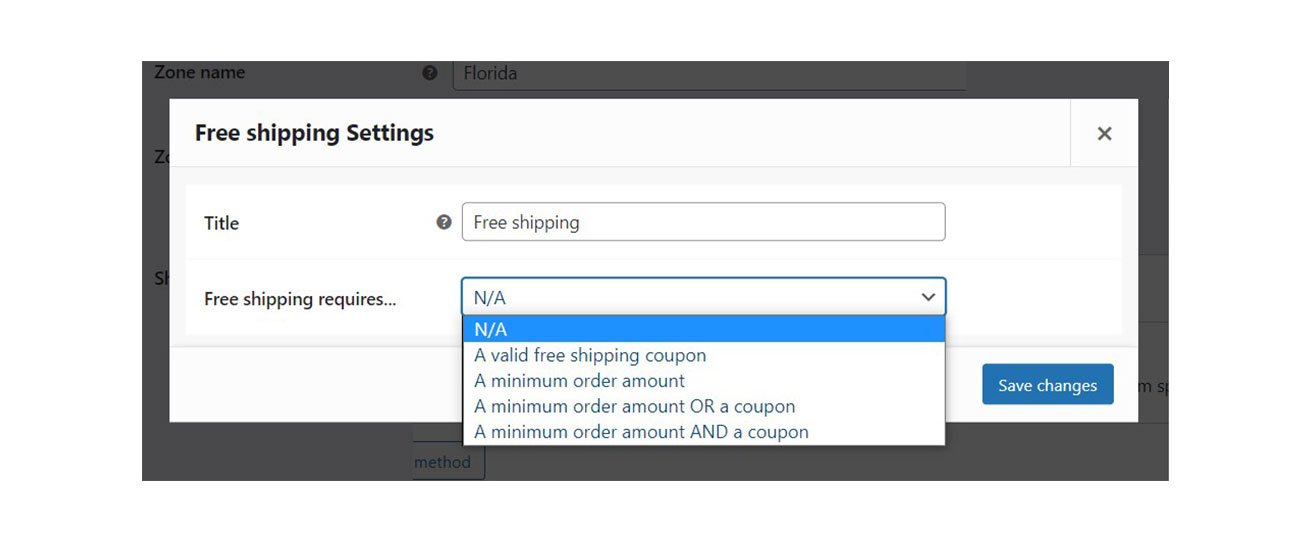
Here are some of the options available for the free shipping method:
- A valid free shipping coupon – It provides a free shipping option when a customer enters a specific discount code during checkout.
- A minimum order amount – It offers free shipping based on a minimum cart value.
- A minimum order amount OR a coupon – It offers free shipping to customers either when the cart is above a specific amount OR when they use a dedicated coupon code.
- A minimum order amount AND a coupon – It offers free shipping if the cart is above a specific amount AND the customer has a discount code (both must happen to activate the shipping method).
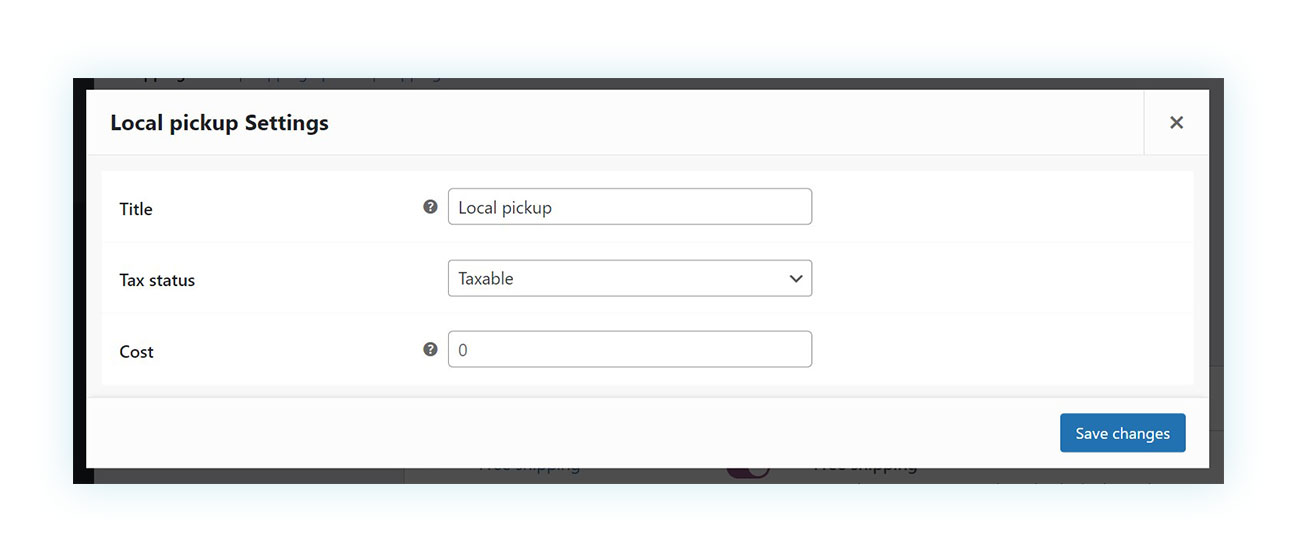
Local pickup on WooCommerce
For the purpose of being thorough, even though this shipping method isn’t employed that much, you may also want to take local pickup into consideration, especially if you have a physical shop.
The “Local pickup” option can be included when creating the different shipping methods, and you can also set a cost for it in case you need to send the item to the store or have any other associated shipping fees.
How to add flat rate shipping on WooCommerce
As the name suggests, the “Flat rate” shipping method is very straightforward. It’s a fixed shipping cost that customers will pay when they check out.
For instance, your flat rate shipping cost could be $10, which would cover shipping and handling expenses. Just make sure not to overcharge these shipping fees as customers may be discouraged from purchasing if they see an excessive fee.
To complete the flat rate shipping configuration, you can simply enter the cost you believe to be accurate in the “Cost” field. However, this may not be enough due to all the variables associated with shipping costs and the fact that the same approach cannot be used for all cases.
What are shipping classes on WooCommerce?
Shipping classes may not be clear to new WooCommerce customers, so let us explain a bit more in detail how it works: in essence, they are a sort of attribute (similar to tags) that can be assigned to certain items to modify their shipping cost.
To make it simpler, consider a “Fragile” shipping class. If an item is at risk of breaking when shipped, it may cost extra to guarantee its security. This is where the shipping class cost comes into play, to allow us to cover the expenses of delivering a fragile object.
How to create shipping classes in WooCommerce?
First, you’ll need to create the shipping class. You can go to WooCommerce > Settings > Shipping > Shipping classes and click on “Add shipping class“.
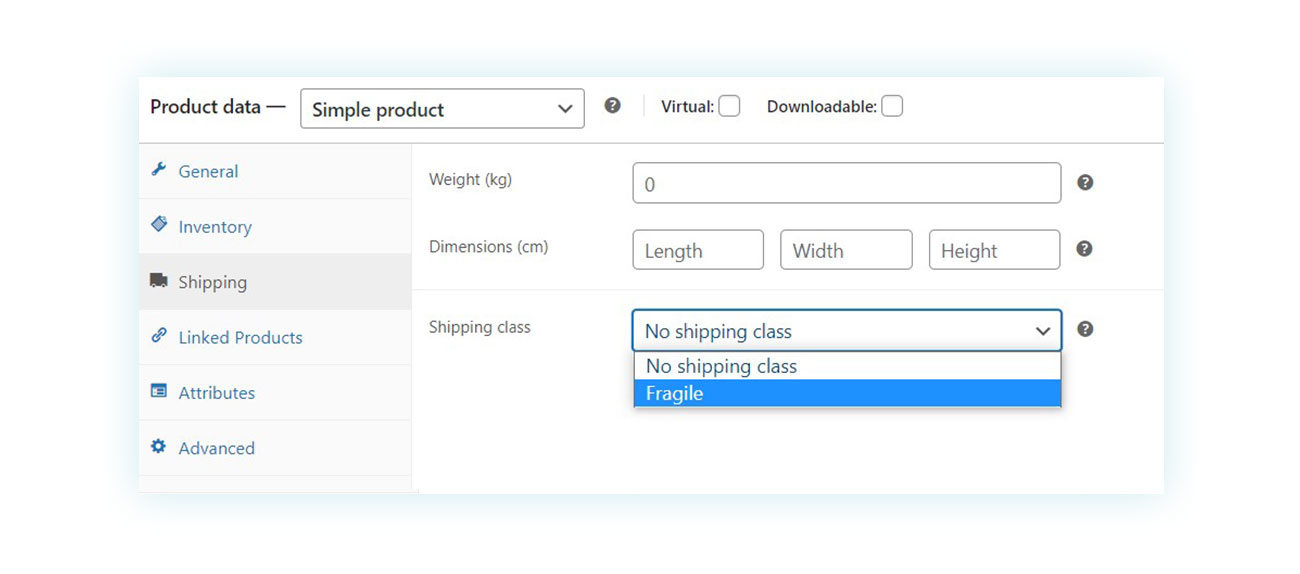
For now, you don’t have to fill in anything except for the shipping class name — in our example, it’s “Fragile”.
The next step is to assign the shipping class to all the products it includes — in this case, it’s all fragile products. You can do this in two different ways:
- You can select “Quick Edit” on the products list page and scroll down to the “Shipping Class” section.
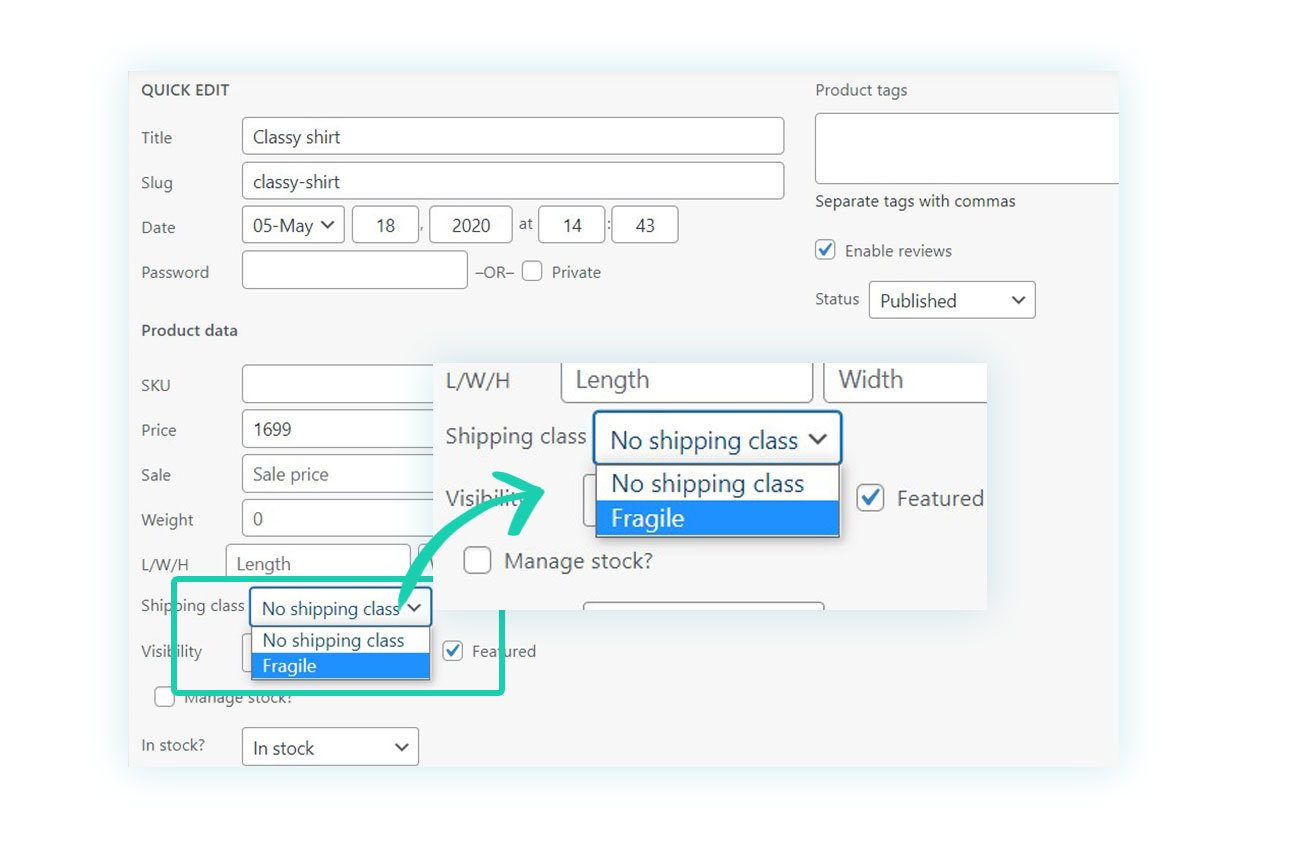
- Or you can go to the product edit page, scroll down to Product Data > Shipping, and select the shipping class.
After doing that, you’ll need to go back to WooCommerce > Settings > Shipping and select the shipping rate associated with your store, you’ll find a new section that covers the “Shipping class costs”:
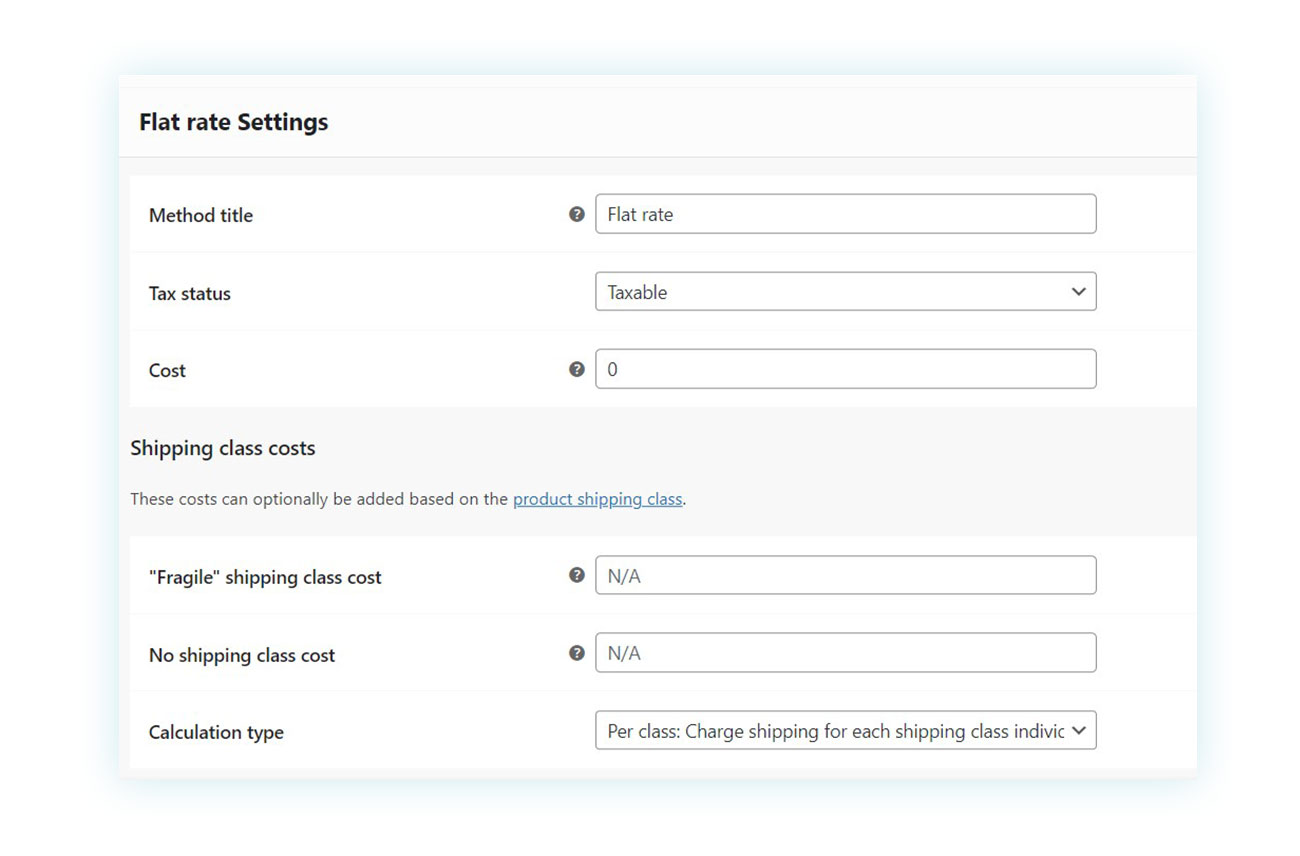
Here you can specify a different cost for all products marked as “Fragile” and this will be shown instead of the standard cost at checkout.
How to charge shipping by weight in WooCommerce?
When it comes to your WooCommerce store and shipping calculations, it’s no secret that the weight of your products plays a big role in relation to shipping costs — a light package won’t cost the same as a heavier one.
With that in mind, you may be looking for a way to calculate WooCommerce shipping costs based on the weight of the cart’s content. One solution is to use the free plugin WooCommerce Shipping by Weight. This plugin lets you determine which shipping methods are available based on the total weight of the order.
How to make multiple shipments with WooCommerce?
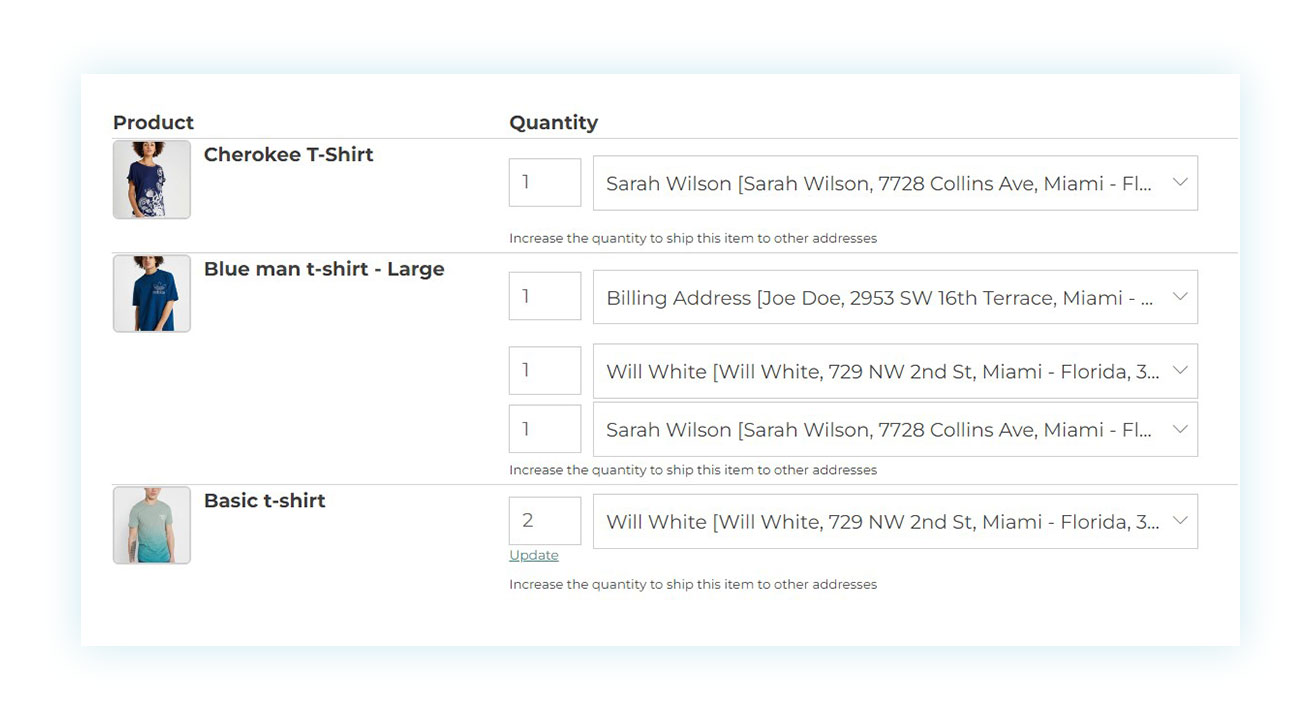
Offering this option on your WooCommerce store is great for customers, particularly during the holiday season, since it allows them to make larger purchases with the assurance that each item can be sent to the recipient of choice. In addition, it is a great way to encourage them to make bigger and more expensive purchases.
If you’re looking to send each product purchased in a single order to a different address, then WooCommerce by itself won’t be enough. You’ll need an easy-to-use plugin like Multiple Shipping Addresses for WooCommerce.
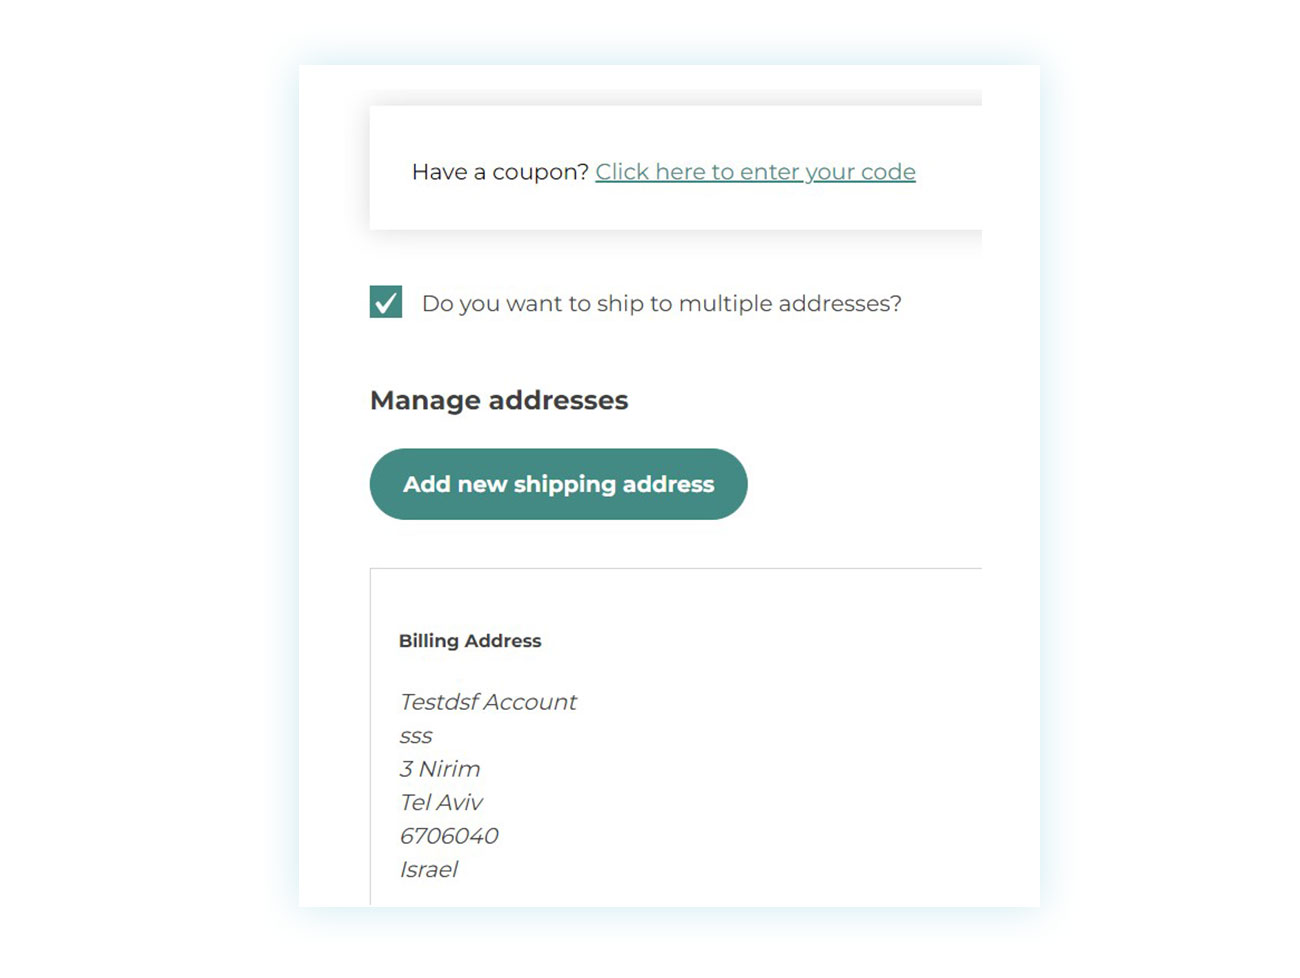
Thanks to it, the customer can select which product goes to which address:
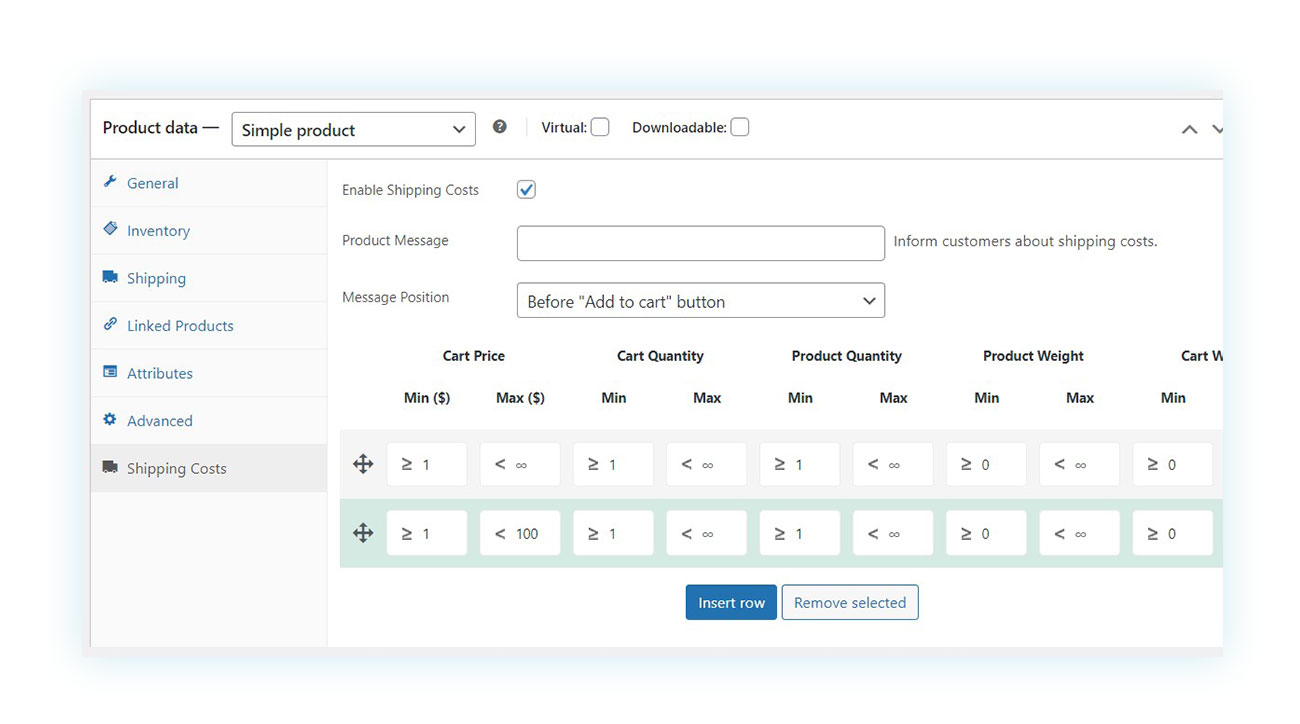
How is the shipping cost of a package calculated?
Generally, shipping costs are simple to calculate, but you might need a shipping calculator if you sell a wide range of different products.
This, being confusing enough for store owners, can be even worse for customers. Thus, to avoid any unexpected expenses, it’s important to provide a precise view of shipping costs and make sure they are contemplated in the cost of the sale.
For this, we recommend the Product Shipping for WooCommerce plugin. This plugin operates on the basic WooCommerce settings but further expands its capabilities, allowing you to set distinct shipping rates based on the product type, the number of items bought, and even the customer’s role.
You can conveniently specify the shipping cost and availability for the customer location directly on the product page thanks to the easy-to-use system.
How to handle shipment tracking in WooCommerce?
It is impossible to consider the process of shipping and its basic elements without talking about tracking. Nowadays, customers are more interested than ever in knowing the whereabouts of their orders, and a basic shipping date usually does not satisfy the desire for advanced shipment tracking.
Although it is feasible to include a tracking code in the order notes, this can cause more issues than solutions, as customers do not know where to look for the information and do not get clear messages about it.
To take advantage of the benefits that come with a dedicated plugin, you may want to look into WooCommerce Order & Shipment Tracking. This plugin offers a variety of bonuses, like the ability to add tracking information and convenient links to the carrier’s website, as well as embedding the tracking code in WooCommerce emails.
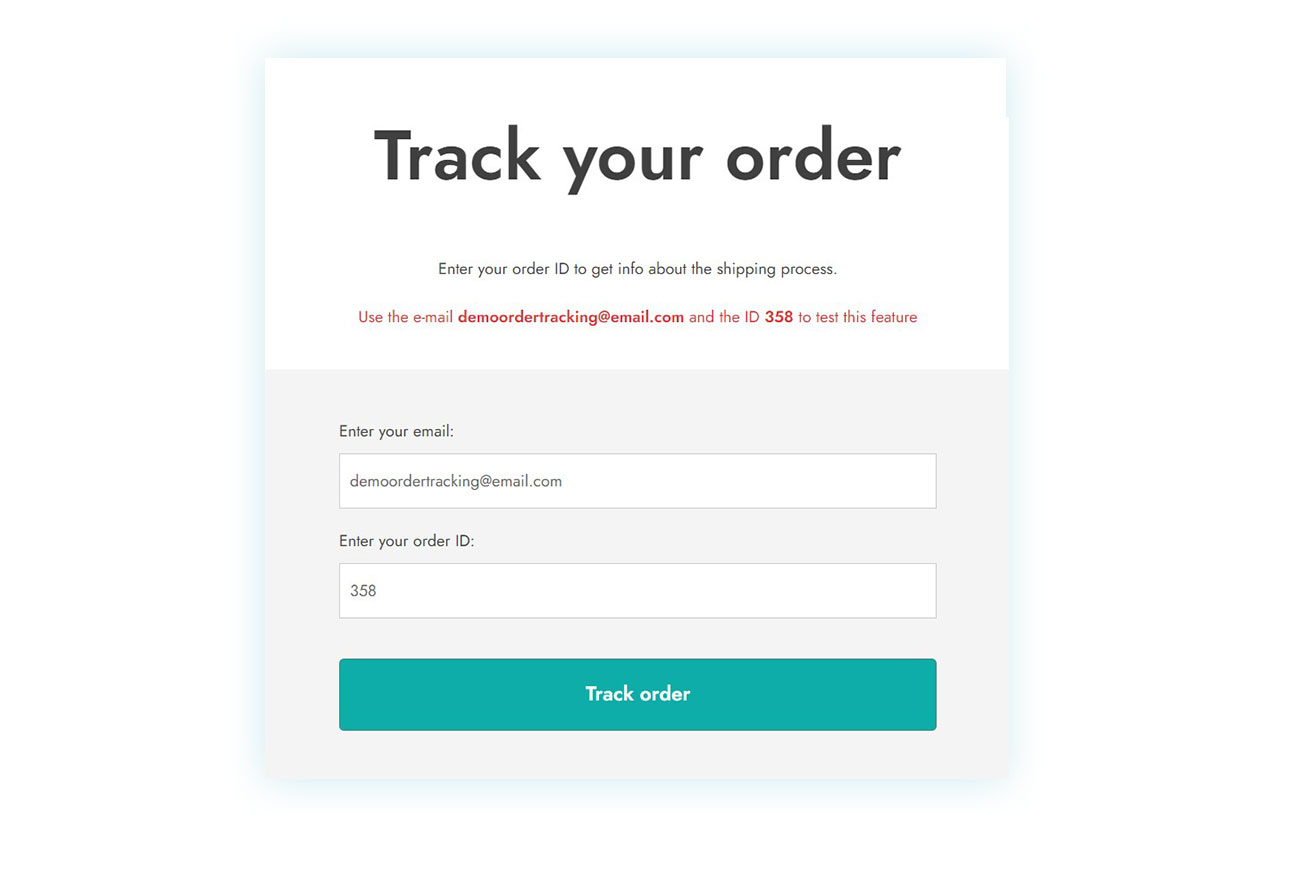
All of these improvements will lead to improved customer satisfaction, a reduced workload for your support staff, and a more efficient and automated store.
Other WooCommerce shipping plugins
It’s important to emphasize the great features that plugins can bring to your store’s shipping options. For example, with WooCommerce Delivery Date, your customers can select the delivery date that is most suitable for them, which could be especially helpful for those who have tight schedules.
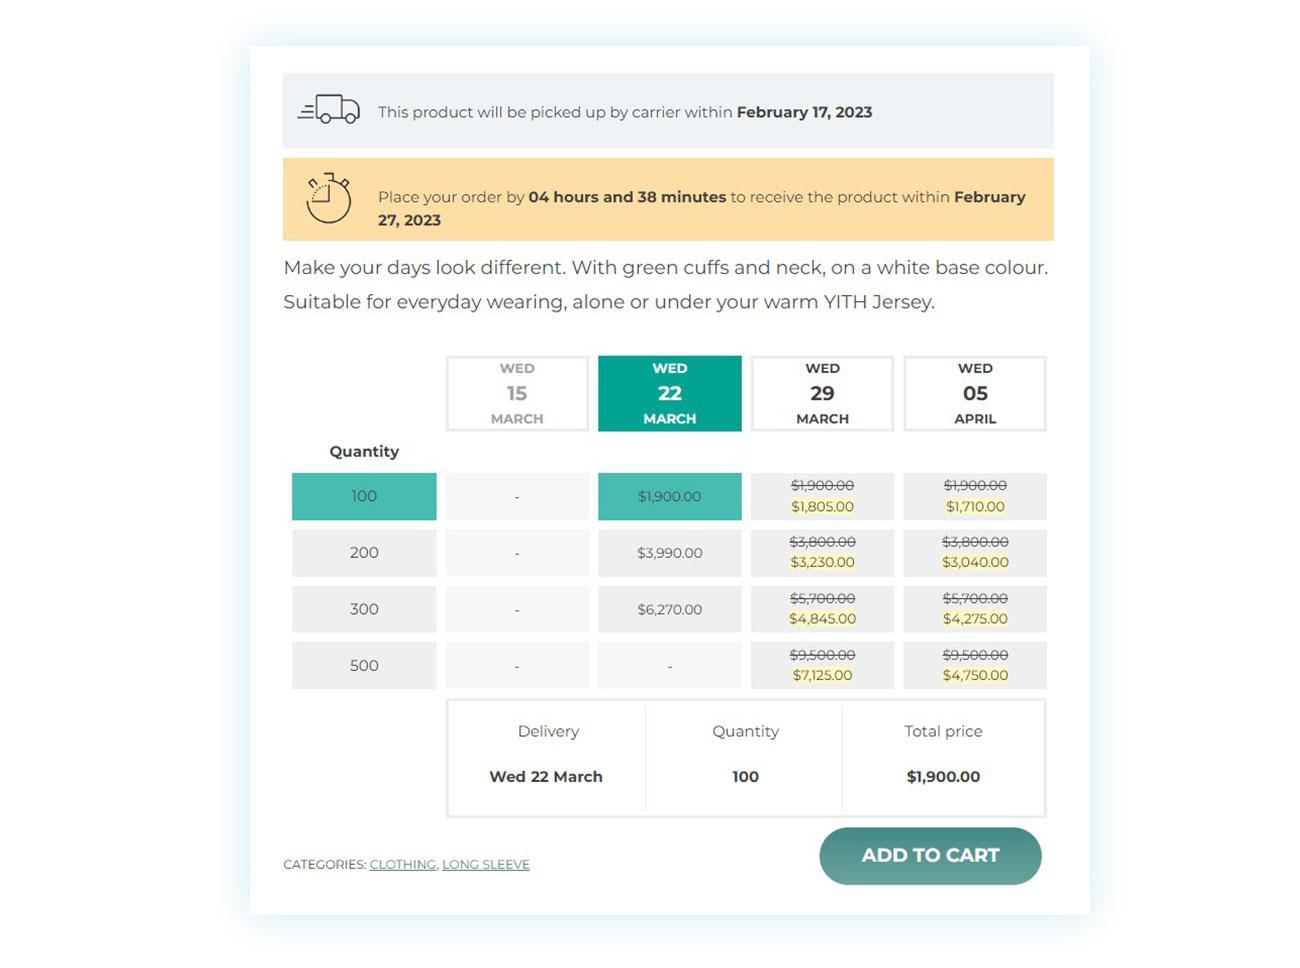
Indeed, this plugin provides customers with convenient and helpful information, and, moreover, it allows you to apply discounts to specific days so you can manage shipments more effectively.
Conclusion on WooCommerce shipping
Delivering goods after a sale is a step that tends to be overlooked by sellers in general, given the fact that the order is complete, their enthusiasm vanishes and so is the effort to provide efficient shipping options.
Nevertheless, it is vital to recognize that the way products are shipped through your eCommerce store will have a direct influence on your sales: offering shipping options such as a free shipping method, tracking information, discounts, or additional WooCommerce shipping extensions, may have a positive effect on conversions.
Therefore, it is up to you to choose the right tools to make sure the influence on your store is in fact positive.