Most online sellers are always looking for ways to improve their store and increase sales. They want to optimize their store and provide the best possible experience for their customers.
When it comes to WooCommerce, while this platform provides an excellent framework for starting an online business, its standard features often fall short of maximizing your business potential.
For example, the sales pages provided by WooCommerce are convenient and straightforward, but usually less efficient than other specialized options. Aside from integrating advanced functionality using dedicated plugins, you may be curious about how to generate add-to-cart URLs in WooCommerce. In other words, how can you create a custom link that allows you to add a specific item to your cart and position it elsewhere on your website, such as articles or other pages?
Throughout this guide, we will explore the use of WordPress and WooCommerce settings to generate custom URLs. These URLs can be placed on any page, allowing users to add products directly to their shopping carts by simply clicking on a link. This functionality improves the shopping experience on your site and helps increase overall sales.
Table of contents

Why use custom URLs to add products to your cart?
Let’s first understand the importance of learning how to create a custom URL before digging into the quick process. While we mentioned its usefulness earlier, it’s essential to explore the advantages you can have when using this feature on WooCommerce:
- Speed of purchase – It’s important to remember that making a purchase requires multiple steps. Typically, the customer will need to search for a specific product, evaluate different options, make a selection, add it to their shopping cart, review the cart content, proceed to checkout, input all necessary information and finish the payment. However, this process can be challenging due to customers’ limited attention span and short amount of time spent on websites. On traditional sites, customers may only have a few seconds while on eCommerce platforms they might have just a few minutes – often insufficient time to complete their purchase. In fact, it is not uncommon for customers to postpone or even abandon their purchase altogether. To enhance user conversion rates in such scenarios, using custom URLs can expedite the initial phase of searching and adding items into the cart.
- Usage flexibility – Generating a custom link for a product on WooCommerce allows you to use it in different ways. This includes creating a dedicated sales page and integrating it into your marketing strategies, such as newsletters, social media posts, advertising campaigns, and more. Instead of directing customers to the product page where they would need to search and click on the purchase button, you can ensure that once they click on the link, the desired product is already added to their shopping cart.
Additional options are certainly available, but they can be viewed as an expansion of these ideas. In general, using this framework leads to faster, more straightforward, and more efficient navigation. Is generating a custom URL a challenge?
Of course not, all you have to do is know what product ID is.
What is Product ID and where to find it
The product ID is a numerical code that works as an identifier for each product in your WooCommerce store. This code is generated automatically by the platform whenever you create a new product, and you can easily access it by navigating to WooCommerce > Products.
Once here, simply hover your mouse over a product to see its ID code:
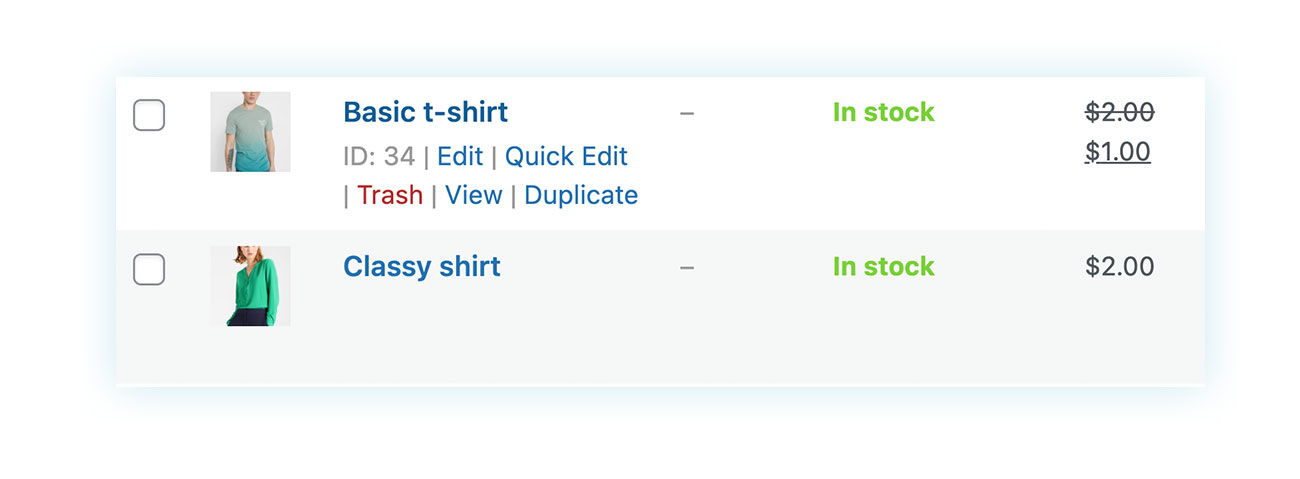
Once you have written this ID code down, you can create your own URLs.
URL to add a simple product to your cart
After locating the ID code for your products, simply familiarize yourself with the process of WordPress and WooCommerce URL generation. When a customer clicks on the purchase button for a product, a URL is promptly generated that includes their selection.
To accomplish this, all you need to do is pre-generate the URL.
URL added to cart for simple product
When adding a product to the cart, the link generated will be of this type:
https://sitename.com/?add-to-cart=X
Of course, you’ll need to replace “site name” with your specific domain, but this represents the basic URL for adding items to the cart. As you can see, what has been done is simply adding the ADD-TO-CART at the end of the URL.
However, there is one missing link: you also need to enter the ID of the specific product. It’s as simple as replacing the X in the example with the code you found earlier. Considering that in the previous example this number was 34, the URL will be modified accordingly.
https://sitename.com/?add-to-cart=34
By clicking on this link, wherever it is, the customer will add this product to the cart (of course, it is up to you not to overuse this technique). In some cases, however, this may not be enough. So let’s see all the parameters you can use in your URL.

Understand the parameters of URLs
Redirect to specific website pages
The first parameter refers to the redirect parameter. In the above URL, when clicked, the cart is added while the customer remains on the current page. If you want the customer to be redirected to another page, such as the shopping cart or checkout, you must specify this in the address.
Let’s start by taking back our first URL:
https://sitename.com/?add-to-cart=34
We try to redirect our customer to the cart. To do this, we have to add the words cart/ before “?add-to-cart”:
https://sitename.com/cart/?add-to-cart=34
The link will behave exactly as before, but this time it will redirect the customer to the shopping cart. Once you see this, it’s easy to guess how to redirect to checkout:
https://sitename.com/Checkout/?add-to-cart=34
And you can do the same for any page in your store. So in a matter of seconds, you’ve learned how to redirect to the shopping cart page or any other page in your store.
However, so far we have only seen how to add a simple product and a single example of it. Let’s see what other ways you can customize our URL.
URL: add a simple product to your cart with quantity
The second distinction that we will see in this article is related to the product quantity. In fact, you could make sure that clicking on a certain link allows a double addition of the product, so that it appears twice in the cart.
How can you do this? Let’s pick up where we left off:
https://sitename.com/?add-to-cart=34
We want the customer to buy a double amount of the product “34”. To do this, we will use the particle “&quantity=X” added at the end of the URL:
https://sitename.com/?add-to-cart=34&quantity=X
Clearly the “X” refers to the number of times we want to apply to the addition to the cart. In our case, 2.
https://sitename.com/?add-to-cart=34&quantity=2
If we want to apply what we saw before, we can move everything to checkout:
https://sitename.com/checkout/?add-to-cart=34&quantity=2
What about variable products?
URL added to cart for variable products
Once again, you’ll find that the process remains the same. The only thing separating a simple product from a variable one is the way it is identified.
For simple products you can simply scroll through the product page of WooCommerce. Things change when a variable product is used.
Each variation has its own ID code. To find it, open the product page, go to the “Product Data” section at the bottom and click on “Variations”:

Once you get the ID this way, the rest is exactly the same as before. So if you want the customer to add the size Large of the given product directly to the cart and be redirected to checkout, you just have to use:
https://sitename.com/CHECKOUT/?add-to-cart=42
The rest is exactly as we have seen so far.
ATTENTION: When generating a URL for a variable product, it is important to use the code that corresponds to the specific variation. If the general product code (which we discussed earlier for simple products) is used instead, customers will encounter an error page directing them to return to the product page and choose from the available variations.
The use of such a screen not only interferes with the process you’re trying to streamline and simplify, it damages your reputation in the eyes of potential clients.
WooCommerce adds more products to cart URL
One question you may have asked yourself at this point is: what if you wanted to add more products with just one click? We’re not talking about two copies of the same product, as we saw earlier, but two different products.
In this case, you can use the “Grouped” products.
Custom URL of grouped products
WooCommerce’s grouped products refer to a collection of products presented on a single sales page. To create one, you must first have the individual products that will make up the group. Then, by creating a new product and selecting “Grouped product” in the “Product data” section, you can establish the grouped product:
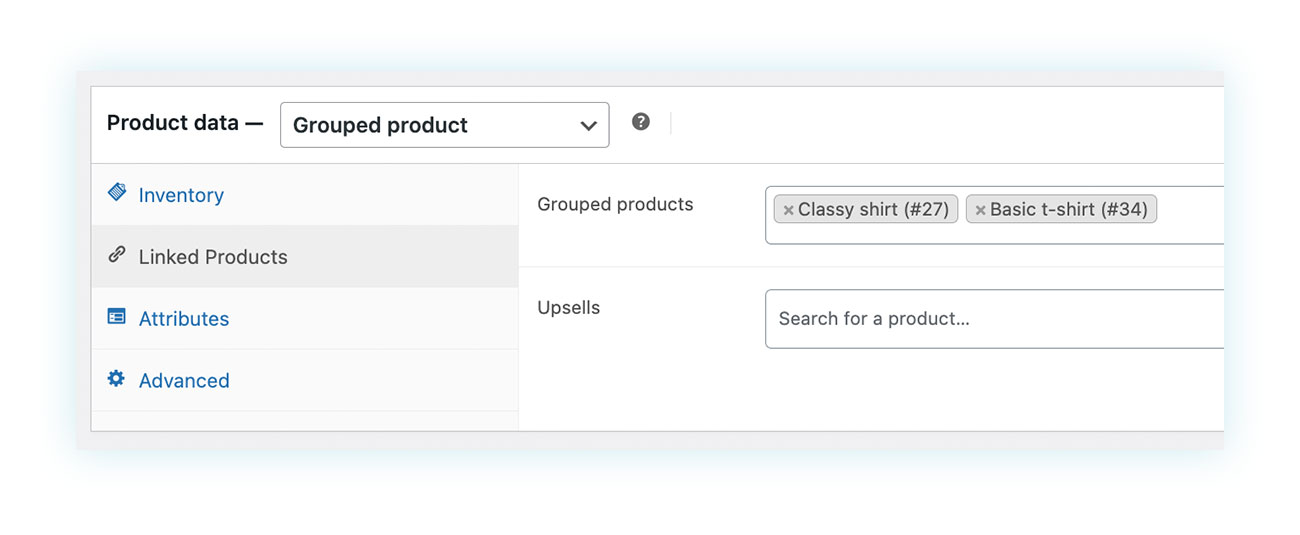
After completing these steps, you will be able to generate your own custom link. This process is a bit more complicated than what we’ve covered so far, but we’ll go through it systematically.
To create this type of URL, you need to write down the ID of the grouped product, as well as the ID of each product that is part of that group. In our example, the grouped product has ID 100 and contains within the product Classy shirt (with ID 27) and Basic t-shirt (with ID 34).
First, as with a simple product, you must go to get the GROUPED product code:
https://sitename.com/?add-to-cart=100
As you can see, we have entered 100, but this URL is not complete. You need to specify the behavior for each product in the group, indicating its ID and quantity. For each of them, you must add the particle &quantity[X]=Y, where X is the ID code of the product in question and Y is the quantity of this product that you want to add to your cart.
Let’s say we want to add a classy shirt and two basic t-shirts. Let’s start by adding the first one:
https://sitename.com/?add-to-cart=100&quantity[27]=1
This adds the classy shirt to the cart, now we need to add the two normal shirts:
https://sitename.com/?add-to-cart=100&quantity[27]=1&quantity[34]=2
Remember that you must specify the number of each product in the group. So if you want to exclude a product you have to do the same procedure but specifying 0 as quantity, like:
https://sitename.com/?add-to-cart=100&quantity[27]=1&quantity[34]=0
Last example
Let’s explore a hypothetical scenario within your business now that we’ve familiarized ourselves with the different guidelines for creating a custom URL. Suppose you decide to create a sales page that showcases a selection of items, such as a summer collection. The goal is to use a URL that allows these products to be seamlessly added to the customer’s cart when they visit the page:
- A hat, on sale on your store with ID 10.
- Two pairs of flip flops, on sale with ID 20.
- A beach towel available in different colors but selecting the yellow variation.
- Finally, we want the link to take the customer immediately to checkout.
How to do it?
First, make sure that all of these products exist in your store. Then create a grouped product that includes each of them. This will give you a grouped product with its own ID, in this case 75.
At this point, you can create your own URL, starting with the grouped product ID:
https://sitename.com/?add-to-cart=75
Now, we add the hat:
https://sitename.com/?add-to-cart=75&quantity[10]=1
Now the two pairs of flip-flops:
https://sitename.com/?add-to-cart=75&quantity[10]=1&quantity[20]=2
Then, go to the variable towel product and find out what the yellow variation ID is, in this case 30 and add it:
https://sitename.com/?add-to-cart=75&quantity[10]=1&quantity[20]=2&quantity[30]=1
To redirect to checkout, we just need to add the checkout/ particle before ? add-to-cart:
https://sitename.com/checkout/?add-to-cart=75&quantity[10]=1&quantity[20]=2&quantity[30]=1
And here’s the link you needed.
Conclusion
Using custom URLs can be intimidating for inexperienced sellers. That’s why we’ve created a detailed guide to help you navigate this process smoothly. While it may seem complex, it only takes a few seconds and has immense potential to increase your sales.
As mentioned above, there are several situations in which your custom URLs can be used. By using them wisely, you can achieve significant sales and improved conversion rates. It also allows you to maximize the effectiveness of advertising campaigns and social media links, while making better use of your investments in these areas.
It’s important to always keep in mind the proper use of custom URLs. Misleading customers by getting them to click on something only to end up on the WooCommerce checkout page with items already in their shopping cart can damage your reputation and cause you to lose potential customers. Custom URLs should be seen as a helpful service provided by a smart and considerate seller to make the customer’s buying process easier and more convenient.
Start experimenting with custom URLs. See what you get!