Let’s take a look at our free WooCommerce theme Proteo. After installing the theme, you’ll be able to create a unique look for your store in just a few steps, thanks to Proteo’s many useful options. But don’t worry, even if you don’t know where to start, Proteo is there for you. You can also choose from one of our three professionally designed skins that you can import to your website in just a few clicks.
Meet the setup wizard
When installing the Proteo Toolkit plugin after installing the theme, our setup wizard will guide you through the setup process. The wizard will help you install a child theme, which is especially useful if you want to make further changes to Proteo later on. In the next step, the wizard will suggest you several other plugins to install. Except for WooCommerce, you don’t necessarily need each of these plugins, so you’re free to choose which ones to install here.
If you are setting up a brand new website or if you liked one of our demo sites, you can also have the setup wizard install one of our skins in the last step. You can use these prepared skins as a solid base for your design or get inspiration for your own design.
Skins
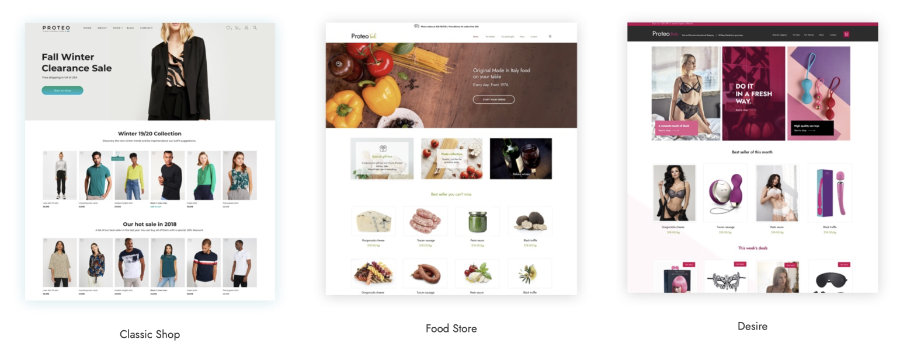
Unlike child themes, our skins consist of a complete set of content, widgets, options, pages, menus, and sidebars. Again, however, you have the choice of importing the whole set or just individual parts to your website.
If you select all of these components and your website was previously empty, you will receive a 1:1 copy of one of our demo pages after the import. From here, you can make adjustments, remove and replace parts or try out how we put individual components together.
Customizer
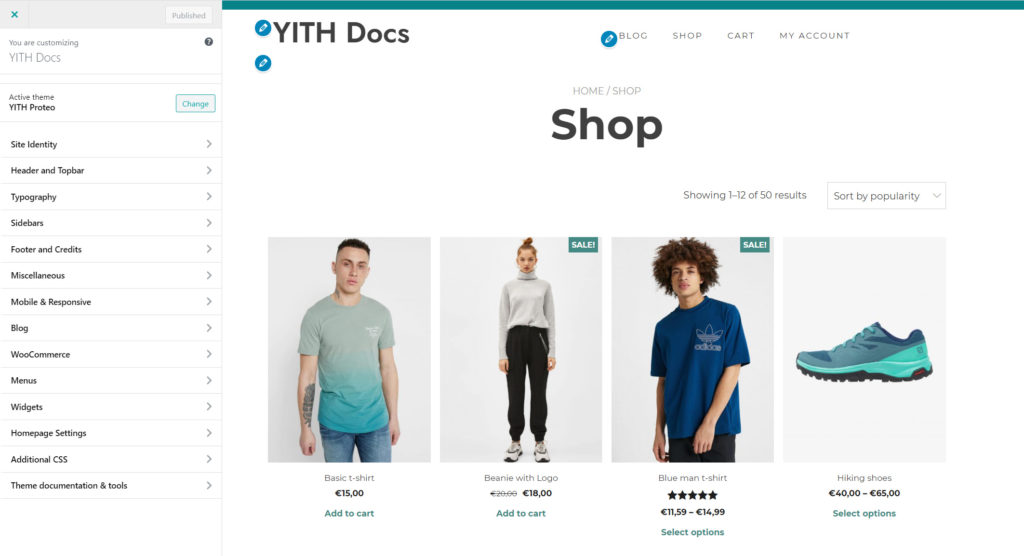
The Customizer is an interface provided by WordPress. It combines theme and plugin options with a live preview of the site. You will find many options here that affect the appearance of your website here. To make your work a little easier, we have tried to include as many useful options as possible in Proteo. This should allow you to control all important aspects of your website’s appearance without writing code yourself.
To open the Customizer, click on “Appearance / Customize” in the admin menu. You should then see the Customizer interface, which shows you several sections on the left, while on the right side of the screen, you can see a live preview of your website. As you change options, you’ll immediately see how it affects your site, but your visitors won’t be able to see the changes until you save them in the Customizer.
The options in the Customizer are divided into different sections where related items are grouped.
For example, we could upload our own logo as a first step, customize the site title and tagline. All these options can be found under “Site Identity / Logo and Title”. In the sections “Header and Topbar”, “Sidebars” and “Footer” we can influence the page layout. If we want the header’s logo to be centered, blog articles to be displayed without a sidebar, or the footer to display widgets in fewer columns, we will find what we are looking for there.
But all these sections include much more than these *rough* settings. Additionally, in “Typography” font type, style, size and color can be defined. “Mobile & Responsive” contains many options that affect the behavior of the website on mobile devices.
In addition to options for color adjustment of many elements, the “Miscellaneous” section contains, for example, breadcrumb navigation and display options for buttons and forms.
You will find more granular options for all pages related to WooCommerce – from store overview to individual product pages to checkout in the “WooCommerce” section.
Your next steps
If you don’t have it installed yet, you can download and activate Proteo directly from the WordPress.org directory. The optional Proteo Toolkit plugin will guide you through the steps described above. If you have any questions or want to learn more about individual options, you can find answers in our extensive documentation.