Online courses have been a successful and profitable industry to invest in even before the pandemic that brought attention to distance education.
Currently, there are multiple Learning Management Systems (LMS) available worldwide, including Moodle, Acorn LMS, and Canvas LMS. However, many content creators and authors prefer creating their own platforms to sell online courses to their followers.
There are plenty of reasons to make this choice. You get complete control over revenue and costs, plus more power over your audience. While platforms that unite multiple creators may assist in building up your customer base initially, they can ultimately become a source of competition and distraction.
Many authors who traditionally relied on physical media to distribute their courses are now exploring online solutions due to the clear advantages they offer:
- You can increase your profits by avoiding the costs associated with the support itself and shipping.
- You have the freedom to express yourself and make regular updates, without any restrictions and limitations that a book or a CD could have.
- Thanks to the Internet, we can now connect with a much wider range of potential customers, and shipping is no longer a barrier to reaching people all over the globe.
Are you ready to start selling your online courses on your very own eCommerce platform with just a few clicks? Let’s dive in and see how it’s done!
Table of contents
- Why use WooCommerce to sell online courses
- What it takes to sell online courses with WooCommerce
- What are the best WooCommerce plugins to sell online courses?
- How to install and configure plugins
- How to create online courses with WooCommerce
- Promote and manage your online course
- How much do you earn by selling courses with WooCommerce?
- Conclusion
- FAQ
Why use WooCommerce to sell online courses
It’s common to mention WooCommerce when discussing eCommerce, and it’s no wonder considering the multiple advantages it offers.
Let’s start by understanding what exactly WooCommerce is. It is a widely used WordPress plugin, which is a globally popular Content Management System (CMS). WordPress is known for its blog feature and the fact that it allows you to create a functional website within minutes. Now, if you add WooCommerce to the equation, you can transform that website into an eCommerce platform so you can sell products and accept online payments.
Countless websites use this combination, and an increasing number of sellers are turning to WooCommerce due to two primary factors: its versatility and user-friendly interface.
You don’t need to be a coding expert to create a website on this platform. The page builders are intuitive and the platform is supported by a massive online community with unlimited resources.
From a visual perspective, there’s no need to hire a graphic designer. There are several themes available online that you can use to customize your portal to your liking.
If you want to modify the look of your store, you can rely on themes, whereas if you need to add more features, plugins like WooCommerce can help with that.
In this article, we will focus on some plugins that are perfect for selling online courses. Don’t worry, we will include a step-by-step guide to help you set up your store.
What it takes to sell online courses with WooCommerce
Instead of jumping right into how to use the plugin, we wanted to share some previous articles we published that could be helpful if you’re not sure where to begin. We hope these resources help you get started.
1) Choose a hosting and domain service
When we talk about “hosting”, we’re referring to the place where we’ll be buying space for our website’s server. And “domain” simply means the name of our website, as it appears in the web address (www.mysite.com).
With so many hosting services available, it’s easy to feel overwhelmed. To help you out, we recommend checking out this article about the top hosting services for WordPress/WooCommerce.
In the article, we mention WordPress recommends certain services, such as Bluehost.
2) Choose the best WooCommerce theme to sell online courses
As previously stated, there is a wide variety of themes to choose from to customize your website appearance.
Here’s a quick tip: themes can be categorized as either WordPress or WooCommerce themes. Although both are compatible, using a WordPress theme may result in some graphic issues because it’s not designed to support all of WooCommerce’s features.
For a well-suited WooCommerce theme, we recommend Proteo. This modern and minimalist theme is perfect for different products, including online courses.
3) Install WordPress and WooCommerce
After selecting the appropriate theme and acquiring the hosting service, the only thing left to do is to install WordPress, and then WooCommerce.
It’s quite common for a specialized hosting service for WooCommerce to include the customization step with the purchase. So, once you’ve made the purchase, you can start customizing your site and enhancing it with plugins and products.
In case you haven’t already, we recommend checking out our article on “How to create an eCommerce store on WordPress with WooCommerce“. This guide gives a step-by-step explanation of how to install WooCommerce, while our article on “How to add a product on WooCommerce” covers the different types of products you can add to your online store.
In fact, you don’t have to know every single product out there, but having some knowledge about creating products that can be sold will be helpful when you want to market your online courses.
After getting the essential plugins, you will have everything you need to start creating and selling your courses. That’s it!
What are the best WooCommerce plugins to sell online courses?
To your advantage, you can sell your own online courses with just one additional plugin, and that’s exactly what we will be covering in this article.
The WooCommerce Membership plugin allows the sale of several courses and the creation of exclusive website sections for customers that buy specific products. We will thoroughly explain how to use this plugin to achieve your goal in a moment, don’t worry.
While Membership remains the essential plugin, we’ll also recommend some additional plugins that could be beneficial for an online course-selling store.
But first of all, let’s see how to install and activate a plugin.
How to install and configure plugins
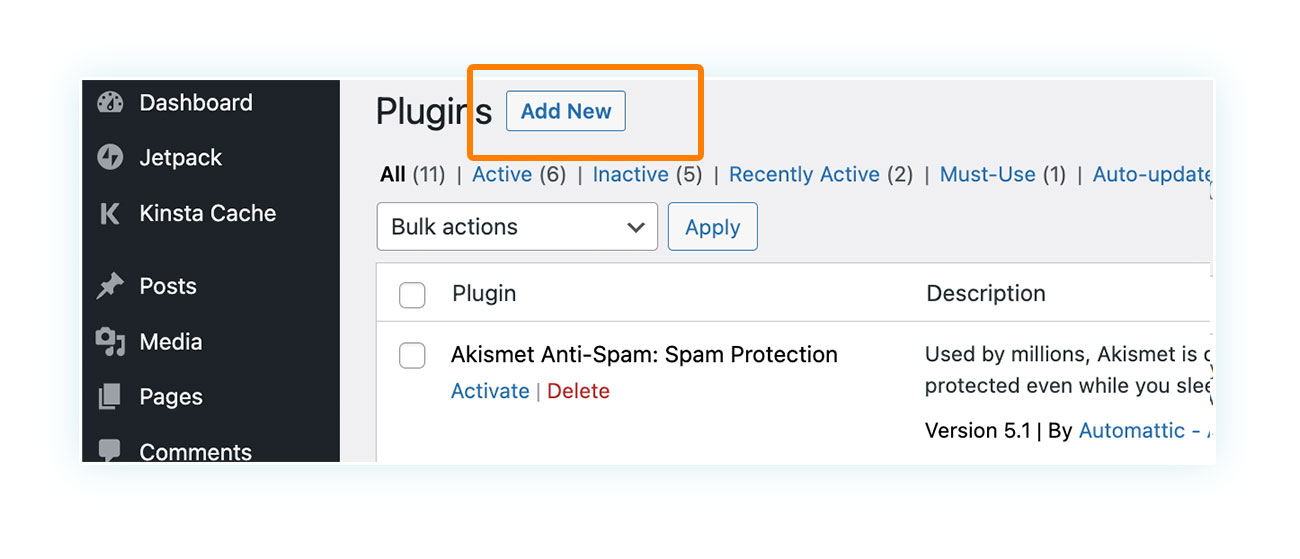
Adding a plugin to your WordPress site is a straightforward process. Simply head over to the “Plugins” section and select “Add New.”
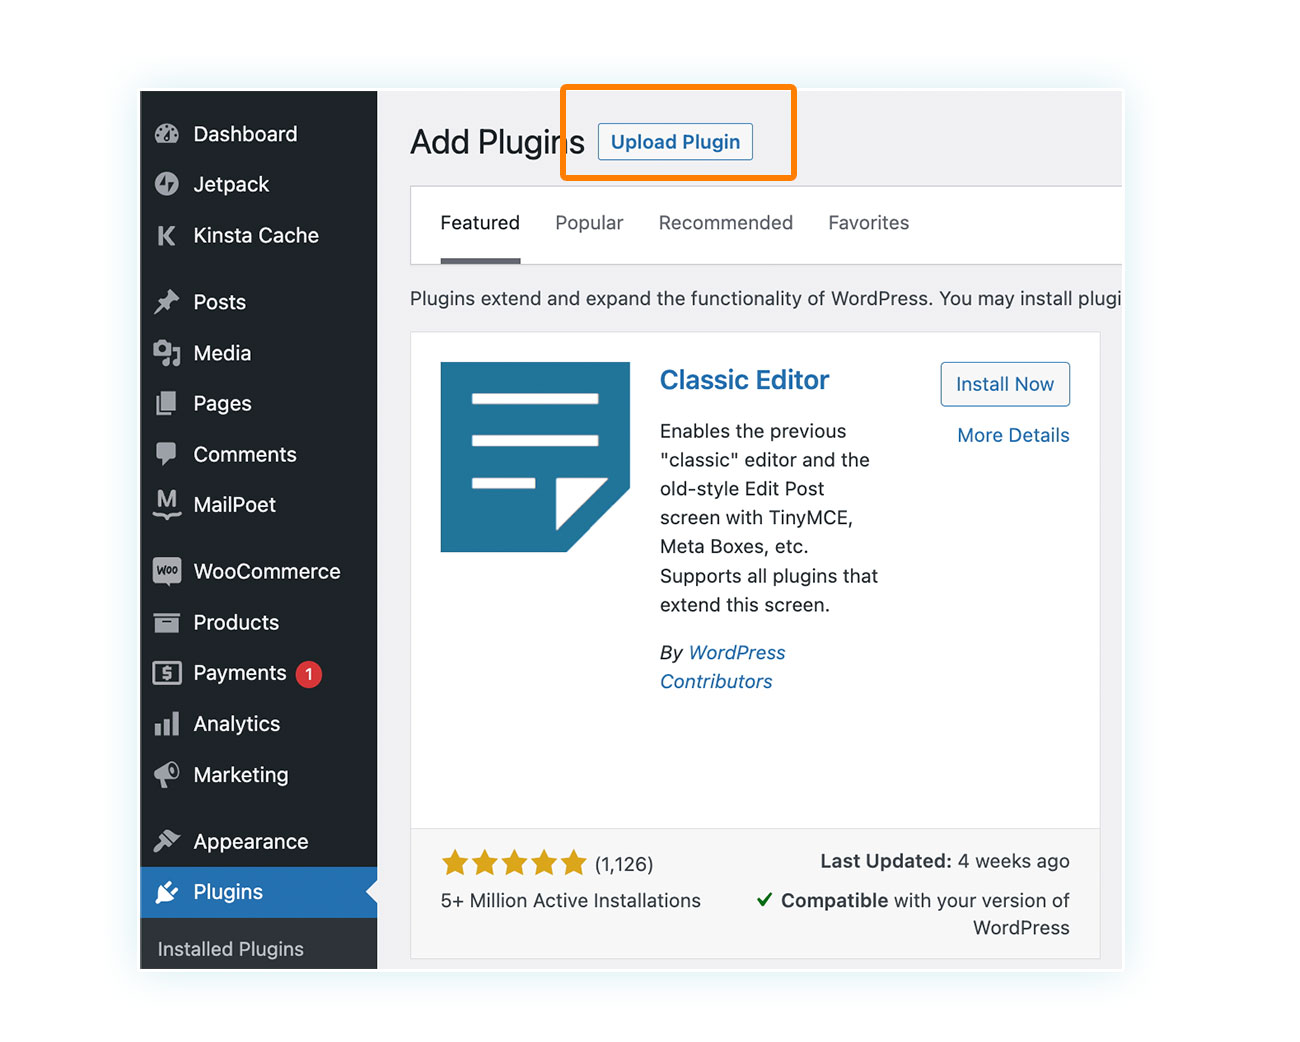
At this point, you have the option to either select a plugin from the online catalog or upload one of your own. To upload your own, simply click on “Upload Plugin” at the top and upload the .zip file that you got after making your purchase.
After completing this step, your website will have WordPress, WooCommerce, and the WooCommerce Membership plugin. Now, it’s time to focus on creating the course.
How to create online courses with WooCommerce
We won’t go too deep into the specifics of course structure since we believe you’re the pro here. But it’s crucial to figure out how you plan on delivering it to your customers who are the ones that will purchase it.
Typically, people who sell online courses tend to take one of two paths:
- They display the course content on the website only for those who have made a purchase to see.
- They share the content through downloadable files that include videos, text files, presentations, and other formats.
The top choice for these kinds of stores is the first one as it offers better product security and lower chances of unauthorized distribution.
After choosing the right way to present your course, you can start creating it.
To sell a successful online course using WooCommerce, it’s important to focus on three key tasks: creating a product that can be purchased and grants access to the course, developing the course content and uploading it to your site, and configuring limited access to it. Membership works as a crucial link between the product you’re selling and the course content itself.
We’ll break down the entire process into simple steps, using the example of selling a programming course to make it easier to understand. Let’s go through it together.
1) Product creation: “Programming course”
Creating a product on WooCommerce is the easiest and most intuitive first step. Simply take it like any other product you would sell.
Remember that article we shared about creating products? Well, here’s a quick summary of the whole process.
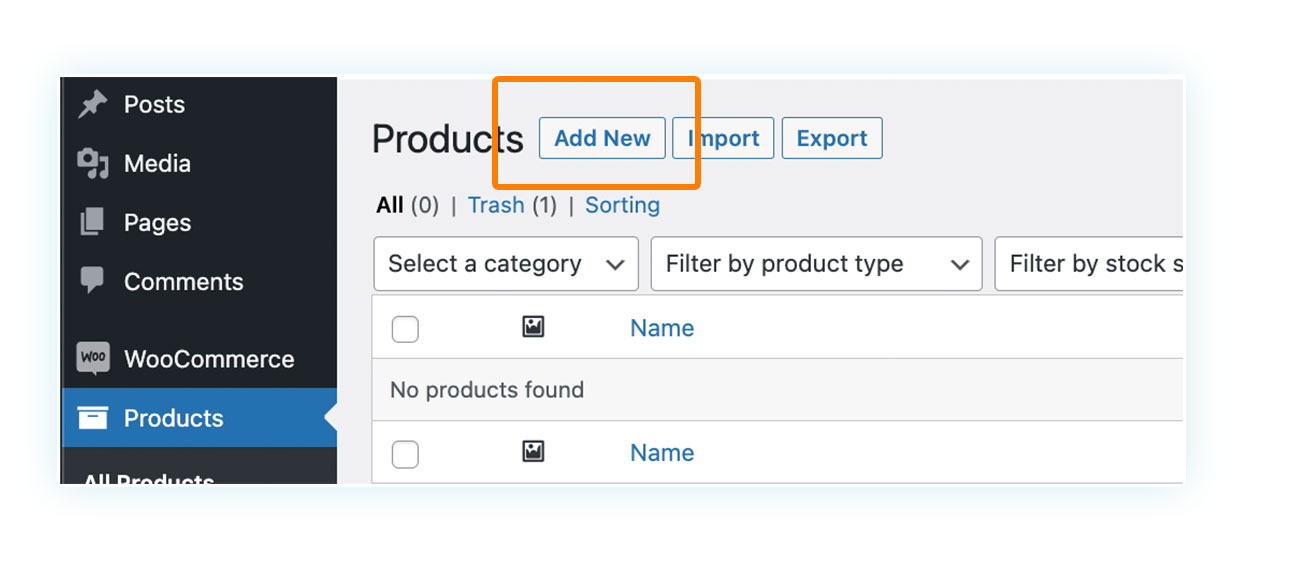
First, you need to go to Products > Add New:
Once you’re on the product edit page, simply enter the course name, product image, description, and price:
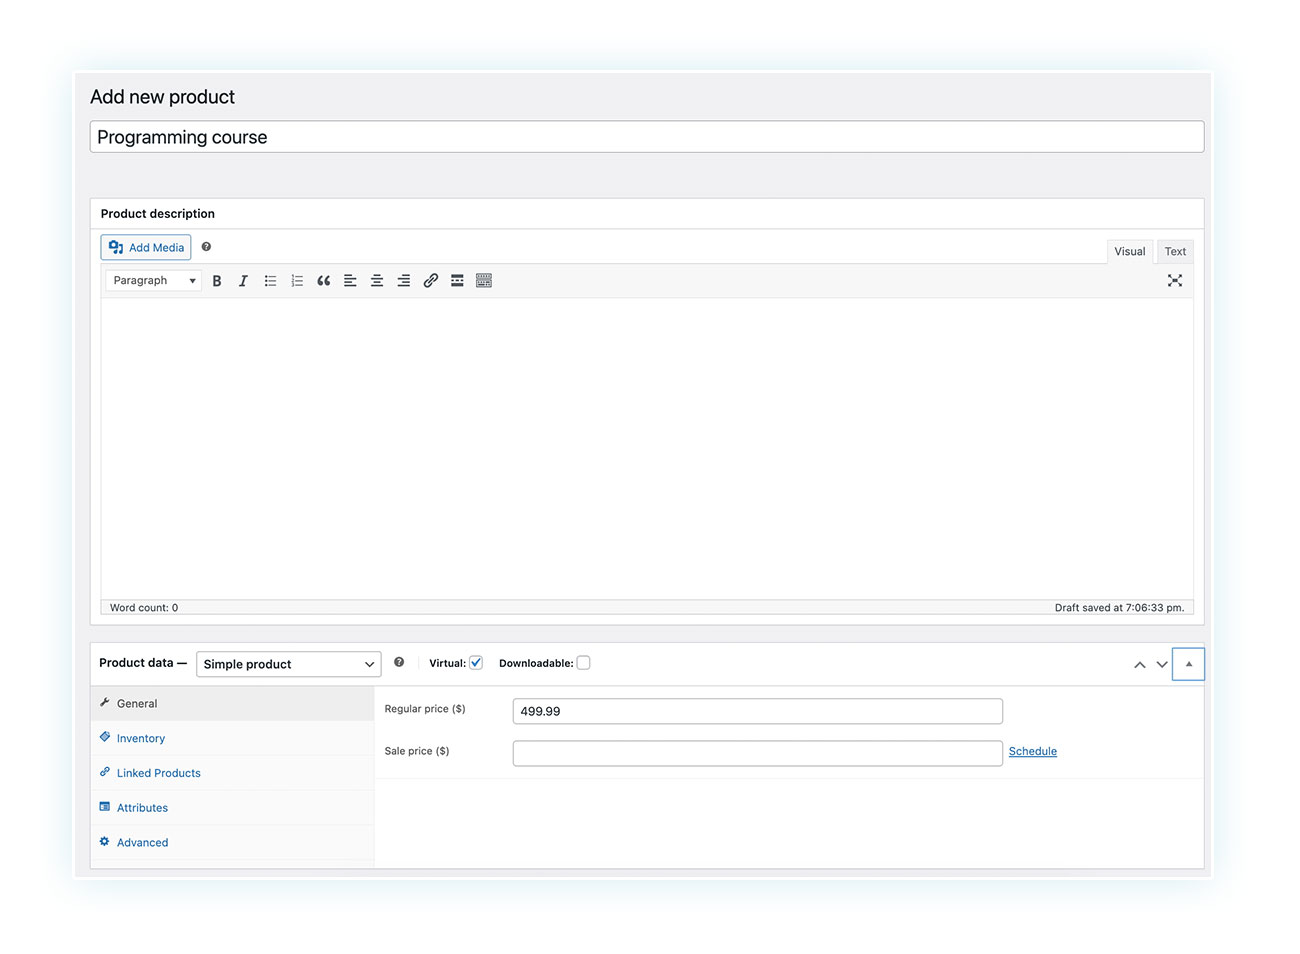
If you want to customize your product, you can do it. Please note, if you’re not selling a physical course that needs to be shipped, make sure to check the “Virtual” box:

Don’t worry about shipping costs, they don’t apply in this case so you won’t have to spend time configuring them.
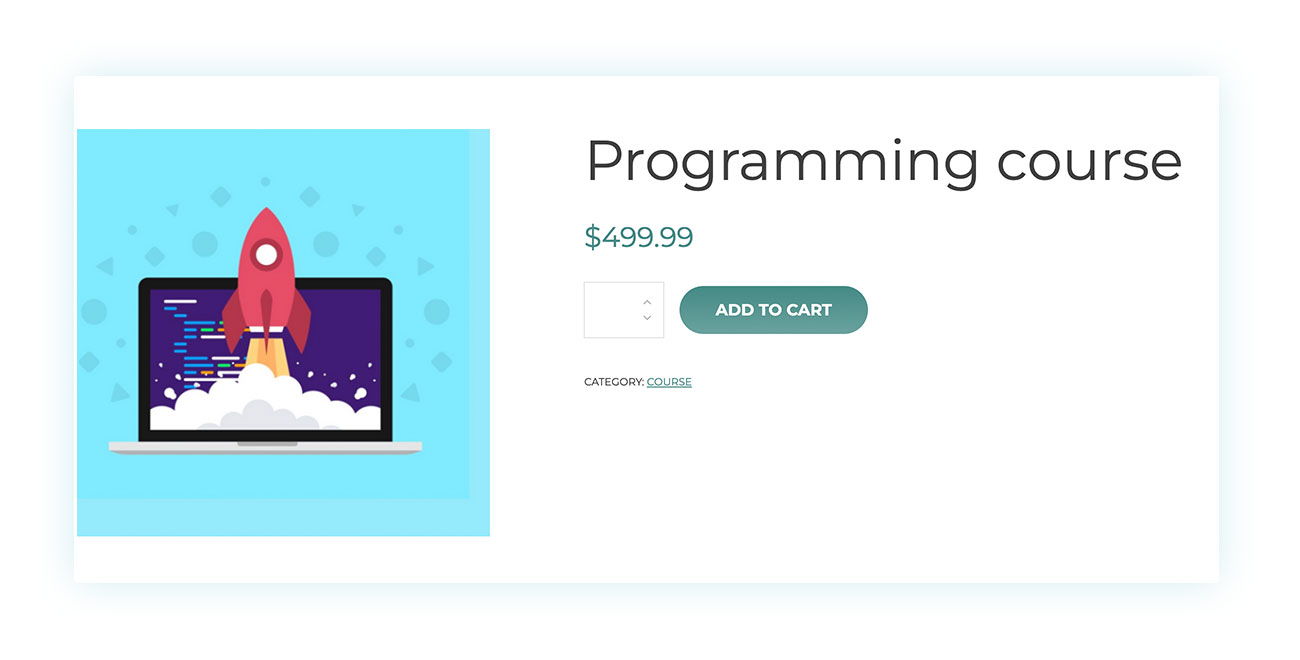
After the product is created, it will look like this:
SALES IN SUBSCRIPTION FORMAT
Earlier, we mentioned there were other plugins that could be of great help to sell online courses. The first plugin that we would like to recommend is WooCommerce Subscription.
Online courses are often associated with two aspects:
- A very high-value content
- Consistent and up-to-date information
Taking this into consideration, charging customers a one-time fee may not always be the best approach. Your clients may find it discouraging to pay a large amount upfront, and the course may not generate any further revenue after the initial sale.
Want to solve this issue? Use Subscription! It’s super easy — just add a field to your product that lets customers make recurring payments instead of a one-time fee:
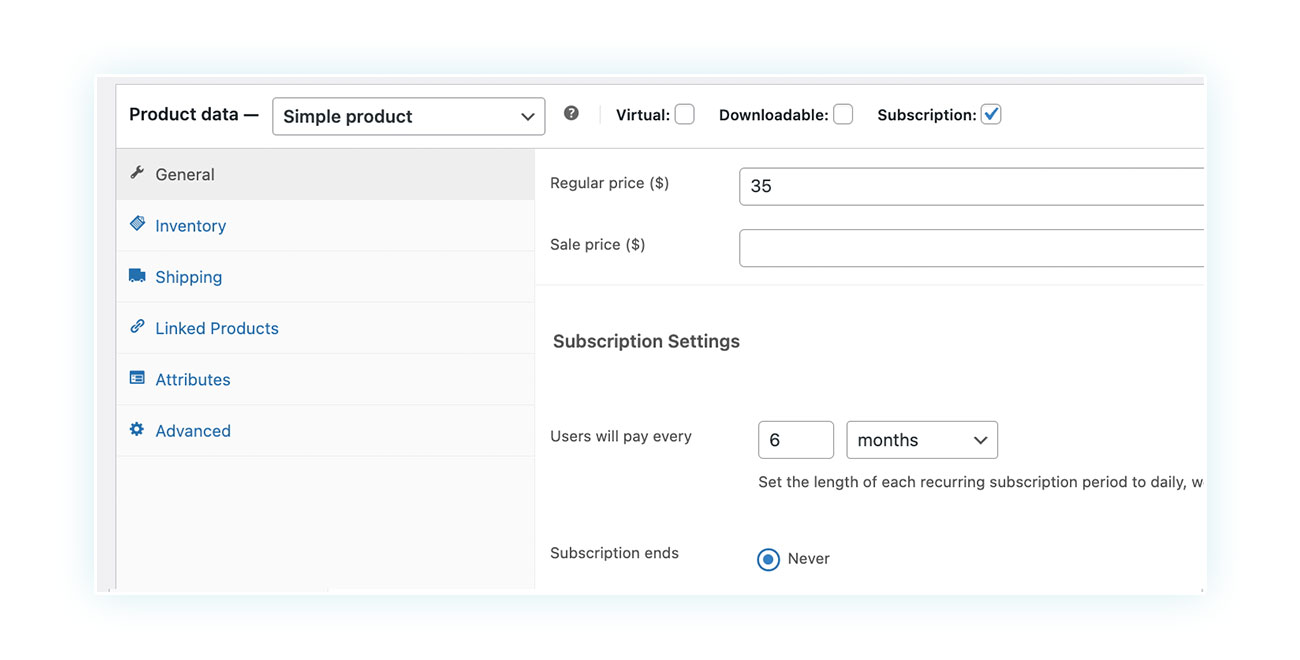
Remember the example we gave you earlier? Well, instead of paying $499 upfront, your potential customers can opt for a monthly subscription of $49. This makes the course more accessible to those who can’t afford the full price right away.
Monthly billing is a popular option, but adjusting the time frame is also possible. You may choose to decrease it by charging customers every few weeks or increase it by charging them annually.
You have the option to either charge this amount without any limit (until the customer cancels the subscription) or set an end time for this recurring charge.
2) Creation of course content
You’ve created the product that your customers will have to buy to access the course. Now, it’s time for the online course creation!
Depending on the course type, the approach may vary. You can choose to write articles, design pages, upload videos, and so on.
It’s a good idea to have a section on your website just for course content. This way, customers who buy the course can easily access it.
After uploading your course, simply link the product you’ve created to the content it grants access to. To do this, we will use Membership.
3) Make your content exclusive
Don’t forget the name of your product and where you’ve placed the course on your site, this is important to link the course to the product — doing it is a piece of cake.
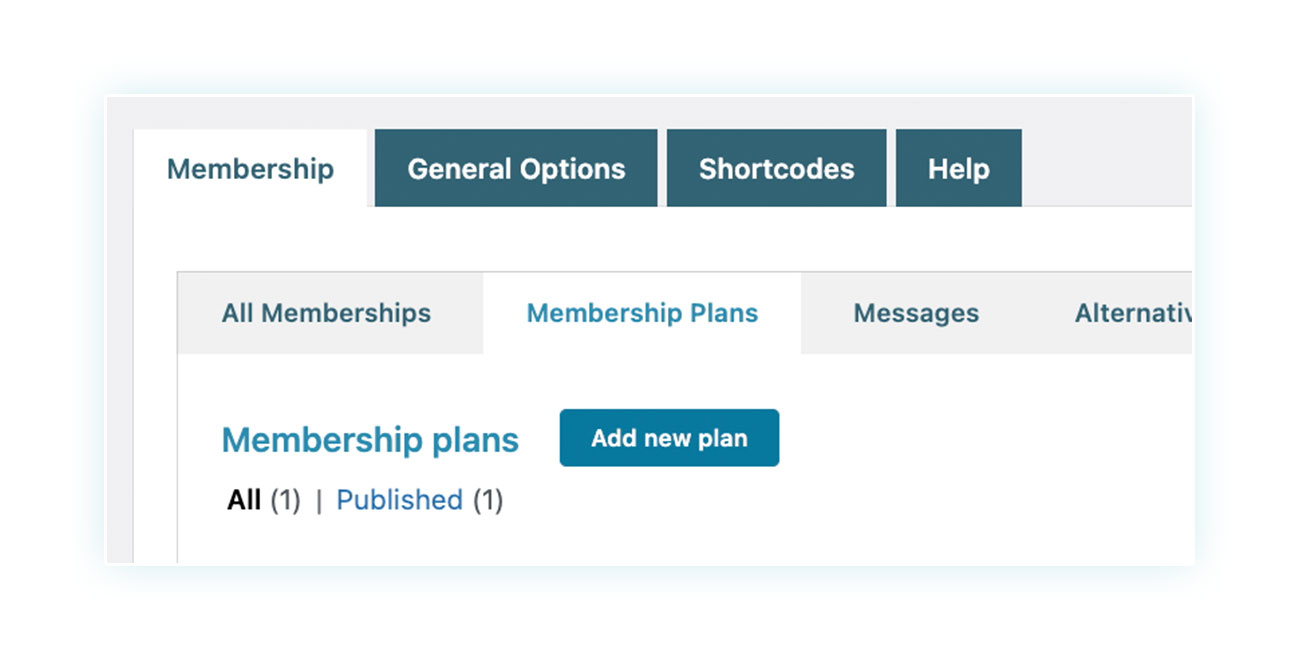
Simply head over to YITH > Membership (make sure you’ve installed and activated the plugin first) and in “Membership Plans”, click on “Add new plan”:
Once you’re in, you’ll see a page with a bunch of important settings. Let’s check out the first ones:
To start, pick a name for the membership plan. Don’t stress too much about the name, it’s just for you to quickly identify the plan and separate it from the other ones.
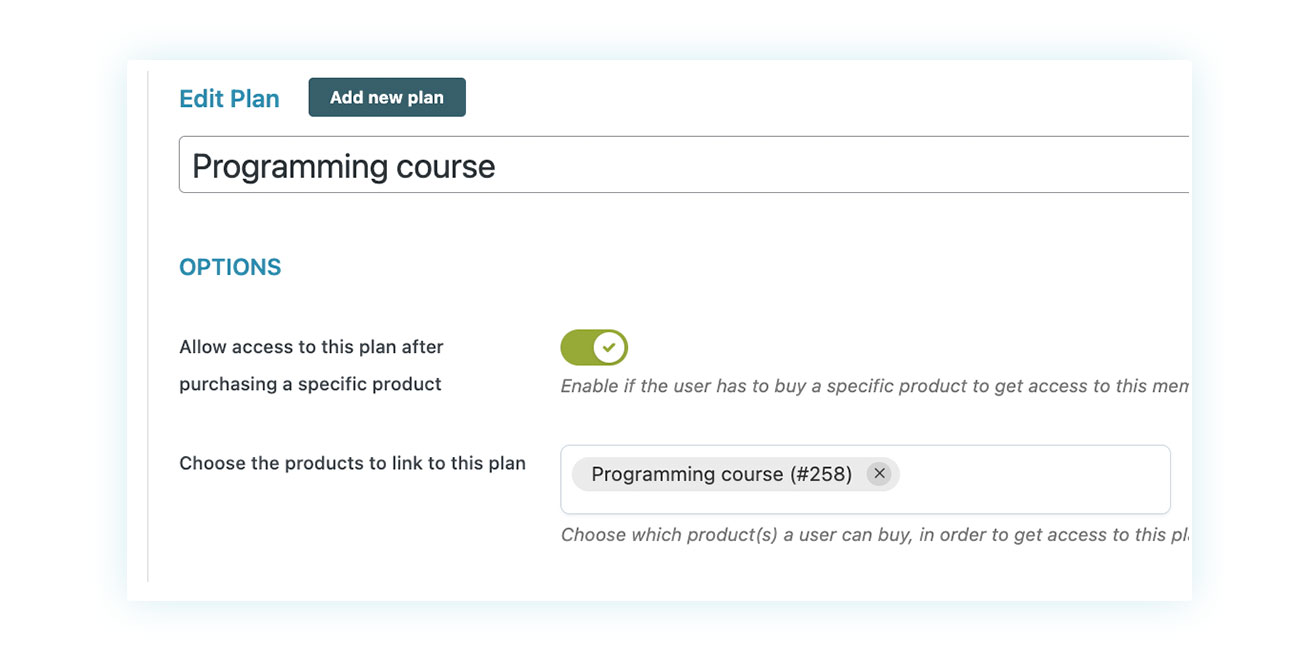
To make sure your customers can access the course, activate the “Allow access to this plan with the purchase of a specific product” option.
Once done, you can easily enter an already created product in the “Choose the products to link to this plan” option. Simply type in the first few letters of the product name to locate it and select it.
You’ve linked the product to the membership plan, but there’s still one more step left — linking the membership plan to the course content.
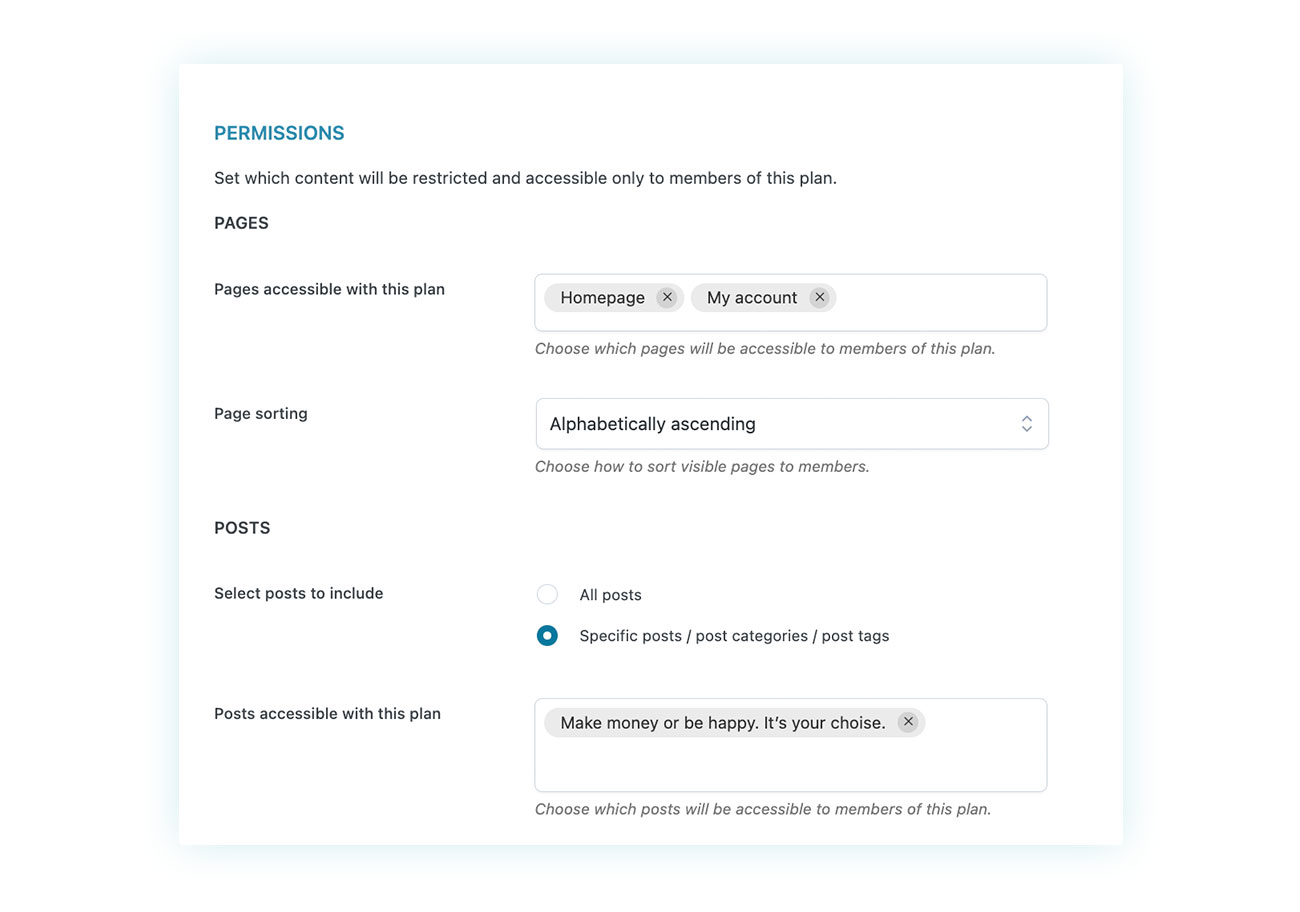
As you can see, this step is also very intuitive. Based on where your course is located, you just have to enter the page or article in the correct section.
This way, only those who have this membership plan can access these pages.
In just a few minutes, you’re all set to start selling your online course.
Promote and manage your online course
Just having a course for sale won’t guarantee business success. While WooCommerce allows more flexibility than other LMSs, it’s important to know how to attract and engage your audience.
Luckily, WooCommerce has multiple features and plugins that can boost its SEO performance.
You may want to check out some plugins that work with your current Membership setup to optimize your investment.
For example, one way to implement cross-selling is to encourage customers who have bought a course to buy another one. With Membership, you can offer a percentage discount on other products to all members of a specific plan:
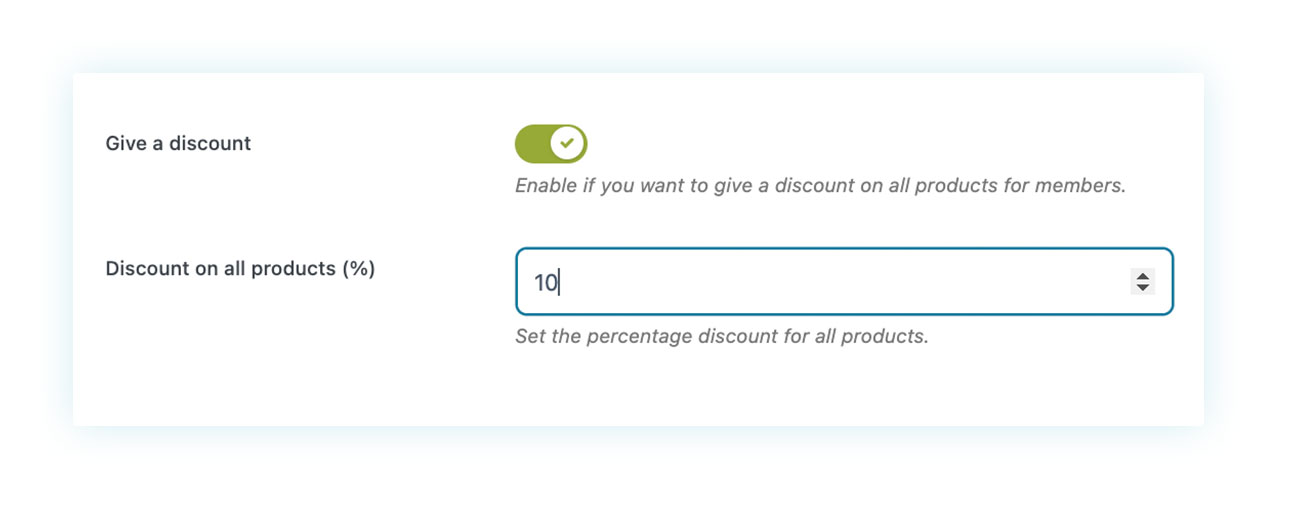
Although the feature is impressive, it’s typically more beneficial for those seeking to provide a premium subscription that includes discounts, rather than for your particular situation.
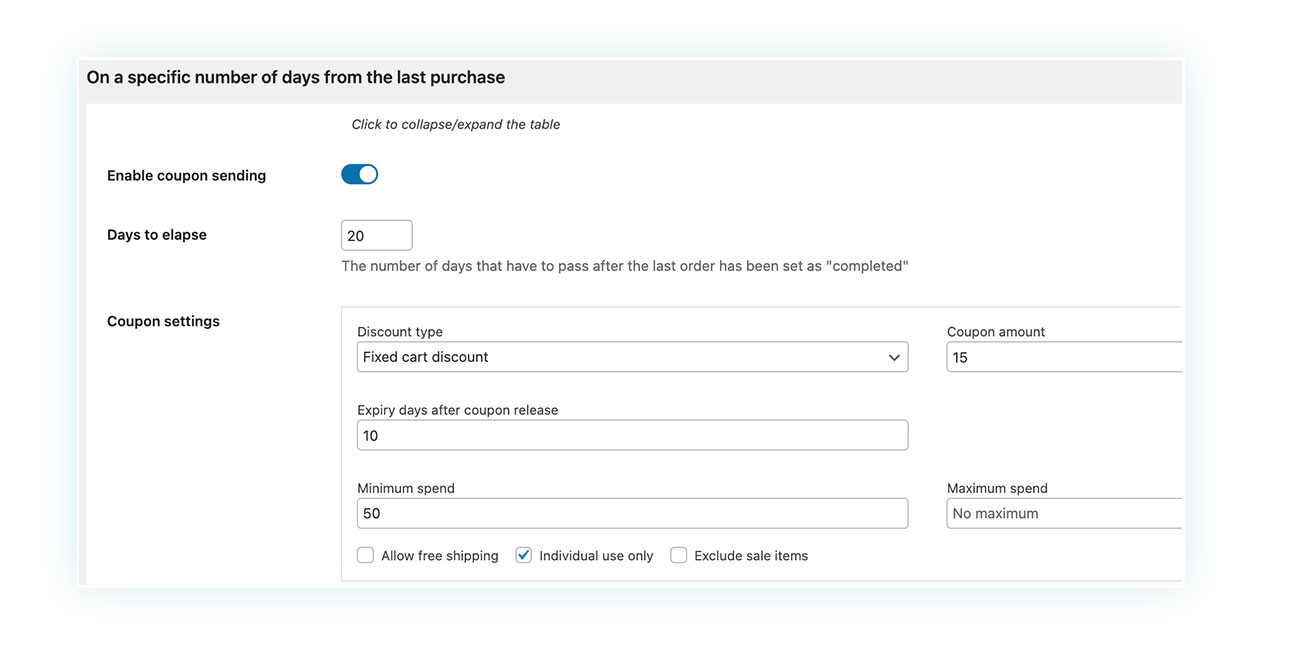
The WooCommerce Coupon Email System is a possible option to consider. This plugin allows you to schedule promotional emails triggered by specific customer actions.
How could you use this plugin?
Consider providing progressive courses in your store, such as basic, intermediate, and advanced levels, and track the average time it takes for customers to complete them. Once you have this information, send out an email containing a discount for purchasing the next course within the given time frame.
By taking this approach, you can boost conversions as customers are already in a purchasing mindset. Additionally, you can increase the average value of each customer, preventing them from making a one-time purchase and moving on.
How much do you earn by selling courses with WooCommerce?
Calculating potential profits for your WooCommerce business may be challenging, but there are two factors that can provide peace of mind:
- When using WooCommerce, you won’t have to worry about additional expenses beyond hosting and required plugins. Unlike other CMSs, it doesn’t take a percentage of your sales.
- WooCommerce is a platform that values the seller’s time and effort. It offers a range of marketing strategies that can be applied to selling courses. Additionally, you’ll find a simplified page builder that allows easy integration of tools on your site, and exceptional blog functionality provided by WordPress. Hence, it is recommended not to underestimate the potential of attracting organic traffic to your portal.
Conclusion
Online course sellers have valuable knowledge to offer and selling courses allows them to provide top-notch training without being restricted by any Learning Management System.
Creating your own portal is a wise decision for establishing your brand, gaining authority, and attracting a specific audience to your courses.
With WooCommerce, you can easily set up an online store in no time and without any technical expertise. Just a few clicks and you’re good to go!
FAQ
Why use WooCommerce to sell online courses?
WooCommerce is a cost-free resource that offers flexibility through its diverse themes and plugins. Additionally, its intuitive page builder makes it a user-friendly tool.
What plugins do I need to sell online courses?
To offer memberships, we recommend using the WooCommerce Membership plugin. Additionally, integrating WooCommerce Subscription can provide subscription options to your customers.
How can I provide lessons to my clients?
The Membership plugin allows you to restrict access to different types of content on your website. It’s recommended to group your material on specific pages or blog posts, where you can also provide download links to resources.
What courses can be sold on an eCommerce with WooCommerce?
WooCommerce’s capacity to integrate text files, images, videos, and downloadable files makes it possible to sell all types of courses on an eCommerce platform.