One of the best way to encourage multiple purchases and increase the average value of each transaction in your store, is to offer batches of products.
That’s why WooCommerce itself offers the chance to create “grouped” types of products, so that customer can purchase several products at once.
This kind of product, however, is simply a bundle of multiple items chosen by the admin. What if you wish to offer something slightly more complex?
Shops often offer Christmas Baskets customers can customize with the items they like and use as presents.
By offering them the chance to choose the items that will be part of the basket, maybe including a discounted price on this “batch” of products, the shop offers a service which will increase the income from any single customer.
What if I wish to offer the same service in my WooCommerce based shop?
Let’s imagine it’s the Christmas period. I wish to offer my customers the chance to create a custom basket, with the following features:
- Customers will be able to choose a product of each kind (Cakes, Wine, Cheese, Christmas Crackers etc.)
- These are products that can be individually bought in the store, but they will get a discounted price while in the basket.
- Encourage customers to purchase a specific product based on the items they have previously chosen.
In order to do this, I’m going to use the YITH Composite Products for WooCommerce plugin
How to sell custom Christmas Baskets using WooCommerce
In this tutorial we are going to see how to create a custom basket with these features in a step-by-step guide. After installing and activating the plugin, the first thing to do is to create all of the simple products that can be added to the basket.

The creation process is exactly the same of any other WooCommerce product. We add a title, a description, images and price.
This is going to be the base price, the one for the product being sold individually.
The discount for being included in the Christmas Baskets will be applied later.
Once it’s created, we’ll then have this kind of products:

In this case, I created:
- Baskets – To offer customers the chance to choose the type of baskets they prefer
- Cheese
- Cakes
- Bows and decorations
- Party Cracker
Considering it’s the very same process for each product, I’ve only shown you the first one, but here’s a little advice before we proceed: make sure to group the products of the same type under the same tag or category… this will be useful later on.
Now let’s create the “Christmas Basket” product, that can be purchased by customer and that will include all of the products they want:

Let’s add a title, a description and an image as we would with any other product (if we enter a price, this will be the base basket price, as we will see shortly):

Now let’s go to the “Product Data” section of the product and select “Composite Product” from the drop-down menu:

By selecting this kind of products you will see two new tabs: “Components” and “Dependencies”.
A component acts as a container into which we are going to add the products customers will be able to choose. For instance, if I want to offer wine, I will create the “Wine” component, to which I will add all of the wines that are available to customers.
Let’s select the first one and create the first component:

After clicking on “Add Component” you can select the features of the components that will be in the basket, meaning the pool of products your customer can choose from:

Besides from the name and description, the first thing we find is the “Composite Product Layout”, meaning the overall look of the products once they are added to the Christmas Basket:
We can choose from three types:
- Simple list – Components will simply be listed one beneath the other.

- Accordion List – Every component will be displayed hidden under a button with its name and will be displayed only once it’s clicked:

- Steps – Components will be displayed in numbered steps:

Once you have chosen the style and assigned it a name and description, we need to add products to this component. To do so we have three choices: insert your products manually, or using categories or tags (remember when I said this would have been useful?).
So each component will be composed of the products we decided, and customers will be able to pick from them:

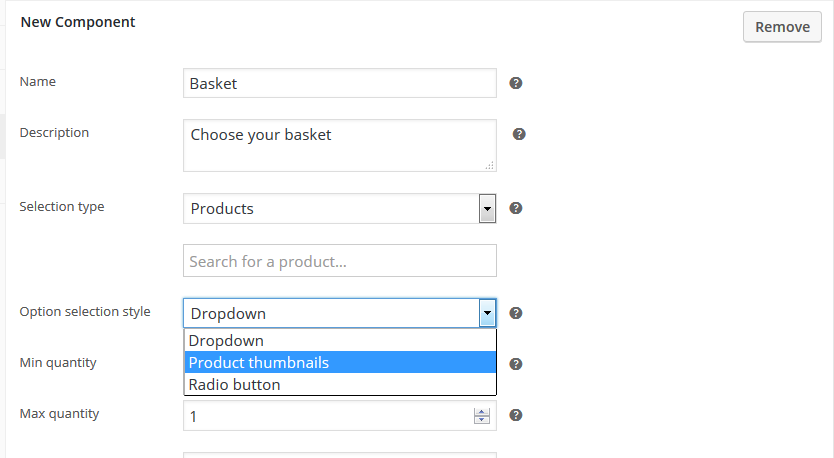
Once the products are added to the same component, we can choose how to display them:

Whether a drop-down menu:

Or by Product Thumbnails:

Or simply as clickable Radio Buttons:

Once this is set up as well, we are basically done. All we have left to do is deciding if you want to apply a discount to the products that are added to the basket and if you want to make any component mandatory:

Once we have created a component for each product that can be added to the basket, here is how our settings page will look:

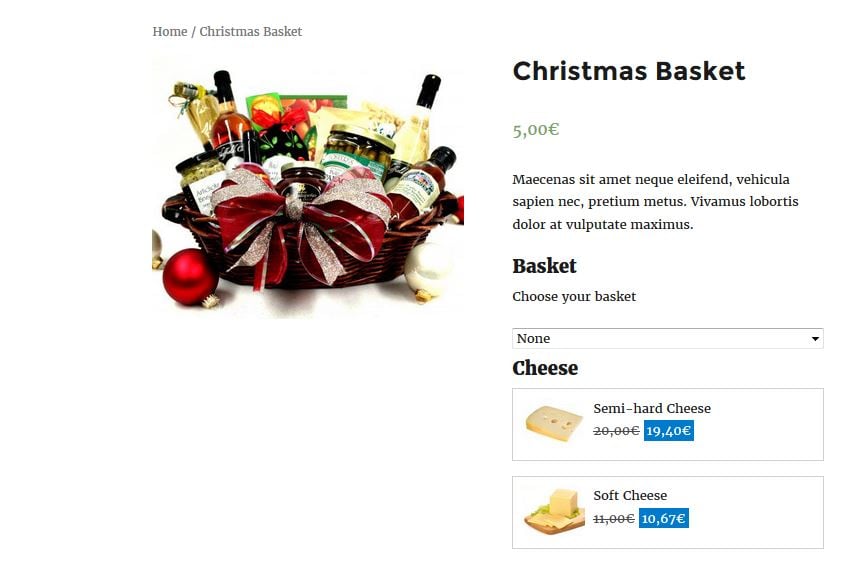
And this is what the Christmas Basket page will look like once it’s published:
As you can see, the starting price is displayed at the top, if we previously entered that. At the bottom of the product page, after picking the component, the total price will be displayed (divided between base price and components prices):

We just successfully created our Christmas Basket! Here is one last information you might find useful:
At the beginning of this article I mentioned that this type of product adds two tabs in the product data section. The second one is called “Dependencies” and it offers the chance to create a dependencies net between components.
For instance, if you want customers to have to pick a specific product once they have chosen the basket, you can do it this way:

So this is how you create your custom basket! Remember you are fully free to customize it, add the products you want and create any kind gift!


