A lot of companies tend to overlook the significance of written content on their websites, and this often results in a drop in sales and conversions. Copywriting has evolved with time, and there are now several techniques and resources available for writers to create compelling content. However, one question that is still asked by many copywriters is “Where can I promote my services?”
There are plenty of options available for marketing copywriting services, and we’ll explore them all in this article while also uncovering the benefits of using WooCommerce as your go-to platform.
Are you interested in knowing the pros and cons of using a freelancing website? Want to learn why it’s worthwhile to invest in your own eCommerce online business and which plugins can help you sell services like this? Keep reading to find out all this and more.
Table of contents
- What is copywriting?
- What are the benefits of copywriting for online stores?
- The benefits of using WooCommerce to sell writing services online
- Creating and organizing your writing services
- Promote your business online with writing services
-
FAQ
- Why should I use WooCommerce to sell my writing services online?
- What pricing strategies can I use for my writing services?
- Can I offer discounts or coupons to my customers with WooCommerce?
- How to manage taxes and invoices in my WooCommerce shop?
- Is it possible to customize the look of my WooCommerce shop?
- What are the best WooCommerce plugins for copywriters?
What is copywriting?
Copywriting is the form of writing that focuses on promoting a product or service. This was usually done across different media platforms such as radio and TV, but in recent times, it has become largely associated with web copywriting due to the increasing demand for web-based marketing.
A copywriter, typically possesses knowledge and experience in writing, as well as marketing and persuasion tactics. One of the renowned figures in copywriting education is Robert Cialdini. A proficient copywriter should have a comprehensive understanding of call-to-actions, the art of composing effective advertising copies, and the ability to develop launch strategies.
The role of a copywriter is crucial in the field of online marketing, but it’s hard to measure their exact impact on sales as it can differ greatly across different online stores.
What are the benefits of copywriting for online stores?
Having a copywriter on board for an online store can offer a range of advantages, such as:
- Less work for customer support – When you provide specific and concise information to your customers, they are more likely to feel confident in their purchase decisions, ultimately leading to increased sales and fewer uncertainties. This approach helps to ensure customer satisfaction and create a positive buying experience.
- More traffic to your site – A copywriter’s skills can come in handy when it comes to creating content for search engines or social media. They can help you attract more customers to your store and increase your online presence.
- Enhanced efficiency of marketing techniques – Newsletters are an essential tool for achieving excellent copywriting results. By developing a comprehensive strategy that includes both the content and subject line of the email, you can significantly increase the open rates and clicks. This is a great way to keep your target audience engaged and interested in your content.
- Success in launch strategies – When it comes to introducing a product to the market, a copywriter is an essential part of the team and their expertise cannot be overlooked. They bring numerous techniques to the table that are indispensable in making a product launch successful.
- More sales – It’s probably obvious, but landing pages that are crafted by a skilled copywriter usually lead to more conversions. For optimal outcomes, it’s best to have both a copywriter and a graphic designer working together on the project.
The benefits of using WooCommerce to sell writing services online
Before we dive into the advantages of creating your own WordPress site using WooCommerce, we must first consider the other options available. Let’s explore the alternatives together.
Advantages and disadvantages of Upwork and Fiverr
It’s common for copywriters to kickstart their business on platforms like Upwork and Fiverr, and it’s not hard to see why. These platforms have a vast network of both customers and freelancers, making it simpler to search for work opportunities or professionals for your project.
In the beginning stages of a copywriter’s career, it’s crucial to use platforms to gain exposure since they may not have an established customer base or website traffic. Yet, with time, these platforms can interfere with professional success due to two main reasons.
To begin with, it’s common for a portion of the copywriter’s income to be deducted by the platform (sometimes the employer also has to contribute), and this amount can be quite substantial.
For instance, Upwork used to take a 20% cut from the earnings of their freelancers, but this percentage decreased as the contract became more lucrative. However, they have now changed their fee structure and charge a flat fee of 10%.
This percentage has a significant influence on the copywriters’ work. It not only affects their earnings but also prompts them to charge more than usual to make up for the losses, which ultimately makes them less competitive in the market.
It is crucial to keep in mind the competition while applying for a copywriting job. It is quite common to come across numerous applications from other candidates competing for the same position.
Many experts in the field choose to create their own businesses by launching their own WooCommerce websites once they have established a loyal target audience.
Advantages and disadvantages of WooCommerce
When it comes to drawbacks, it’s important to mention that creating your own platform may require a significant investment of both time and money. But don’t worry, there is good news to balance it out:
- Time – WooCommerce, a user-friendly CMS, offers the convenience of importing site settings using various themes. This means you won’t have to fuss over site customization and can focus solely on creating content. With this platform, you can have your site up and running in as little as a week.
- Cost – WooCommerce is a cost-effective WordPress plugin, which is available for free. You’ll only need to invest in hosting services, which can be easily found at a low cost with top-quality solutions listed in our dedicated hosting article. Additionally, you may need to purchase some plugins, but don’t worry, we’ll cover one of them in this guide.
While there are a few downsides, it’s crucial not to overlook the benefits — among them being:
- Better authority – Having a website that contains all the pertinent information about your business is an important aspect that distinguishes you from others, from a customer’s perspective. It’s a key factor that can give you an edge over competitors.
- Search engine indexation – If you have writing skills, you can use them to enhance the performance of your website. Each sales page and article on your blog can be used to increase organic traffic, which in turn can attract potential customers to your site.
- No fees – As the owner of the website, you can now keep all of your earnings without paying any commissions.
- Work automation – Sometimes, when you need copywriting services, it can be frustrating to have to go through consultations and back-and-forth communications that can cause delays or even turn potential customers away. But there is a solution! By using a plugin, you can automate the entire process of acquiring new customers, making things much easier and smoother for everyone involved.
Creating and organizing your writing services
We suggest using WooCommerce to create your eCommerce store. It’s crucial for your business to receive online payments, and WooCommerce makes it possible. Besides that, the platform comes with a plugin that automates the entire process on how to sell services. It’s a convenient and easy-to-use option for your online store.
Typically, customers would request a quote from you and you would then provide your pricing schedule for mutual agreement. However, if you have a clear understanding of all the factors that could impact the final price, you can use the WooCommerce Product Add-Ons & Extra Options plugin to automate the process.
Let’s see how.
Step 0 – WooCommerce installation
We won’t dive deep into the initial setup of WooCommerce, but if you’re unsure of where to begin, we suggest checking out the “How to create an eCommerce store on WordPress with WooCommerce” article for guidance. It’s a great resource to get you started!
In that article, we cover everything you need to know about WooCommerce, including how to set up your own online store with just a few clicks. We walk you through the initial installation process, guide you through the setup, and show you how to create your products.
If you’re looking to create a product or service with options, just remember that using the Product Add-ons plugin is a breeze once you get the hang of it.
Step 1 – Options identification
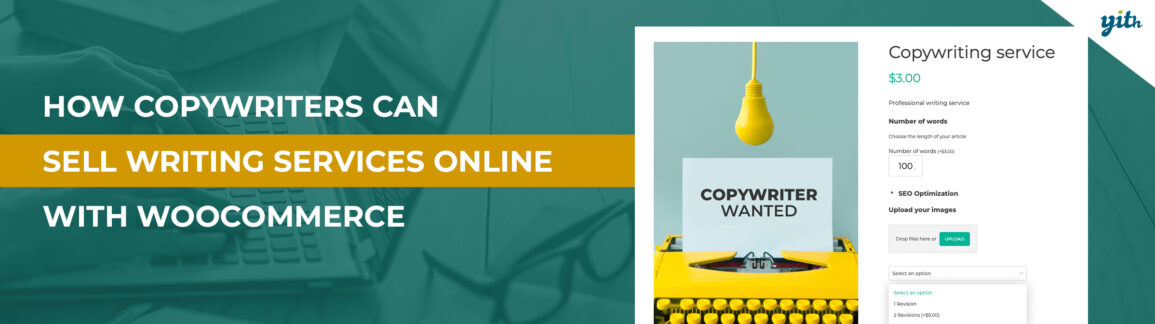
The plugin we’ll look into can help you personalize a product such as a “Copywriting Service.” With the help of additional fields, your customers can select all the specifications they want and see the updated price without requesting a quote from you.
It’s wise to consider which aspects are important to the customer and which factors may impact the cost of the service.
In the field of copywriting, some of these options are:
- Number of words – As a general rule, the length of a piece of writing directly affects the amount of time needed to complete it. That’s why many copywriters request a per-word rate — it’s a fair way to account for the extra effort that goes into longer texts.
- SEO – When it comes to creating content, different techniques and skills are required depending on whether it is a free-flowing piece or one that needs to adhere to SEO guidelines, such as including keywords, maintaining word density, or using specific tools. These variations can affect the time it takes to produce the text and the expertise needed to do so effectively.
- Images – Sometimes, finding suitable images that can be used without any restriction in the article can take a lot of time. In such cases, an extra fee may be charged to cover the cost of using those images.
- Revisions – As a copywriter, it’s our responsibility to provide error-free and polished content to our customers. However, there might be instances where customers request multiple revisions, which can extend the project duration. In such cases, we can offer a certain number of revisions as a standard part of our service, and customers can also opt to purchase additional revisions separately.
- Deadline – When it comes to work, a commonly heard saying is that you can only have two out of three things: quality, low price, or promptness. If you need something done quickly, it’s understandable that it might cost a bit more. To make things easier for everyone, it’s always a good idea to let customers decide when they want their work delivered so that you can better manage your workload.
- Blog posting – You’ll note it’s quite common for your customers to have WordPress or similar CMS-based websites, and sometimes they may want you, as a copywriter, to take charge of the publishing process. As this is an additional service, you can charge a fee for it.
- Customer information – Remember to include a section for customers to share their contact details, such as e-mail or phone number, so that the finished work can be delivered to them.
Although there may be additional factors to consider, the ones mentioned are the most frequent. Once you become an expert in creating and inputting them, you’ll be able to effortlessly generate all the required fields.
To continue with the next step, make sure to install the WooCommerce Product Add-Ons & Extra Options plugin.
Step 2 – Product creation and customization
Let’s start by creating a simple product. To do this go to your dashboard > Products > Add New:
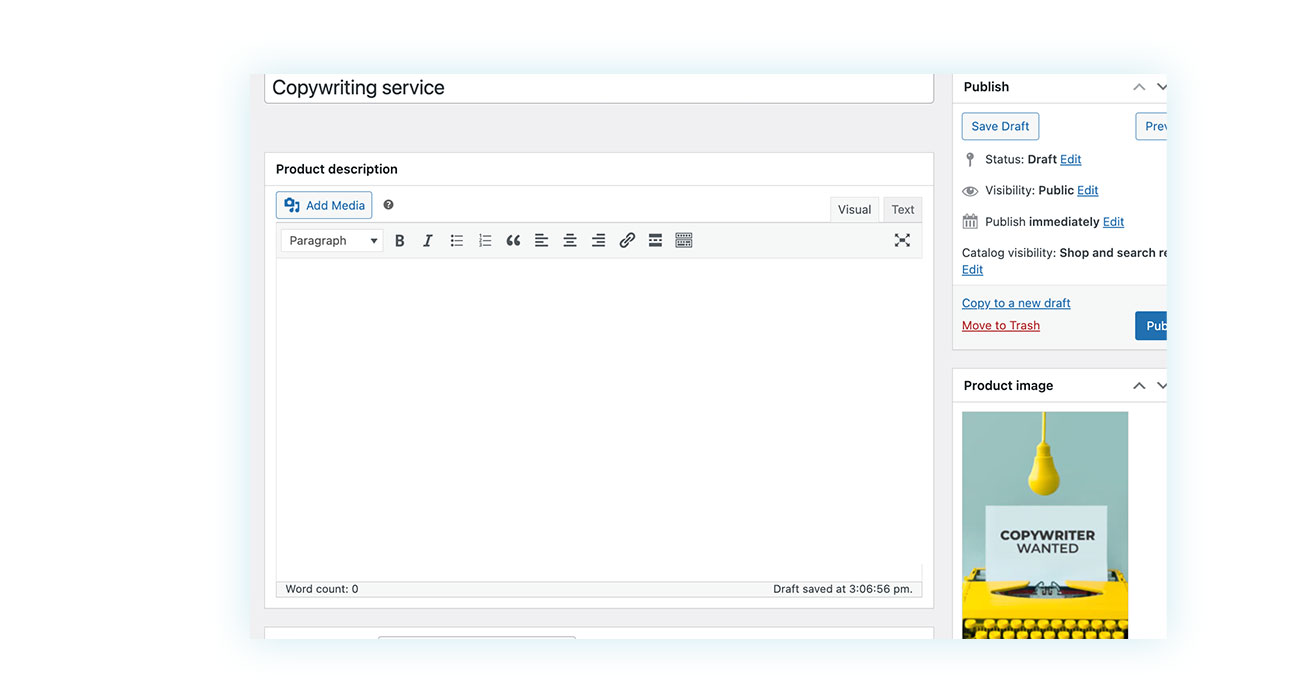
When creating something, whether it’s a product or a piece of content, there are certain elements that need to be included like an image, a name, a description, and the cost. Remember that you can add other costs like the number of words in subsequent fields, so you don’t necessarily have to set a fixed cost — just enter 0 (zero) as the regular price if that’s the case.
After saving the product, head over to YITH > Product Add-ons & Extra Options. Once there, you’ll see the “Options blocks” tab that contains all the blocks with additional fields that you can assign to one or multiple products.
In this case, we will click on “Add block”:
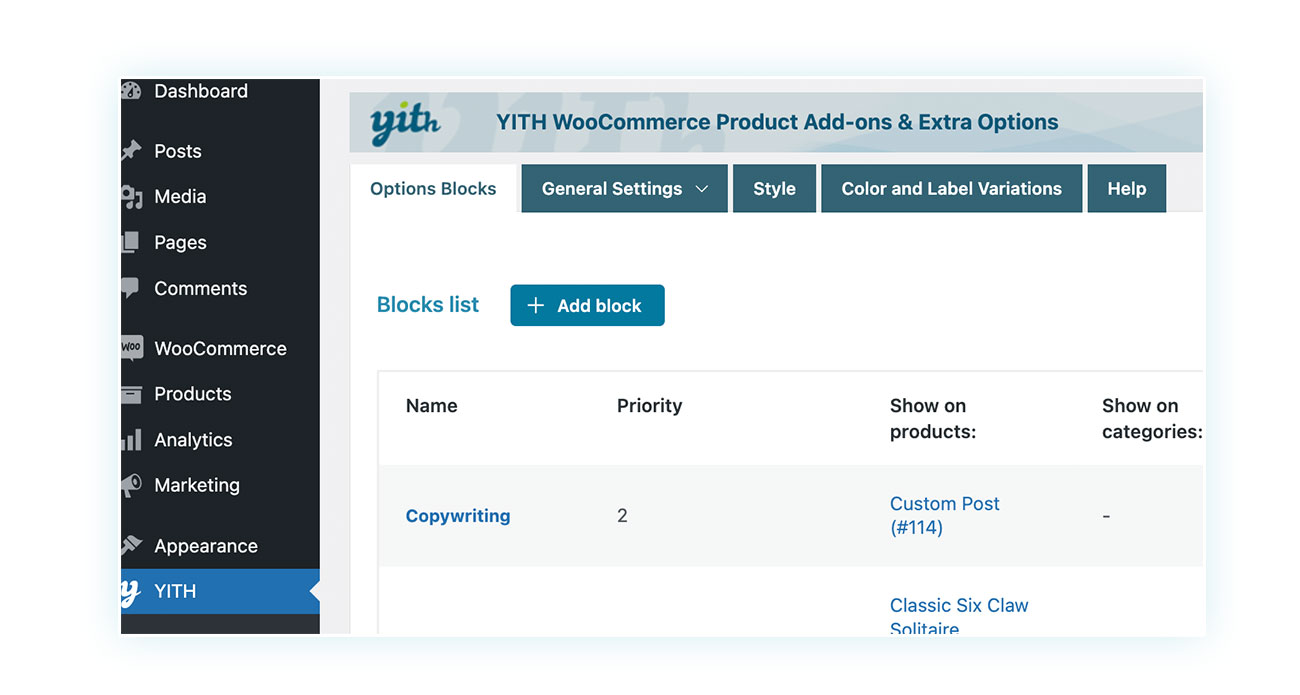
As soon as you start creating the block, you’ll have to make several choices like deciding the block’s name, its priority level, the products it will be displayed on, and the users that will be able to see it:
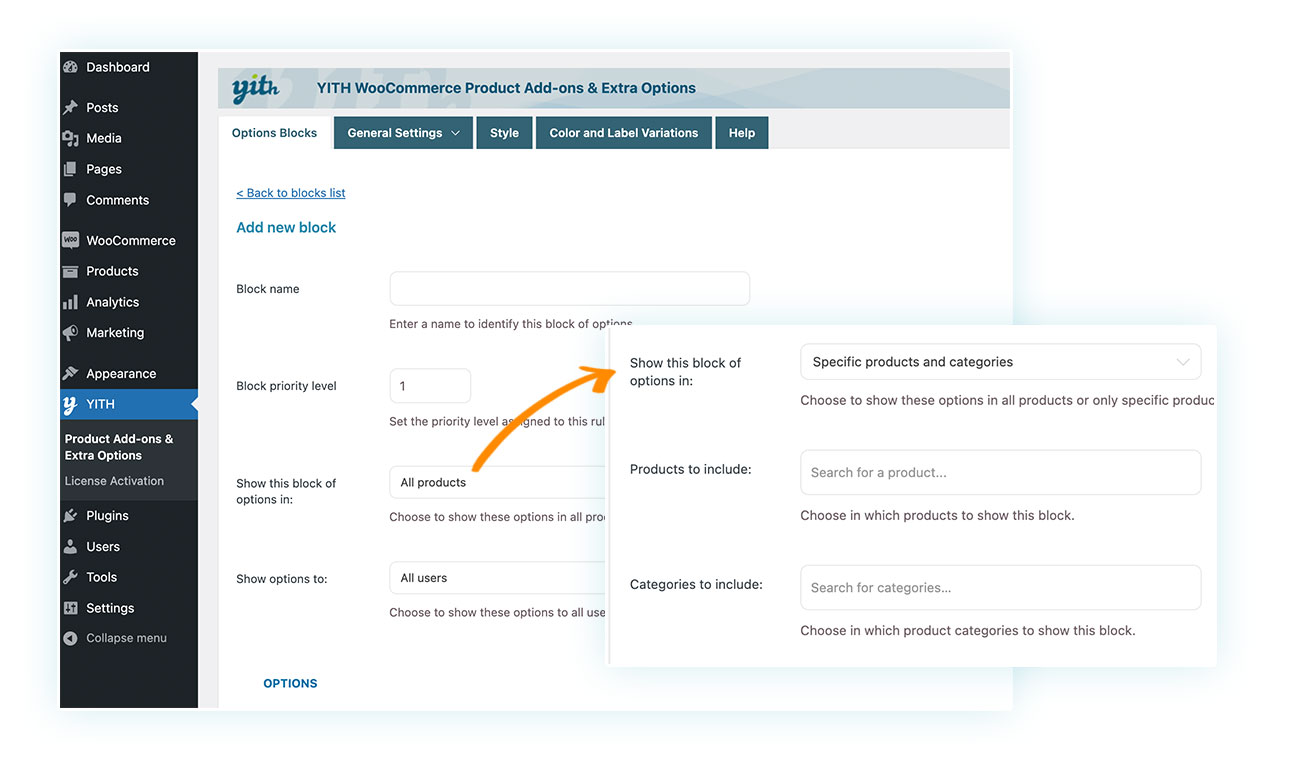
For this particular situation, we’ll name the block “Copywriting” (this is just for your own reference, so you can differentiate it from any future blocks you create).
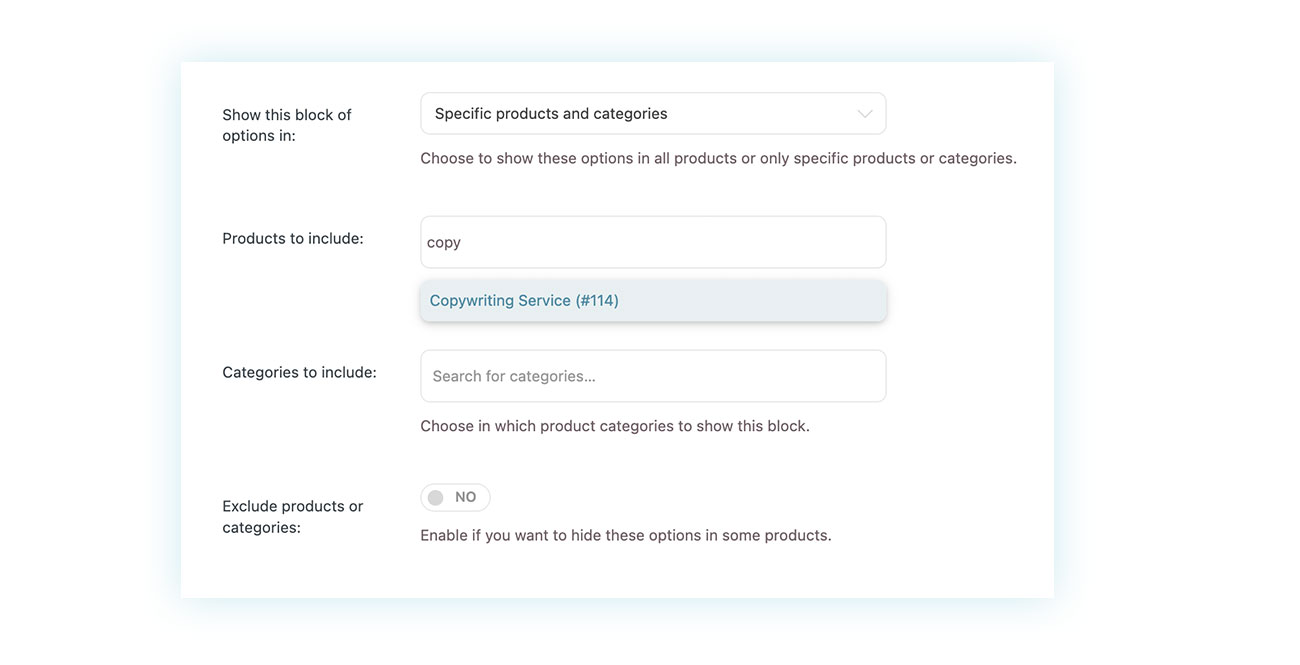
Next, we’ll choose the product where we want to display the fields. For this example, we’ll select the product we created earlier, “Copywriting Service”:
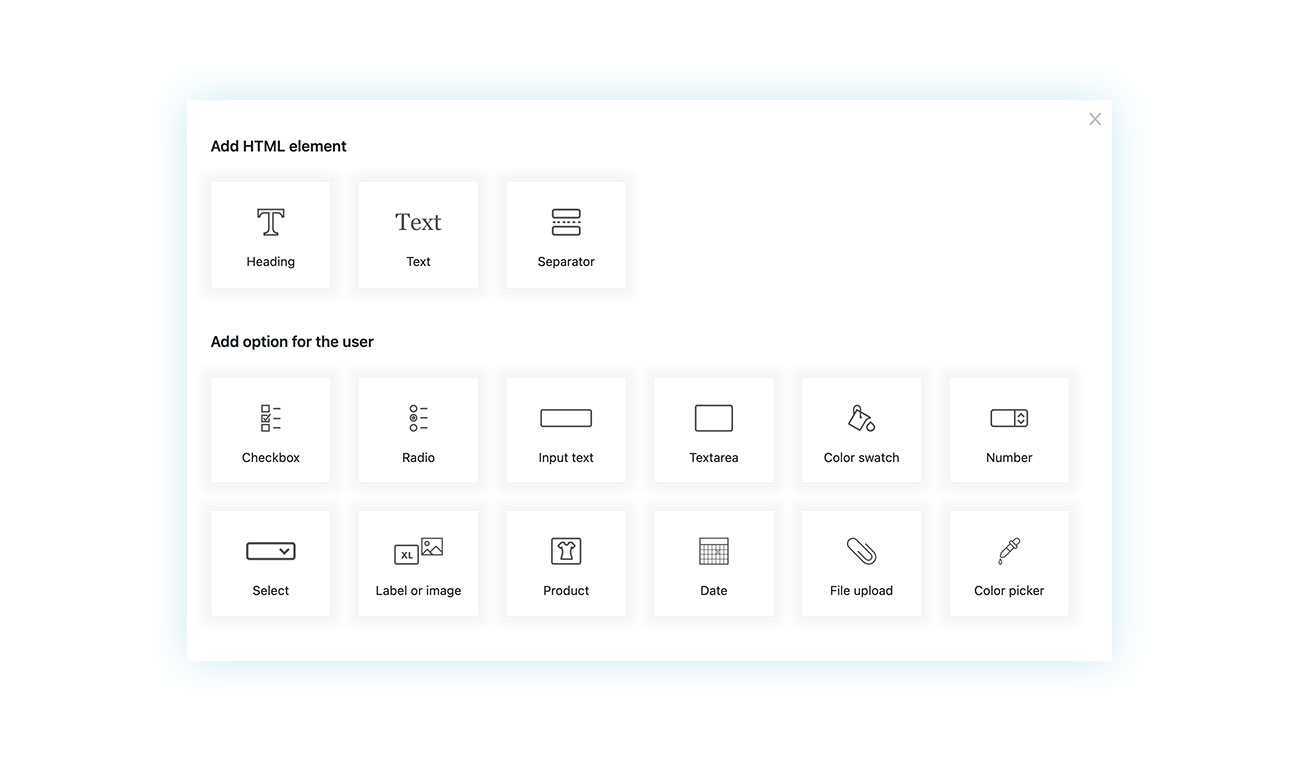
After selecting the product, you can proceed to create the options. You’ll notice that there are multiple choices available:
- Checkbox – Create one or more fields that can be enabled or disabled by customers.
- Radio – Display multiple fields and let customers choose the one that suits them best.
- Input text – Give customers the possibility to add a short text (like their e-mail).
- Textarea – Allow customers to add longer and more detailed text.
- Color swatch – Give customers the possibility to choose the color (not in this case, but in other customizable products it is an essential option).
- Number – Allow customers to enter a numeric value.
- Select – Allow customers to choose from several options in a drop-down menu.
- Label or image – Show customers a field with an image (as in the case of clothing patterns).
- Product – Add as an option one or more products that are already available to purchase in your shop.
- Date – Allow customers to select any specific date from the calendar.
- File upload – Allow customers to upload files in a user-friendly manner.
- Color picker – Offer customers a color selection tool.
After listing out the options, we can proceed to create the necessary choices for our copywriting service. The first and foremost important option we need to focus on is the word count.
Number of words
For this, you simply need to choose the “Number” add-on and then configure it according to your needs:
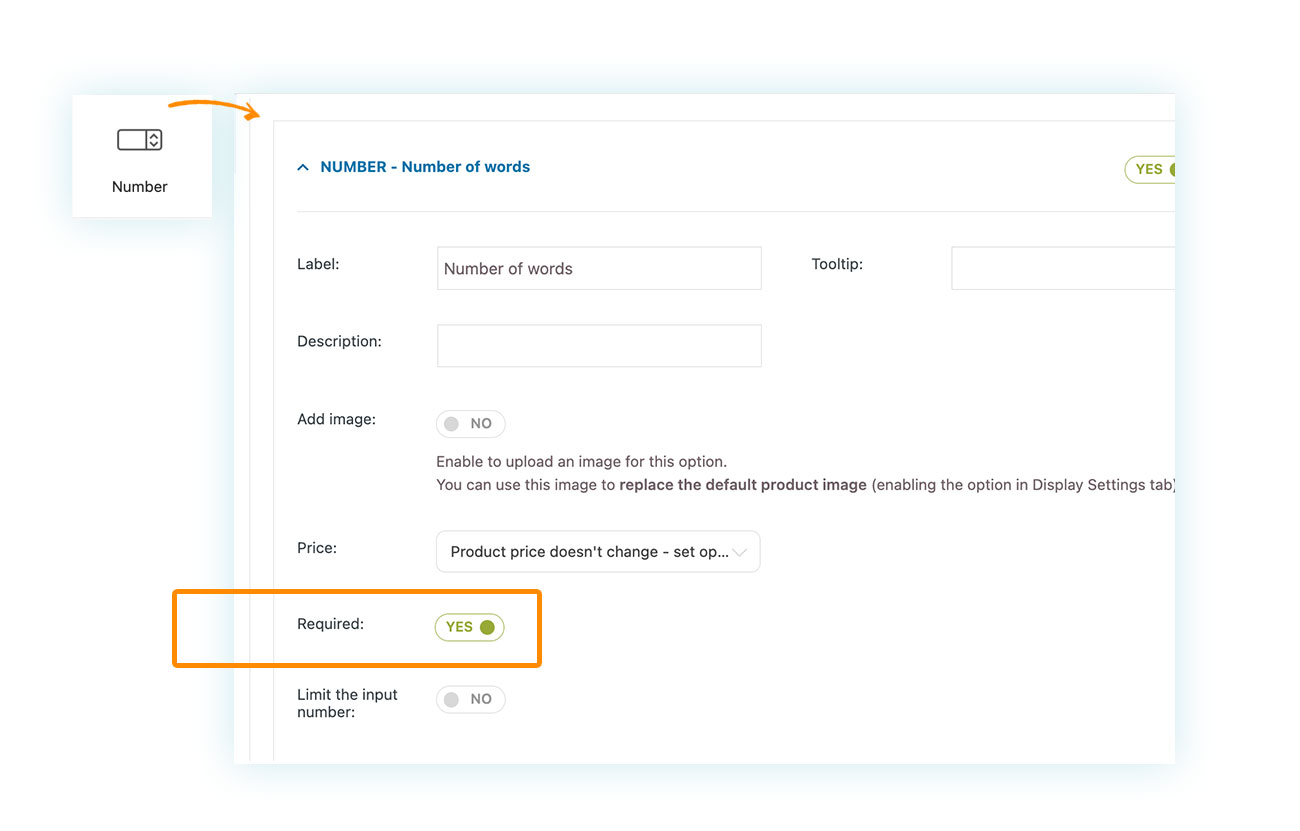
It is possible to assign a specific cost to a set amount of work, like 1,000 words, but it’s usually better to allow customers the flexibility to improve their conversions as they see fit. This way, they have more control over the outcome and can make adjustments as needed.
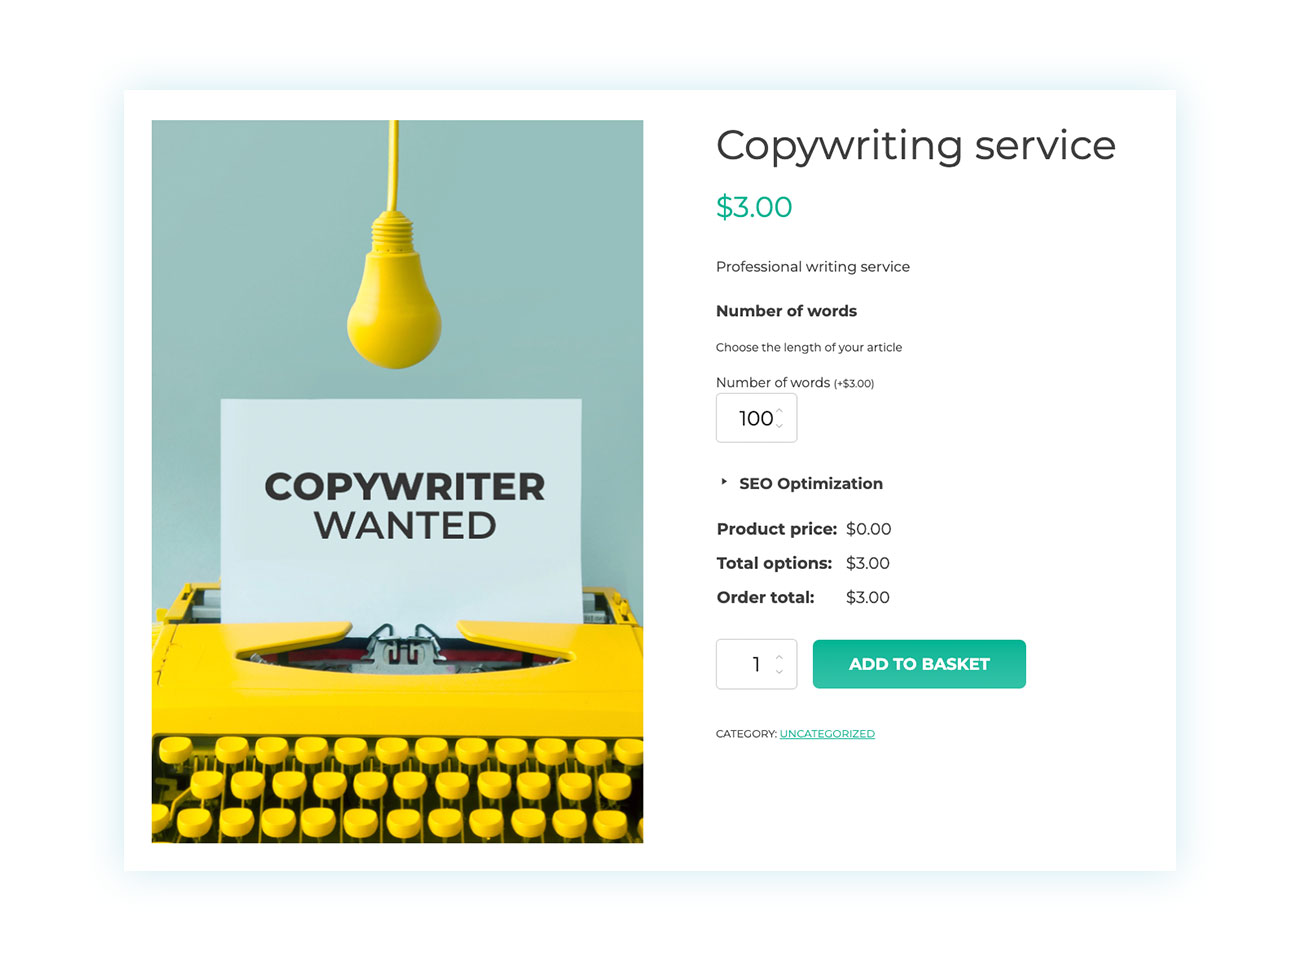
In the example provided, the cost for the copywriting service is 3 cents per word for the customer. To clarify, we will set:
- Price: Increase the main product price
- Option cost: 0.03 – Price multiplied by value
And we will enable the “Required” option because this is crucial information to complete the task successfully. The options will be presented to customers like this:
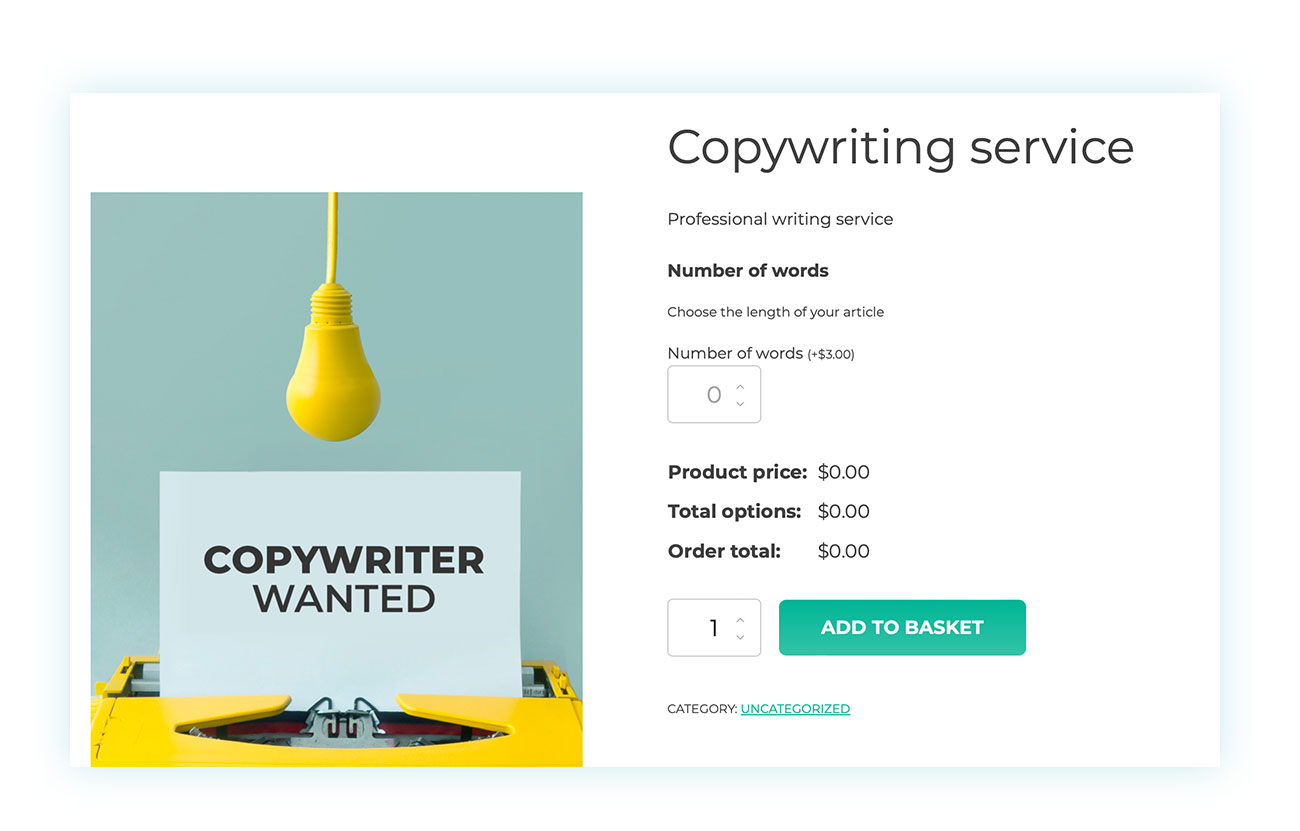
At the moment, there is no fixed cost set for the product, so the order total is $0. However, once the customer enters the number of words, the total amount will automatically update accordingly:
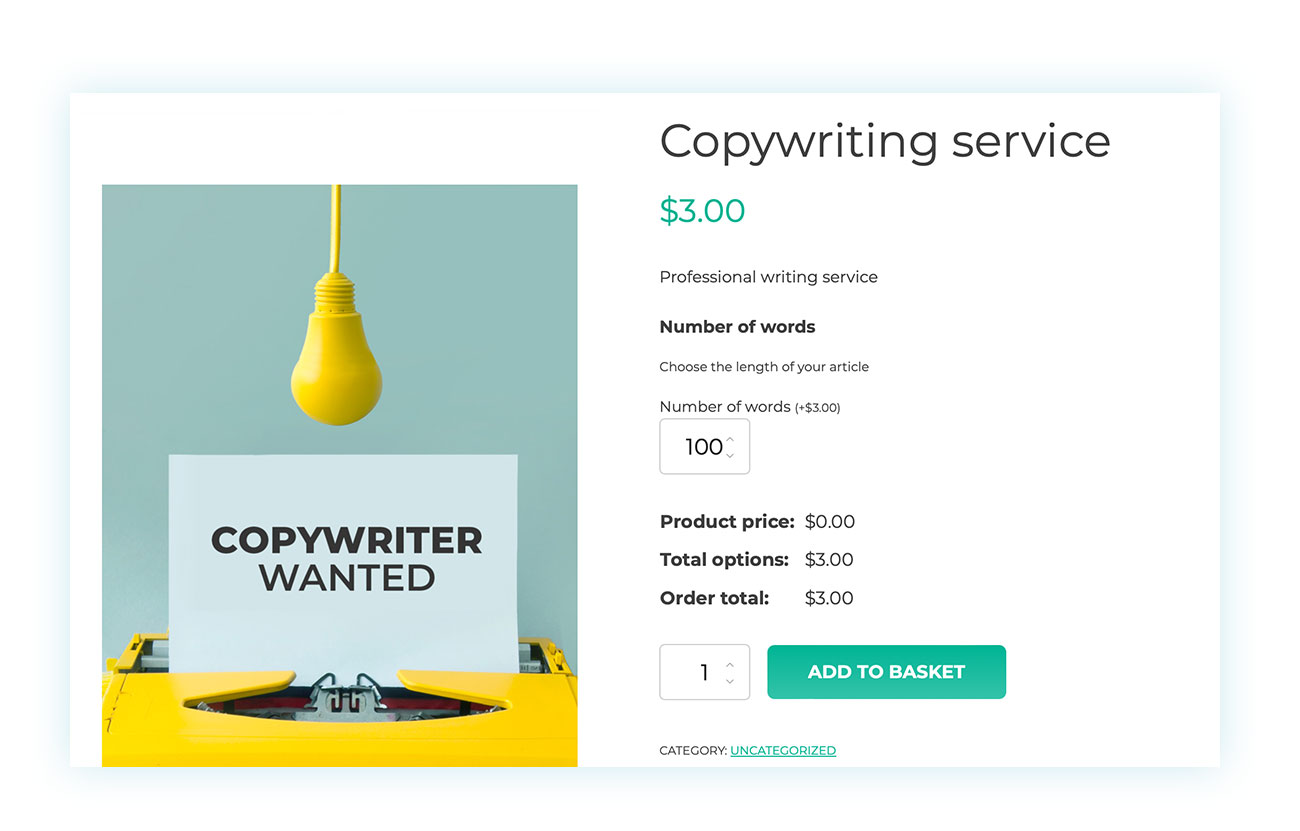
Within seconds, we were able to create the first option.
SEO OPTIONS
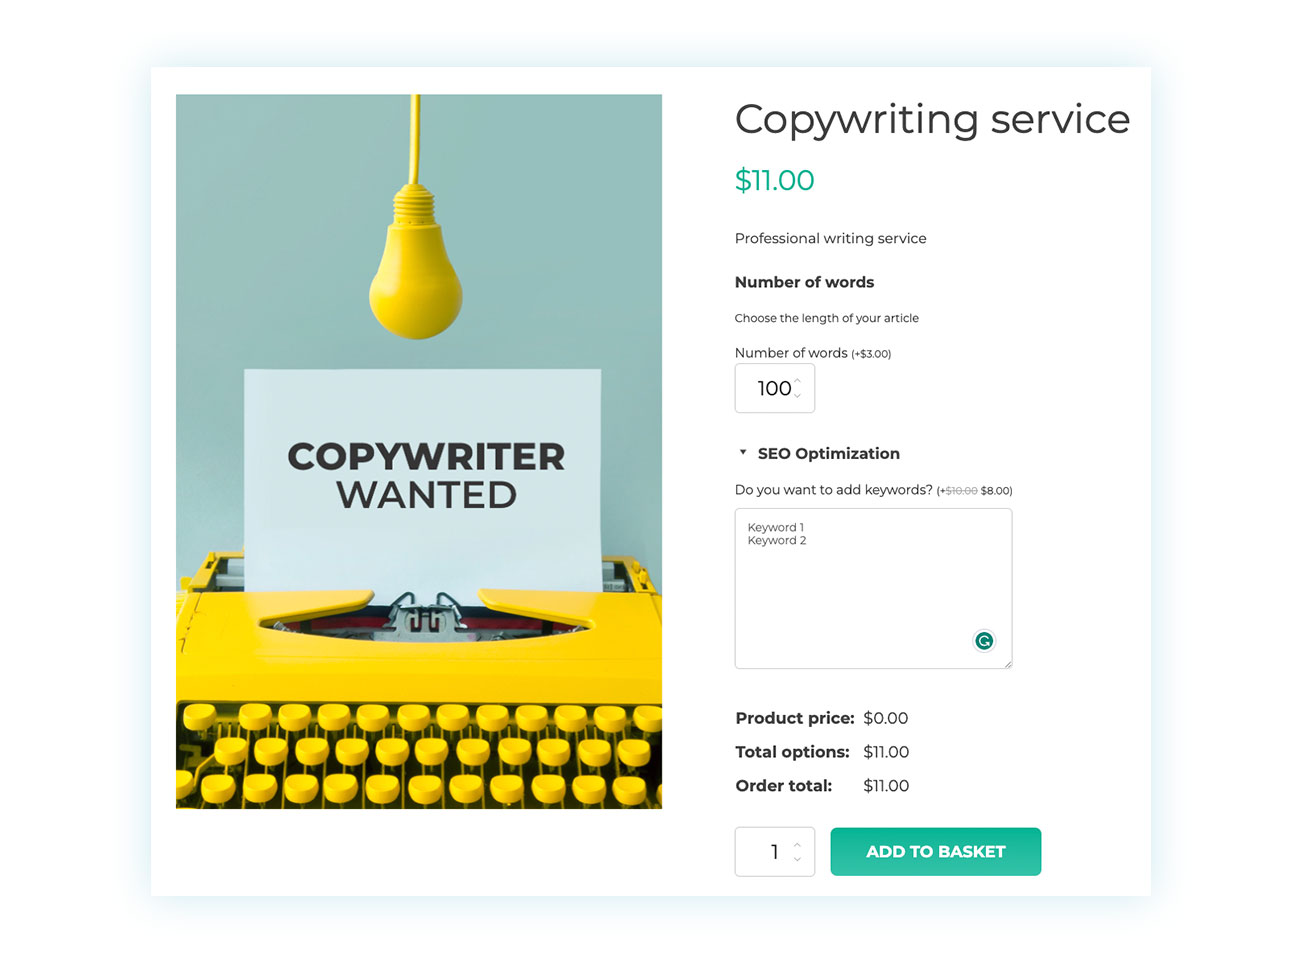
As we discussed earlier, it’s crucial to focus on SEO while creating content. Therefore, providing your customers with the ability to include specific keywords in the text could be a great idea. To achieve this, you can use the “Textarea” add-on and customize it according to your needs:

We have added a small activation fee of $10 to this option, it comes with a text field that is shown when a customer chooses to include it in their order.
If you want to achieve this, just head over to the “Display Settings” section and set “Yes, with toggle closed by default” in the “Show as toggle” option.
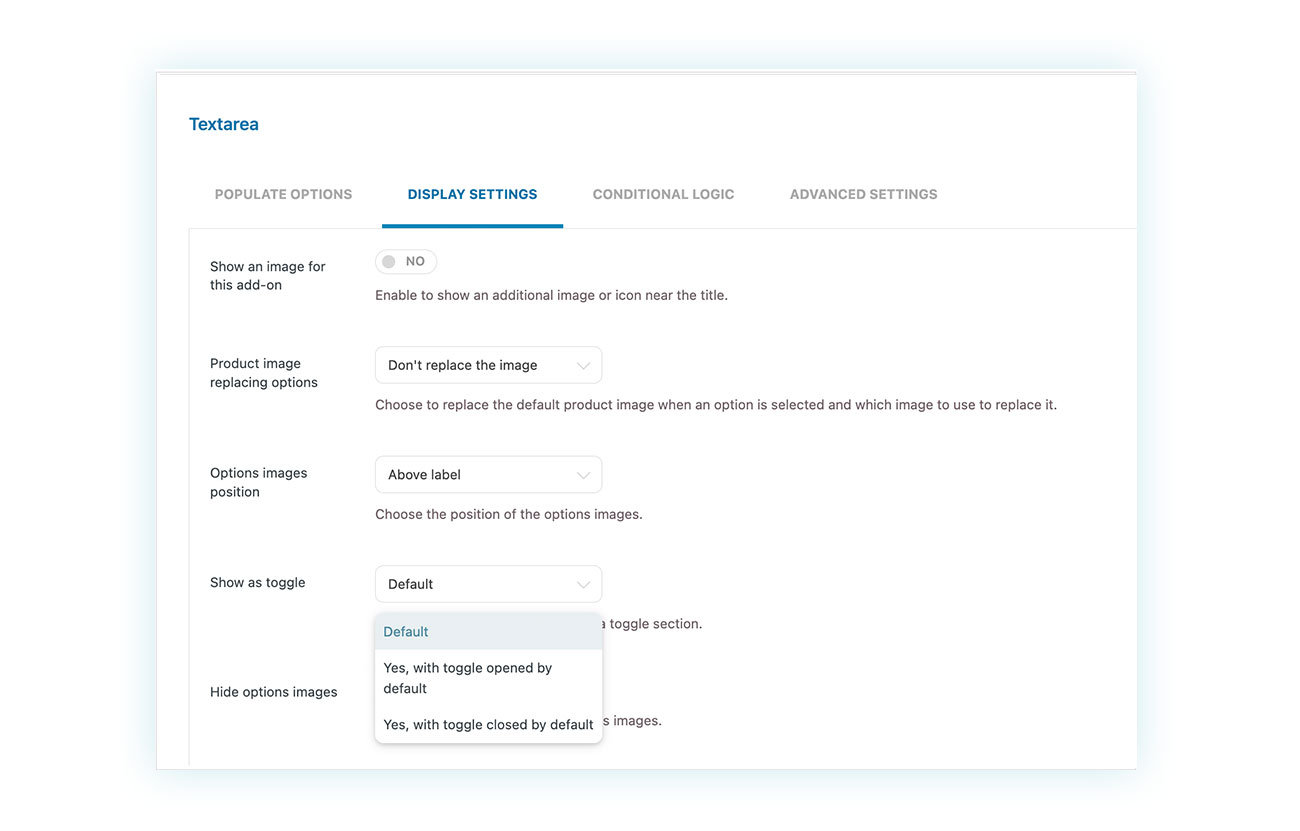
This way, customers will see the option like this:
To add the cost and open the text entry field, customers just need to click on “SEO Optimization”:
You can use the same section to ask for contact details, which would be free and required, and also to offer to post blogs for a fee, where customers would be able to add login credentials if they want to.
Inserting images in the article
What’s the best way to give customers the option to add images as an extra service? We have two options to consider:
- We provide customers with the option to browse through a collection of stock images and include them in their articles for a nominal fee.
- We offer a free service where our customers can easily upload their own images directly while placing their orders without any hassle.
Let’s see how we can do both.
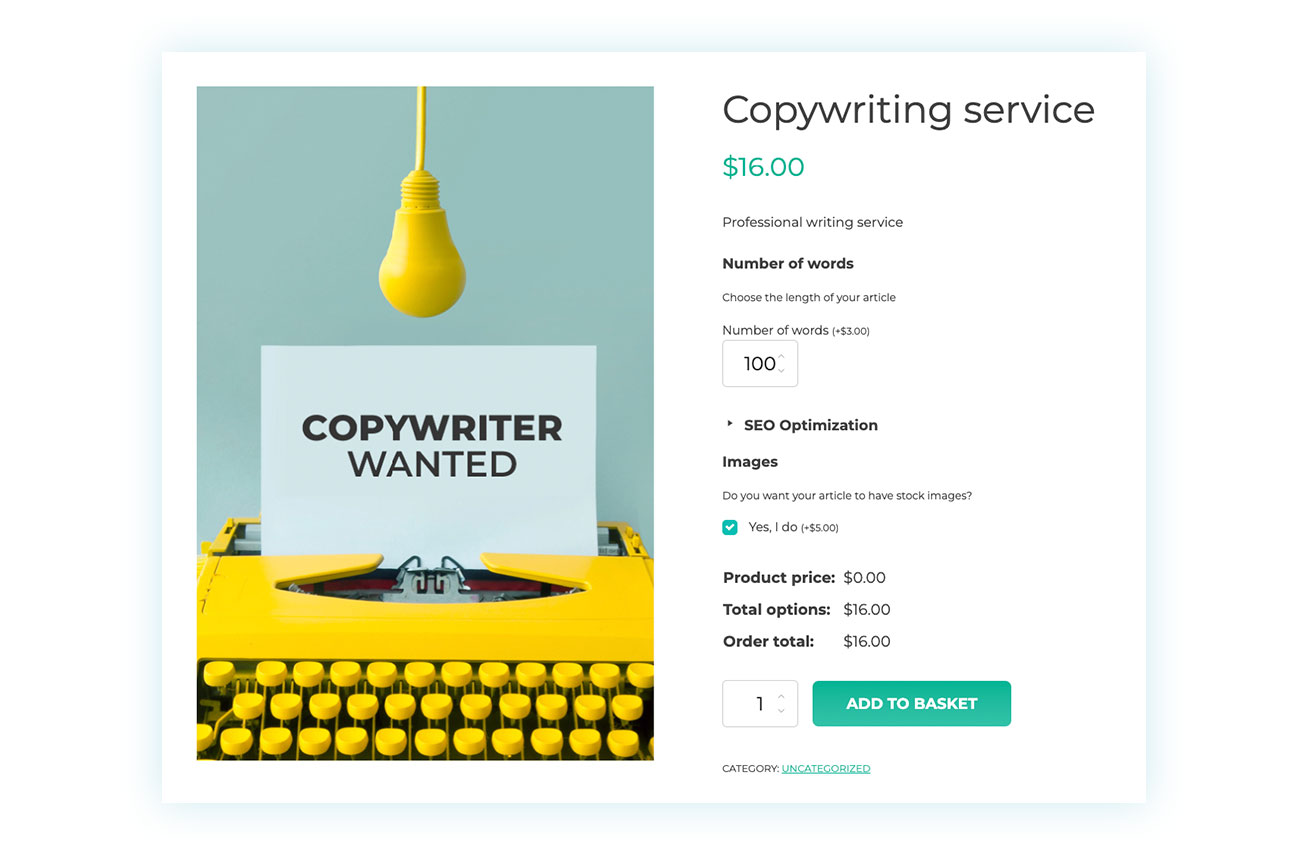
To begin with, we’ll provide customers with a “Checkbox” add-on that they can check if they want the additional service. After that, we’ll set the price and the option will appear like this:
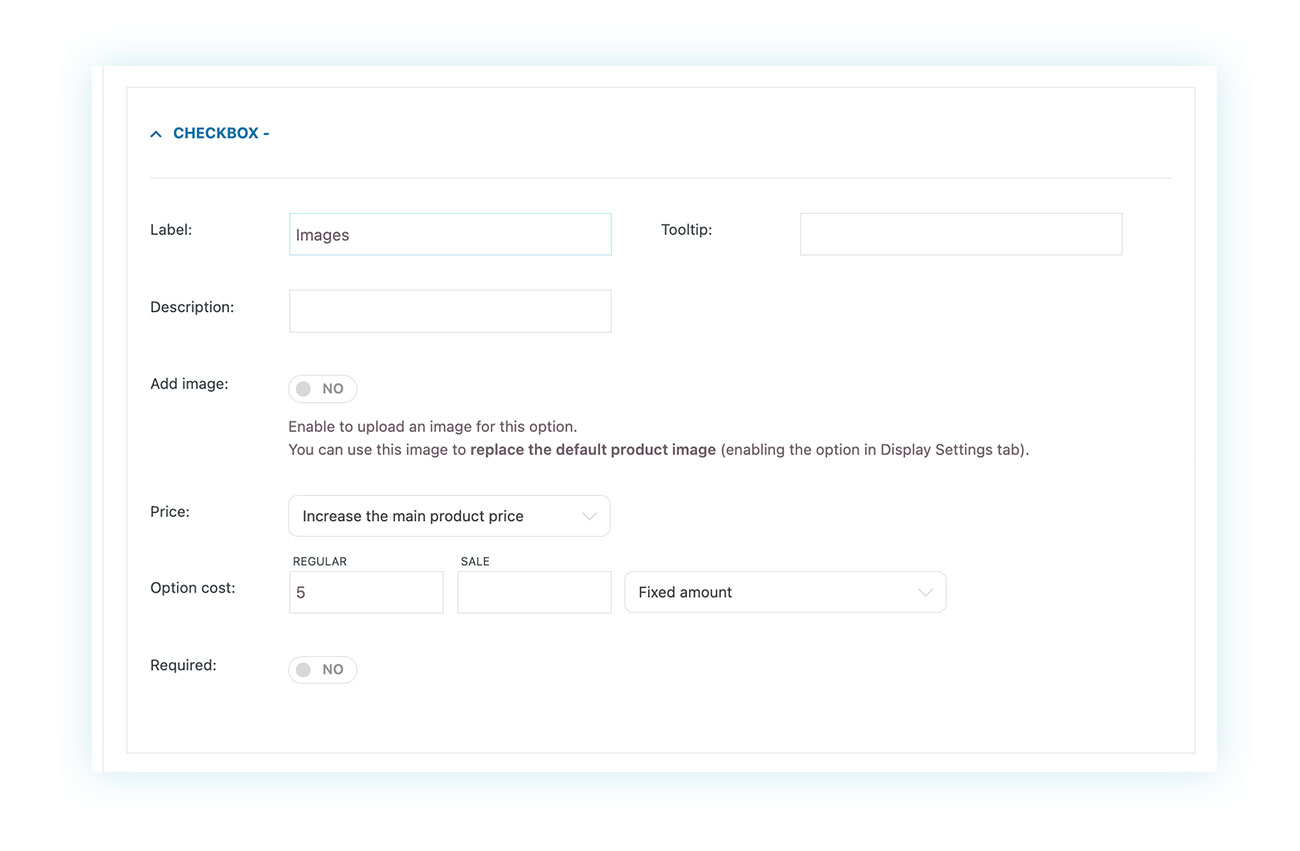
Customers will therefore see it in this way:
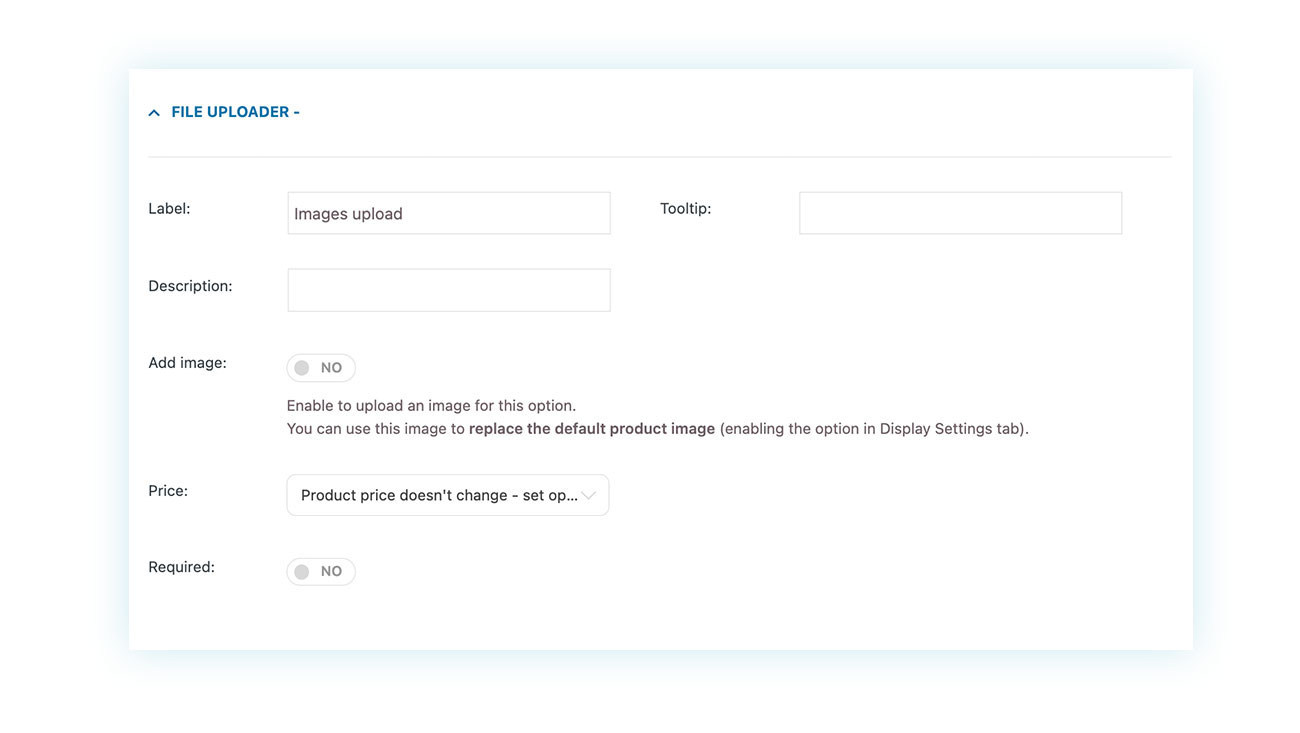
In case you wish to allow customers to upload their own pictures, you must choose the “File upload” add-on and make it free of cost (unless you want to charge for this feature too):
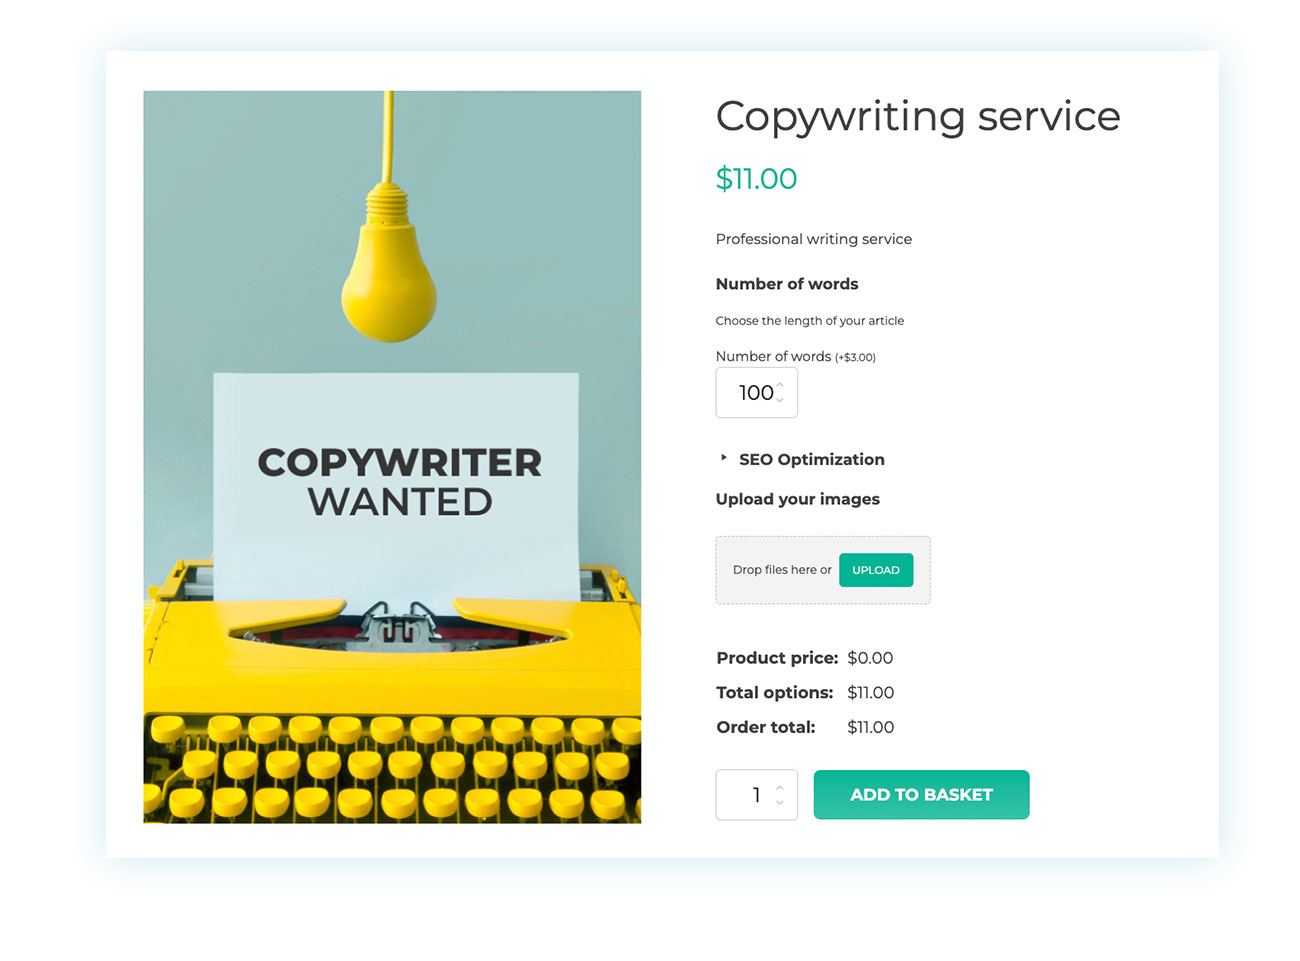
The option will be displayed to customers in the following way:
Standard and additional revisions
Moving on to our variables, let’s talk about revisions. In our example, we’re giving one revision free of charge and then charging a fee for any additional revisions. To set this up, we’ll choose the “Select Item” add-on and create multiple options:
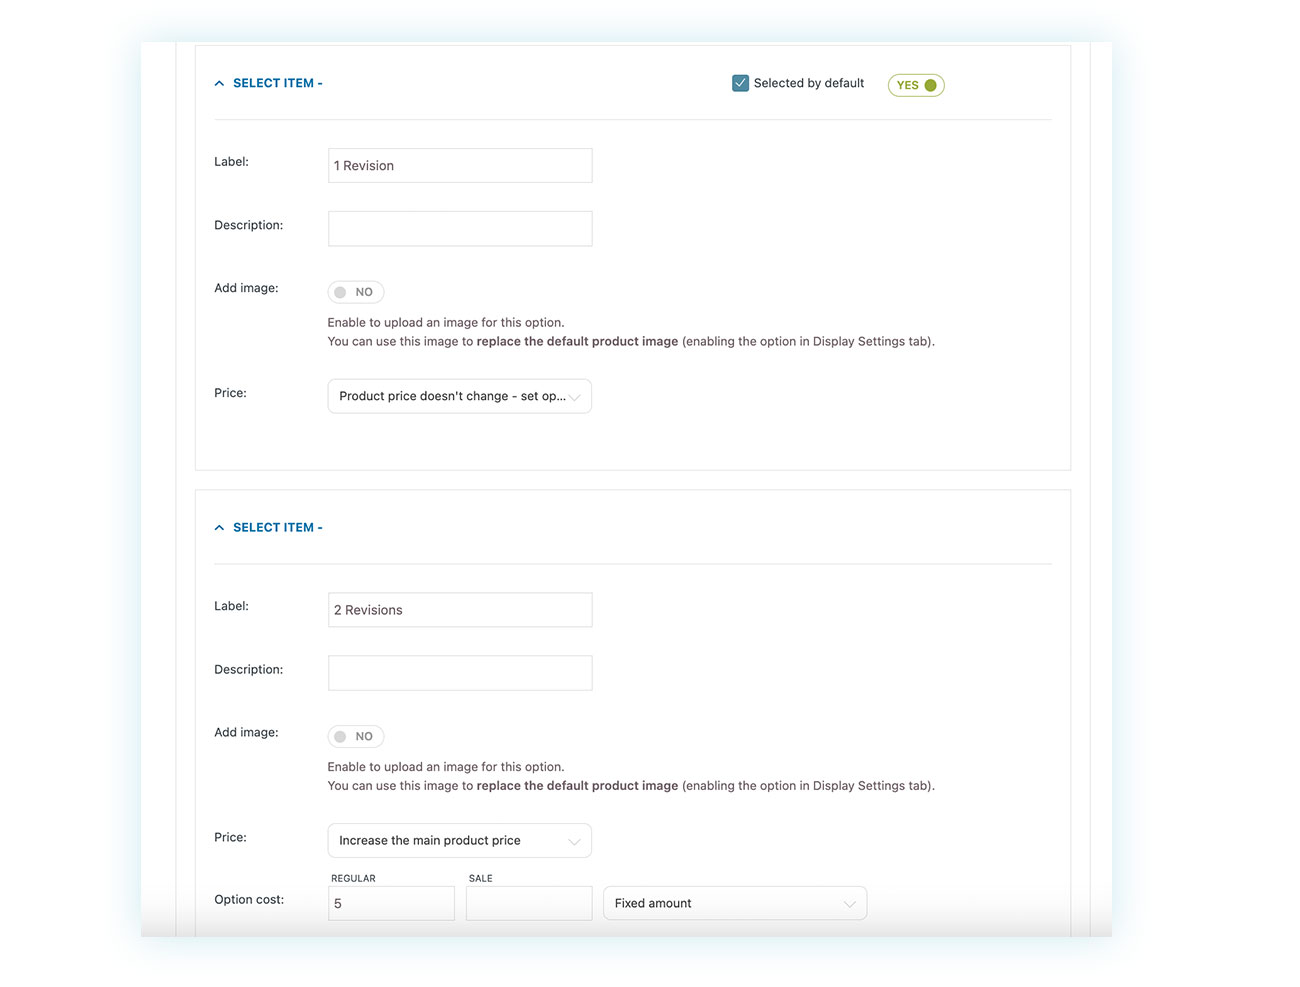
To ensure customer satisfaction, we decided to offer the first revision for free (the price remains the same). For any additional revisions, we do charge a fee. We also made sure to check the “Selected by default” option at the top recommending the free option to prevent any negative feedback from customers.
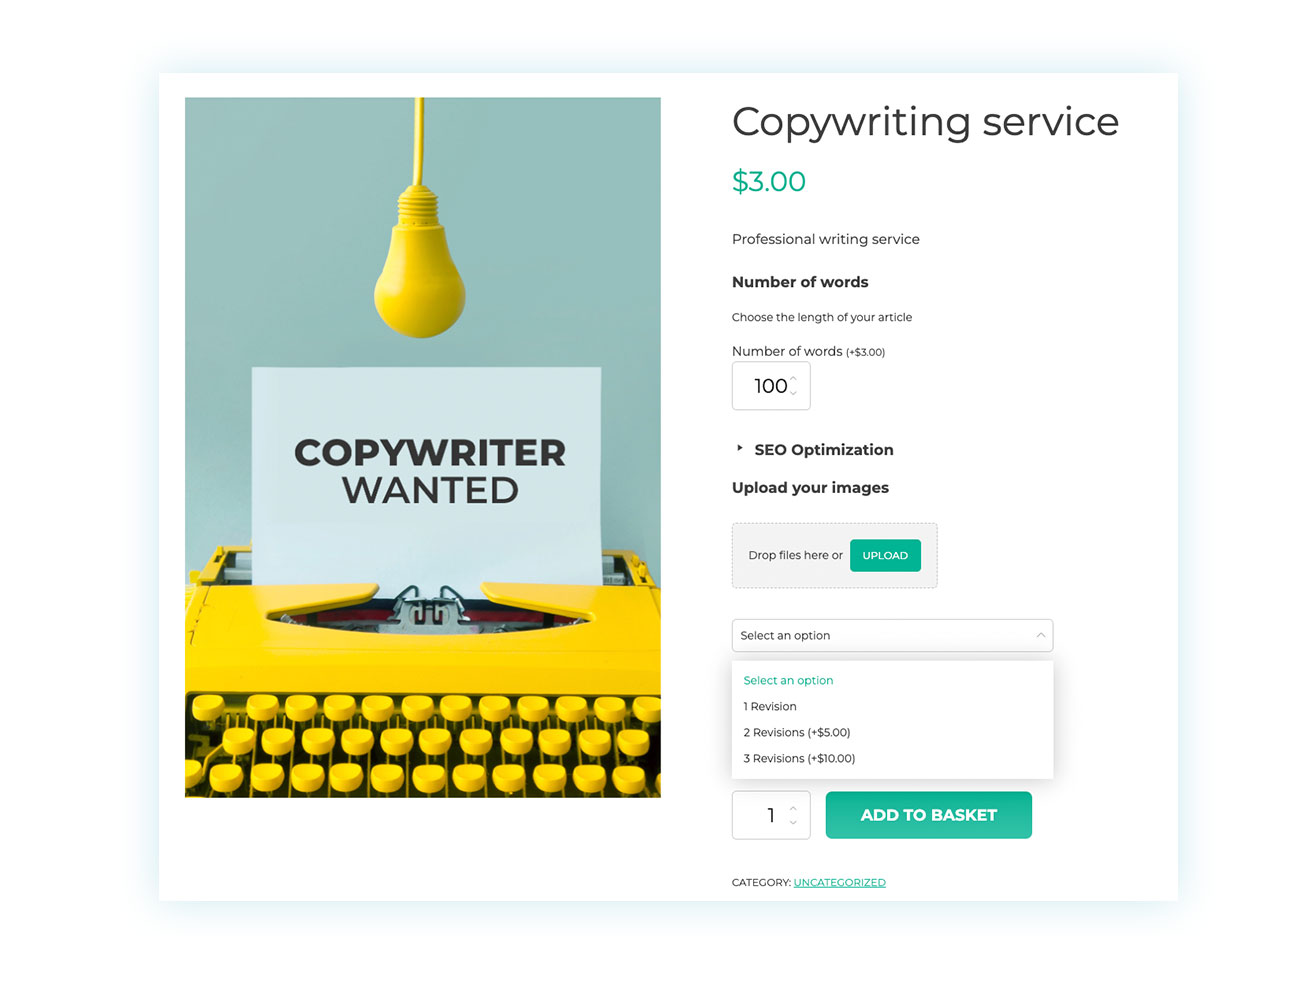
Here’s how it will all look in your eCommerce store:
DELIVERY DATE
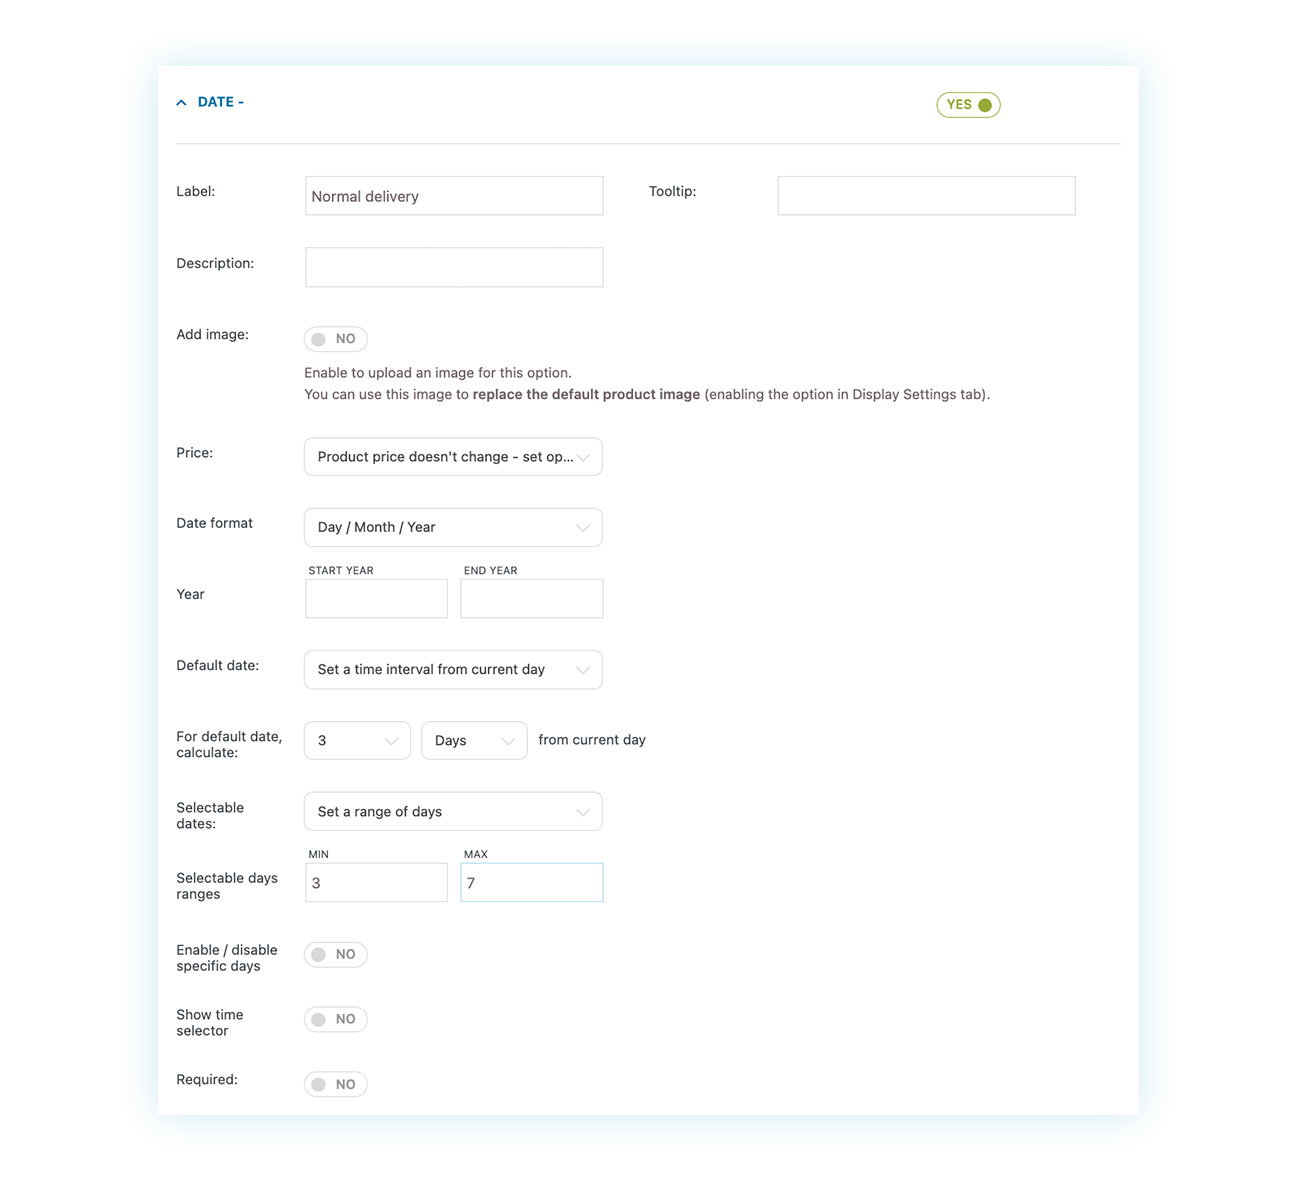
It’s important that we keep in mind the delivery date, as we discussed earlier. Usually, quicker deliveries come at a greater price. That’s why we’ll be offering two delivery options – a normal one that takes 3 to 7 days, and a priority one that takes only 1 day.
When it comes to delivery, we’ll be using the “Date” feature in both scenarios. Our plan is to establish a standard date for normal delivery, while also offering customers the choice of selecting a day within a 3 to 7-day window. Additionally, we can specify the delivery date if the customer doesn’t select a specific one.
This feature will be available at no cost and its configuration will be displayed as follows:
If customers choose priority delivery, we will let them know about the extra charge (which in this case is $10) and arrange delivery within a day:
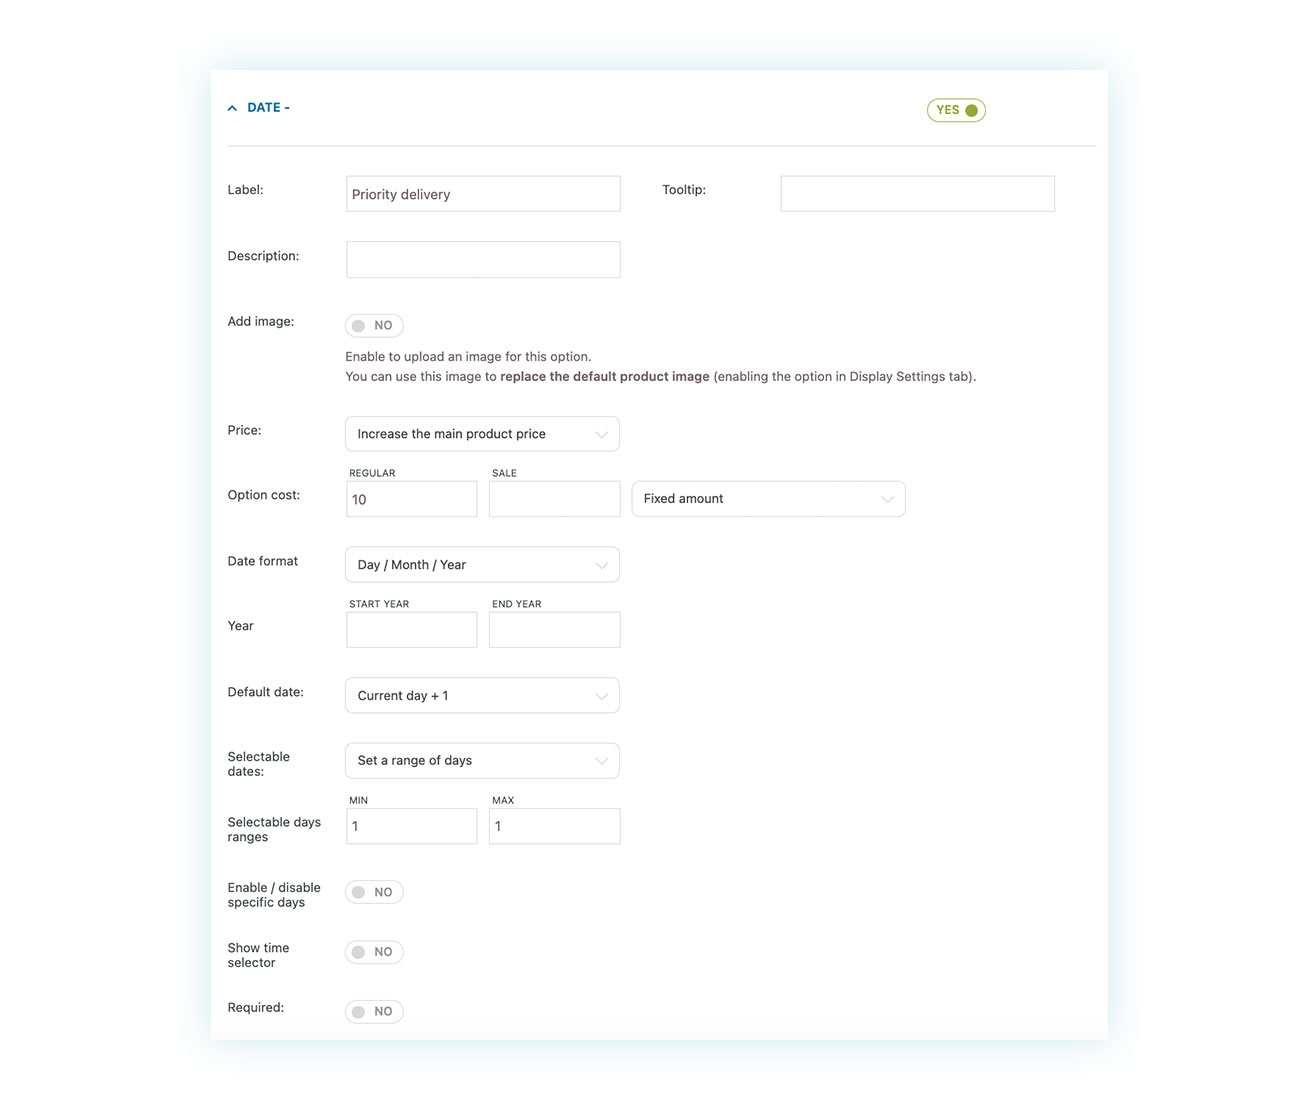
This is how it will be displayed on your eCommerce store:

Now that you know how to set up all these different options, you can go and try them out. You can try using a checkbox for priority delivery or explore all these options in innovative ways. It’s time to have some fun playing around with them!
Promote your business online with writing services
Once you have added the perfect customizable item to your store, make sure to use all your knowledge to boost your sales.
Luckily, WooCommerce offers a wide range of SEO resources and a blog that is easily searchable. The only thing left to do is to implement the strategies you learned during your training to establish a thriving business.
FAQ
Why should I use WooCommerce to sell my writing services online?
With WooCommerce, you can expand your customer base without any deductions from your earnings, unlike other online platforms. It is user-friendly and enables you to set up a full-fledged store in just a few days.
What pricing strategies can I use for my writing services?
Customers are often willing to pay for extra services, but it’s important not to push them too hard. By offering a reasonable delivery date and priority options, you can cater to those customers who need their orders urgently, while also retaining those who don’t want to pay extra.
Can I offer discounts or coupons to my customers with WooCommerce?
Certainly, WooCommerce offers an in-built coupon and discount code system. To maximize its impact, you can leverage the WooCommerce Coupon Email System plugin.
How to manage taxes and invoices in my WooCommerce shop?
The seller takes full control over tax management and it can be personalized to suit individual needs. To enhance customer experience, several sellers opt for plugins like WooCommerce PDF Invoices & Packing Slips to improve the billing process.
Is it possible to customize the look of my WooCommerce shop?
WooCommerce offers complete flexibility to sellers to personalize their eCommerce stores with a wide variety of themes.
What are the best WooCommerce plugins for copywriters?
Several plugins commonly used by marketers in other fields can also be useful in copywriting, but the most effective one is undoubtedly the WooCommerce Product Add-Ons & Extra Options plugin.