When we look at the eCommerce world, it is hard to overlook Amazon, the industry leader. People often attribute its success to the exceptional delivery system and the wide range of products it offers.
There’s no doubt that Amazon’s success is largely due to its multivendor nature, as is the case with other popular sites such as eBay and AliExpress.
This guide covers the fundamentals of marketplaces, the advantages of having such a system, and how to set it up by using just one plugin.
If you have already gone through our guide on creating an eCommerce website with WordPress and WooCommerce, then all you need to do is install an extra plugin to turn it into a marketplace.
Table of contents
- What is a multi-vendor marketplace?
- Differences between a classic store and a marketplace
- What are the features of a multi-vendor marketplace?
- Examples of online marketplaces
- Benefits of multi-vendor marketplaces
- Is WooCommerce a suitable system to create marketplaces?
- How to create a marketplace with WooCommerce
-
FAQ
- How to manage vendors in a store with multiple vendors?
- How do you manage sales and customer reviews in a multi-vendor store with WooCommerce?
- Does WooCommerce support a multi-vendor functionality?
- What's the best multi-vendor plugin for WooCommerce?
- How to manage a multi-vendor website?
- What are the next steps to promote and grow your multi-vendor marketplace in WooCommerce?
- Conclusion
What is a multi-vendor marketplace?
We can start by defining what a multi-vendor marketplace is: it’s essentially a platform that brings together many different sellers. So instead of being just one person that offers their products for sale, it’s one person that provides the website for others to list their products in it.
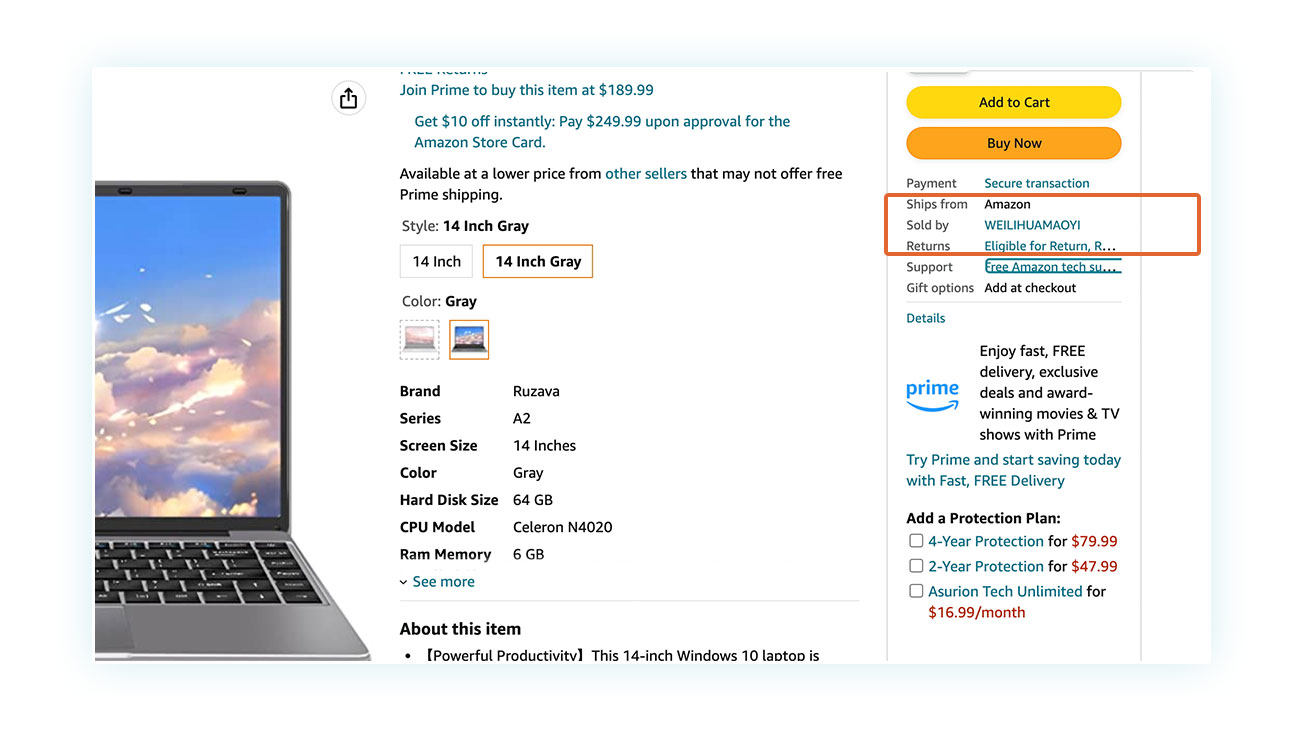
Amazon works like this: customers usually purchase items from third-party vendors rather than directly from Amazon. Amazon Basics is an exception, as these products are sold directly by the company.
Amazon facilitates the connection between buyers and sellers, and manages any conflicts that may come with a sale. Similarly, eBay is mainly dedicated to the exchange of second-hand goods and is driven by the actions of the vendors.
AliExpress operates in a similar manner: while there is just one website, the products listed for sale come from different vendors’ storage facilities.
It can be hard to grasp how effective marketplaces are as a sales tool, however, the figures provided by Forbes and Statista can serve to understand how powerful this model is: nearly half of all online sales (B2C) occur through marketplaces.
Customers showed a preference for this type of platform for both first and future purchases, confirming the confidence that online shoppers have in marketplaces.
Differences between a classic store and a marketplace
Even though we explained it earlier, there may still be some ambiguity as to what separates a classic eCommerce website from a multi-vendor marketplace.
If we think of a classic online store, it is usually managed by one person who owns all the products for sale. There may be someone else helping with the tasks, perhaps employees, but they do not have any products of their own for sale. In this situation, the owner’s profits come from the sales of the products, after the cost of the product and related costs are deducted.
You can think of a traditional physical store to make the comparison: the products on sale are owned by an individual or a business, not by the salespeople.
On the other hand, a marketplace is similar to a market: multiple sellers put up their products and deliver them. The owner’s revenue is a percentage taken from the other vendors’ sales. Therefore, there are no costs connected with the products or shipping, which are taken care of by the different vendors, the owner simply gets a small share of the selling cost.
Therefore, managing this type of eCommerce site is different than managing a typical one: instead of the owner having to handle sales, inventory, and delivery, in a marketplace, the owner essentially takes care of the sellers and guarantees effective communication between them and their customers.
What are the features of a multi-vendor marketplace?
If you are curious about the process of this type of sale, it’s quite straightforward: the website owner sets up a multi-vendor online store, brings in different vendors to showcase their products, and then customers make their purchases.
The quantity and the process of vendor registration can differ based on the policies of each online store. In certain cases, the owner selects people they know as vendors, while in other scenarios, anyone can freely sign up directly on the website.
The second option is often preferred to reduce the workload of the owner, whose involvement may vary from one platform to another: in some marketplaces, they only have to manage potential disputes, in others, they act directly on each sale to split the money.
It’s possible to find marketplaces of all sizes, from the large, international ones like Amazon to more localized ones that are just for local sales.
From a technical point of view, a marketplace usually requires to:
- Allow easy registration of the user as a customer and as a seller.
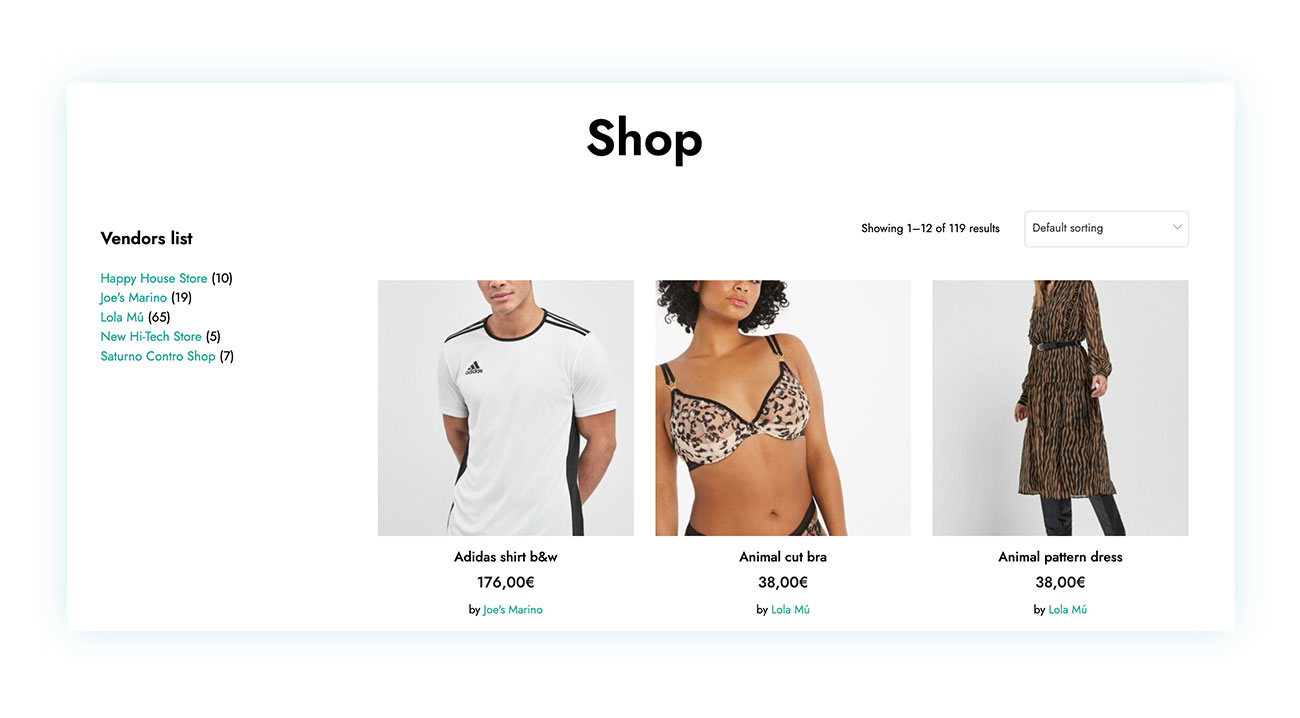
- Present a portfolio for each vendor that details the items they’re selling and a profile of the business. Additionally, it can include customer reviews to demonstrate the vendor’s credibility.
- Establish explicit guidelines for vendor commissions and the amount of money held back on sales.
It is essential to consider certain restrictions when establishing a marketplace, such as the payment methods that should facilitate a quick and efficient management of generated commissions.
Examples of online marketplaces
We previously mentioned three very famous marketplace giants. But replicating the success of a portal like Amazon is certainly not easy and, in comparison, you might be intimidated by the idea of creating a site of this type.
For this reason, it is important to understand what type of marketplace you want to create: how can you attract numerous sellers to your WooCommerce store?
In some cases, this form of sale is ideal for small local businesses: a marketplace that offers regional food and wine products, a flea market in your city, a collectibles store, and more.
The key to creating a successful marketplace is to identify a niche and avoid direct competition against the market giants.
Benefits of multi-vendor marketplaces
It may seem like a lot of work to set up and maintain a marketplace compared to a regular store (although, in fact, it only takes a plugin and a few hours of work), so why bother getting into it?
Operating a multi-vendor marketplace offers significant advantages for everyone involved, especially for the store owner.
From the owner’s perspective, the main benefit is:
- Passive income without extra work – Once the store has been set up, the marketplace owner can simply manage complaints about sellers and the related communications.
With respect to vendors, they would benefit from:
- No initial cost – Working on a portal that’s already online, the seller does not have to face the necessary costs of creating an eCommerce site.
- More customers – When you’re in a marketplace with other vendors, you’ll be featured in customer searches, which of course means there will be a lot of competition.
- Greater reliability – A marketplace with multiple professionals tends to have a greater reputation than a recently established one, which can influence the number of clients and orders.Power of cross-selling – With plenty of items available, you’ll have more opportunities to sell products thanks to orders that are already in progress.
Lastly, the advantages for customers are:
- A wider range of products to select from.
- The convenience of making all their purchases in one place.
- The added security of having an administration that monitors seller actions and safeguards the interests of customers.
Taking these benefits into account, it is no surprise that marketplaces have become more and more popular.
Is WooCommerce a suitable system to create marketplaces?
Considering the specific nature of this type of store, it is reasonable to wonder whether a WordPress and WooCommerce eCommerce platform is the ideal option.
The great news is that we have a specific plugin to create a multi-vendor marketplace store with WooCommerce. And, the additional advantage of this easy-to-use platform is that it’s flexible, which can be the key to success.

Don’t forget that you’re not the only one that would be using your store; all your vendors should be able to upload their items and sell them without hassle. A complicated sales process will surely lead to fewer sellers and, as a result, fewer customers.
Furthermore, WooCommerce has a great selection of plugins that can be combined to achieve a multi-vendor feature for an even more efficient online market.
Next, we will be looking into YITH WooCommerce Multi Vendor / Marketplace, a plugin that has been around for eight years and has been consistently improved and upgraded with new features.
How to create a marketplace with WooCommerce
To get your YITH WooCommerce Multi Vendor / Marketplace up and running, just go through these six steps. First things first, you’ll need to set up your web page; this guide will then lead you through installing the plugin.
1) Purchase the hosting plan and install WordPress / WooCommerce
Prior to launching a marketplace, it is essential to build a website. Many hosting providers allow you to get a website with WordPress already installed in just a few clicks.
Now, you can go through our tutorial to learn how to create an eCommerce store with WooCommerce. Additionally, it is essential to remember a few elements when considering a marketplace:
- As this website is designed to facilitate exchanges between vendors and customers, a high-performing hosting service is a key starting point. Depending on the number of products, you may need to invest in a larger server.
- While your vendors will handle the sales, stock, and distribution of their products, it’s still necessary for you to have a basic understanding of how to use WooCommerce and what the different payment options are.
- After you’ve set up WooCommerce, you have the basic framework for your marketplace, but it’s wise to spend some time customizing the appearance of the site and selecting a theme that suits your needs.
After completing this step, you are ready to move on to the WooCommerce Multi Vendor plugin.
2) Purchase and download the plugin
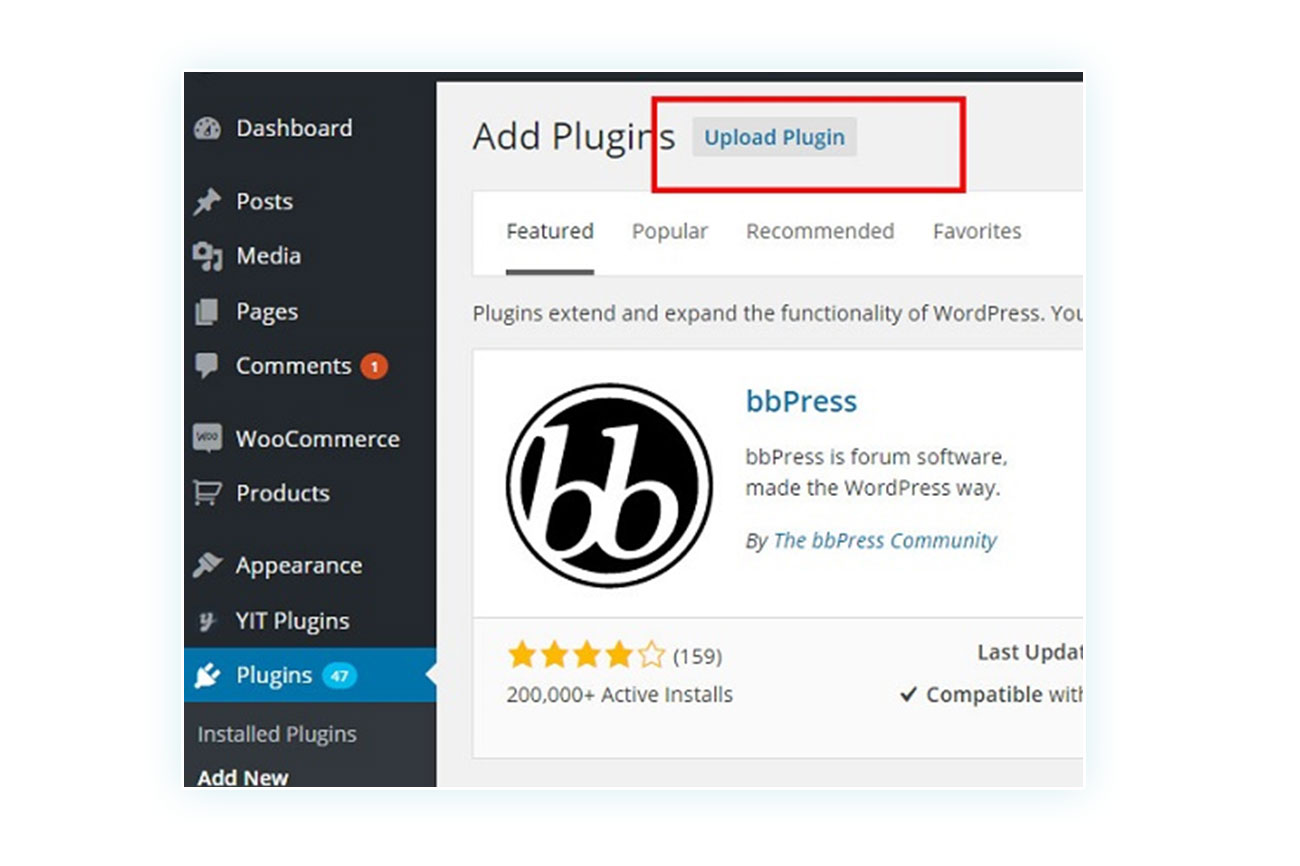
Let’s kick things off by getting into the most basic step. After you have purchased the plugin, you will be able to download a zipped file which can be used to install it on your website.
To do this, go to your WordPress dashboard, to Plugins > Upload Plugin. Following the instructions there, you can complete the installation and then activate the plugin.
Next, you will have to get YITH’s license key: you can find it in your account on the website, in the section titled “Licenses & Downloads”.
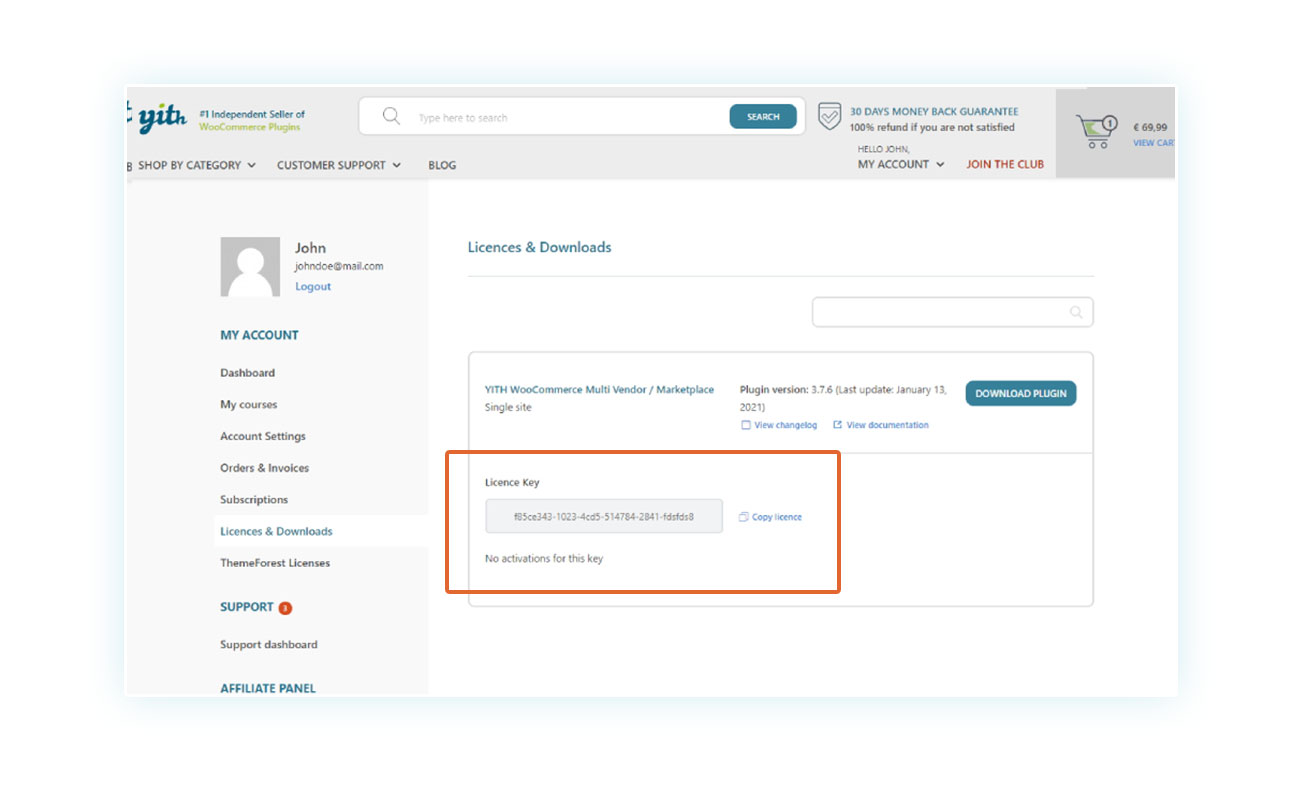
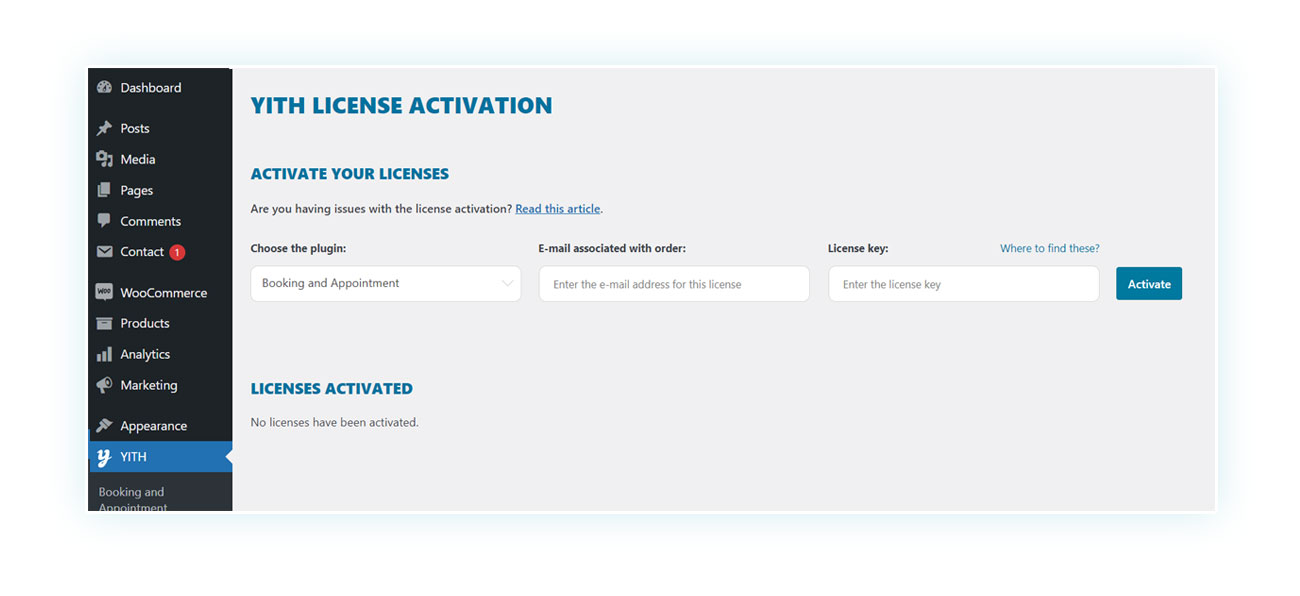
There you find the code that you can enter into your WordPress dashboard, in YITH > License Activation.
Now that you’ve completed the first steps, let’s have fun with the plugin configuration.
3) Configuring the plugin
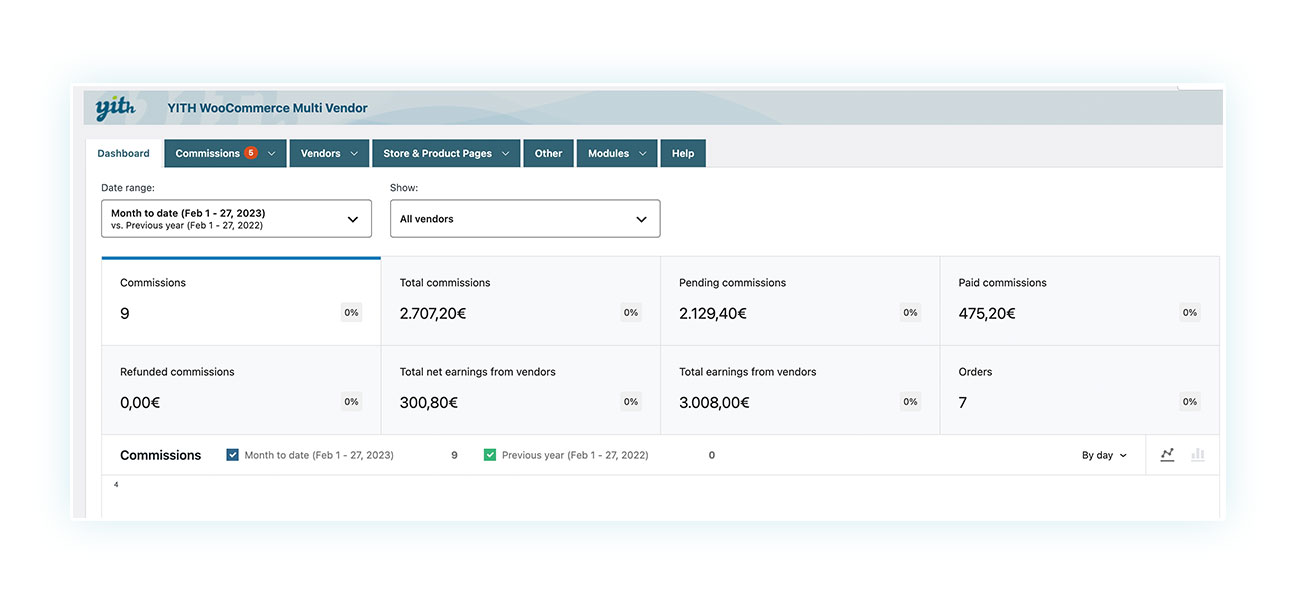
Once installed and activated, the plugin is already running, but let’s explore the features you have to work on. In the side menu, select YITH > Multi Vendor.
When you open the dashboard, you’ll see a full summary of sales and website reports. Since you’ve just created the marketplace, there wouldn’t be any sales yet.
The plugin contains seven sections:
- Dashboard: it offers a comprehensive summary of the store reports, including fees, refunds, profits of the marketplace owner, number of orders placed, bestselling items, and top vendors.
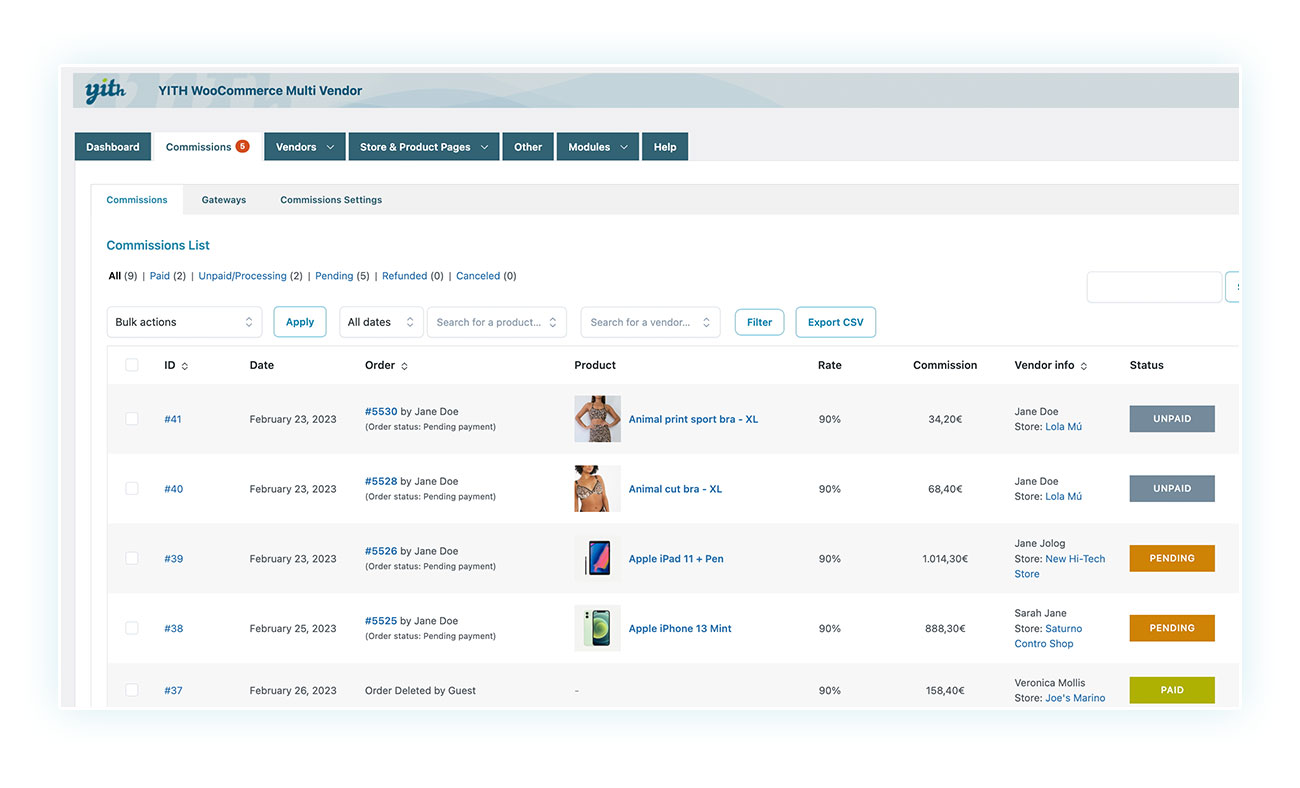
- Commissions: it displays a complete list of orders and contains options to manage payment gateways and commissions.
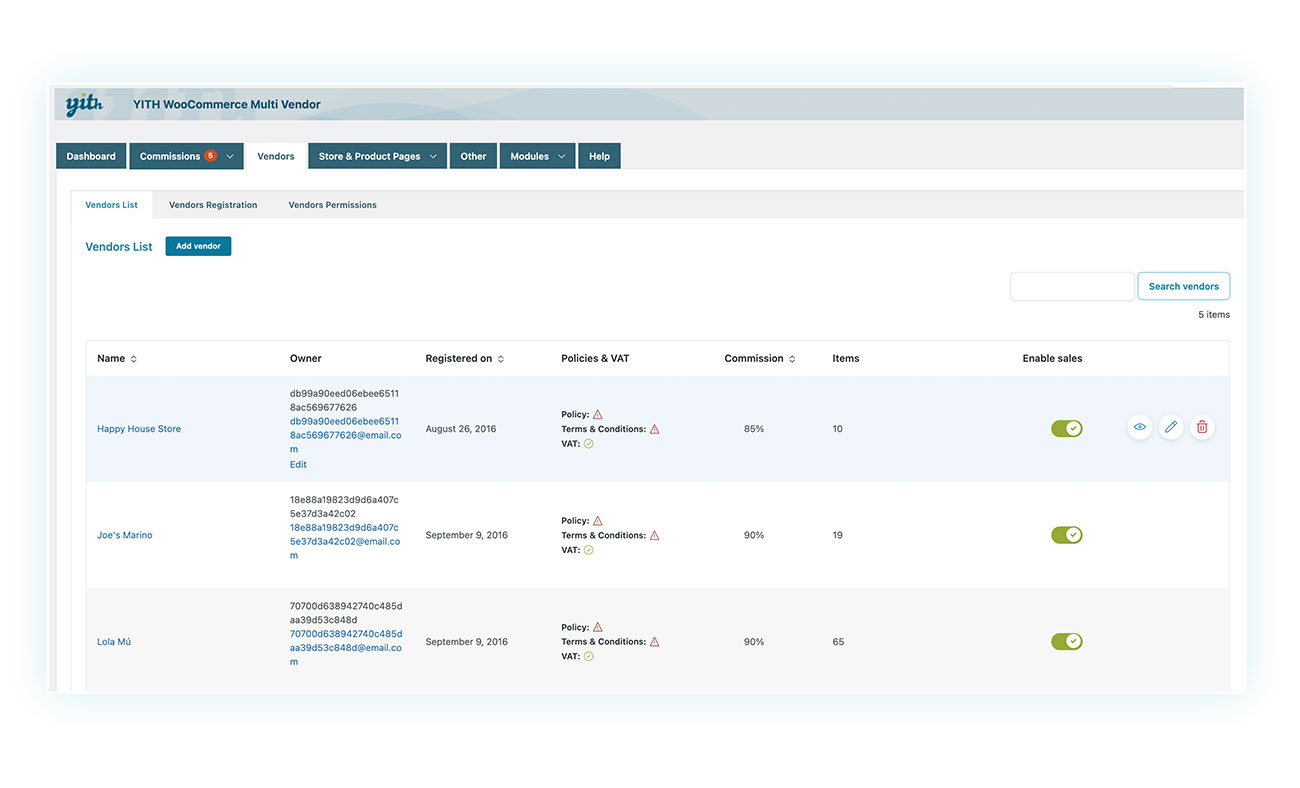
- Vendors: it lists the vendors and displays their respective commission rates, the number of orders sold, and whether or not their products can be purchased.
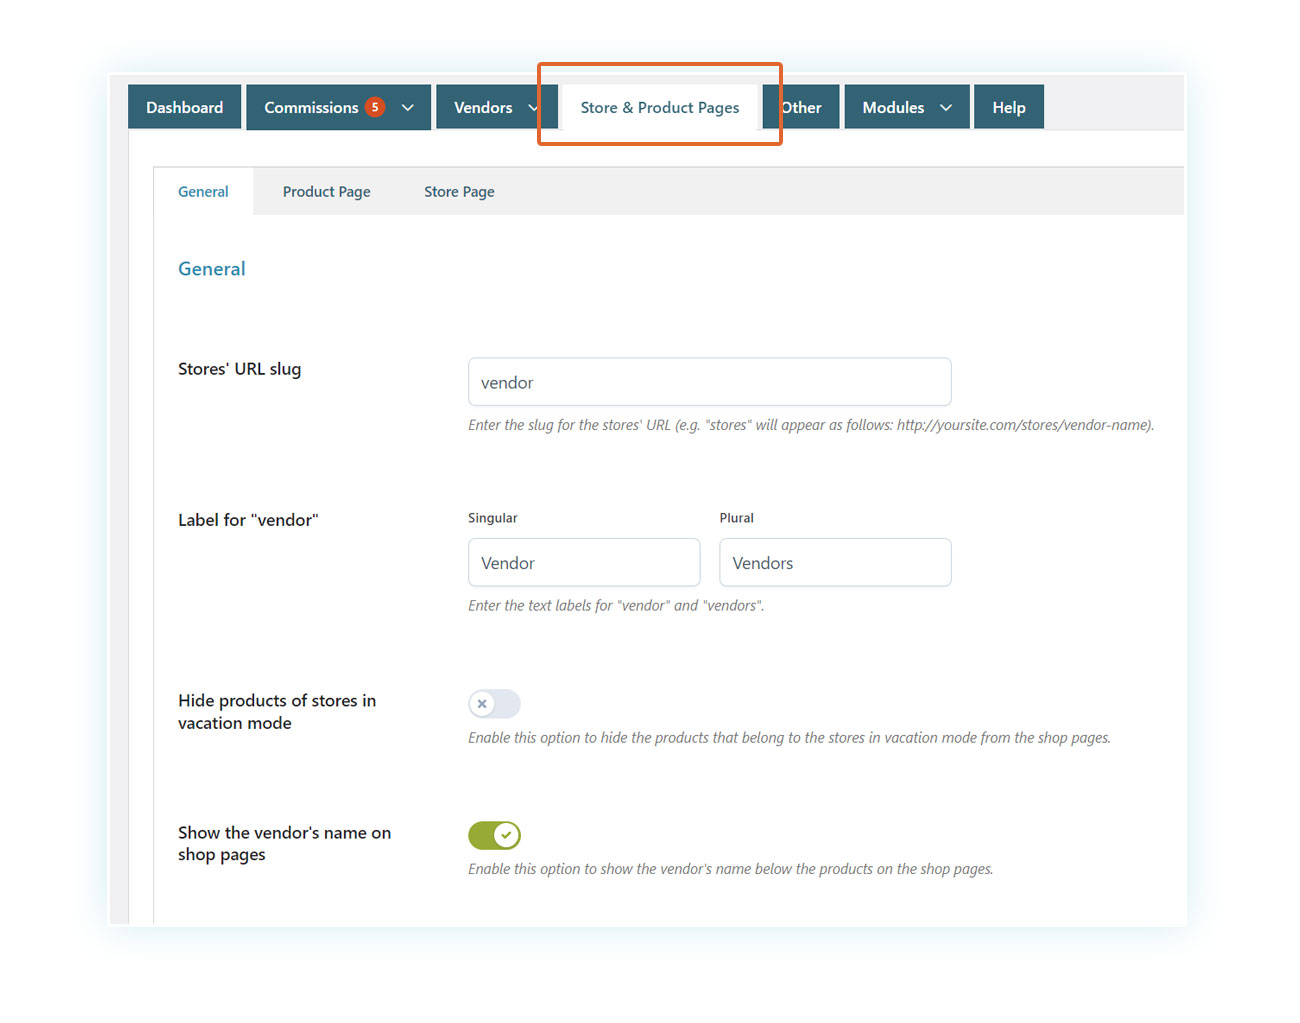
- Store & Product Pages: it includes options to fully control vendor-related options in these two pages of your store.
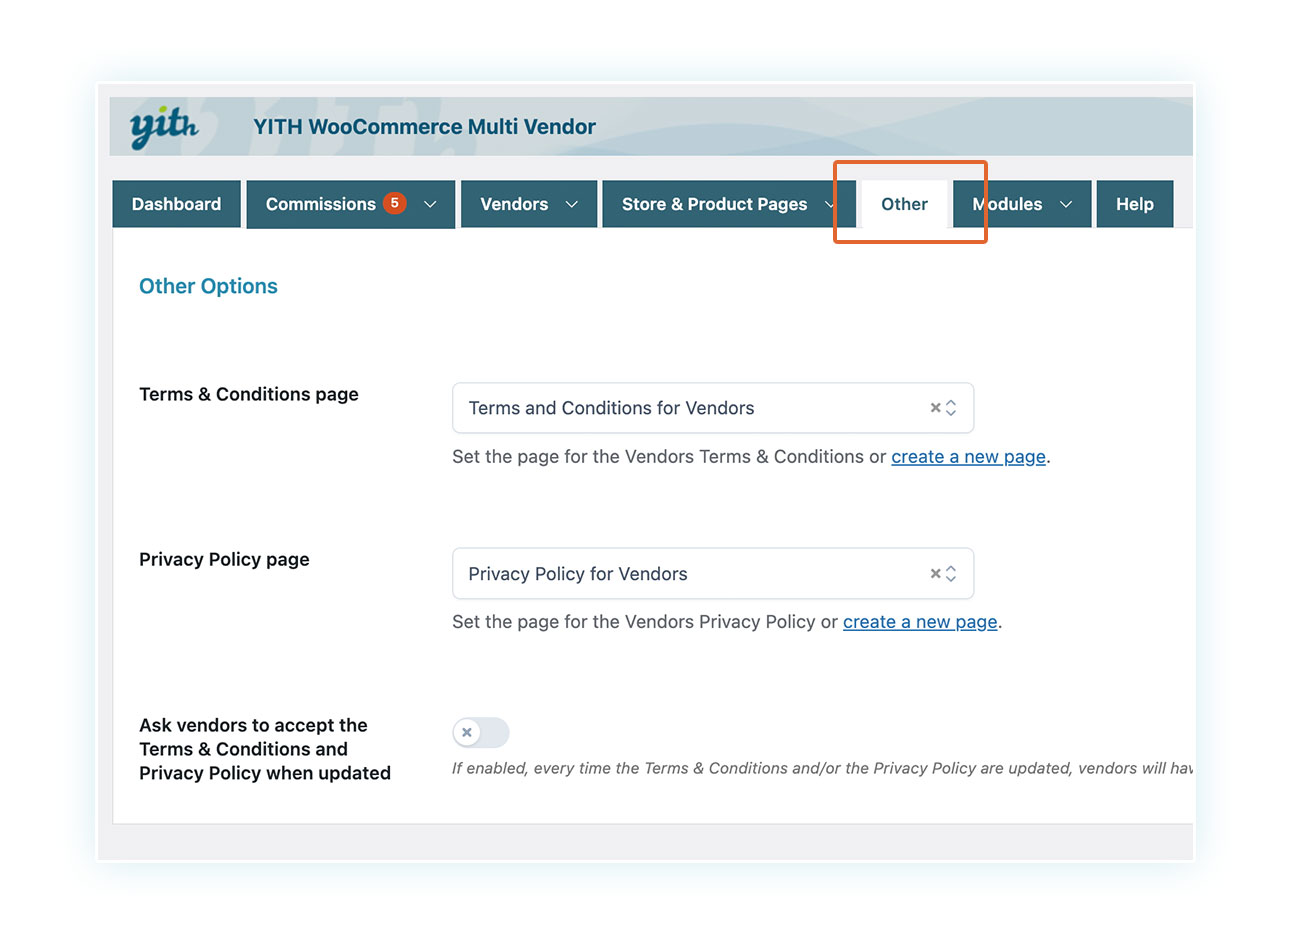
- Other: it allows you to customize your marketplace terms and conditions, privacy policy, and other related configurations.
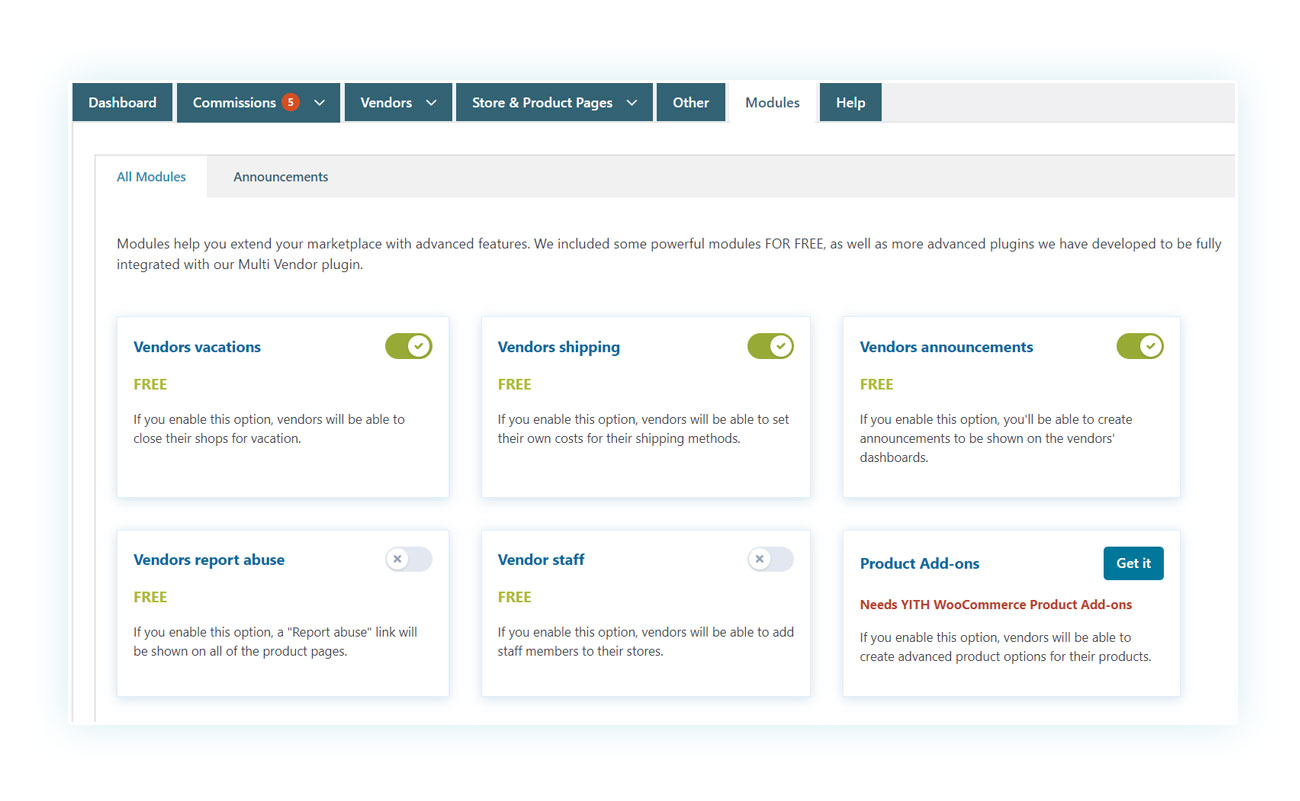
- Modules: it includes key choices such as enabling vendors’ holidays and contains all the combinations Multi Vendor offers with other plugins.
- Help: a tool you can access in case you need help about how the plugin works.
We will now take a closer look at a few of the plugin’s sections that are especially relevant to this guide.
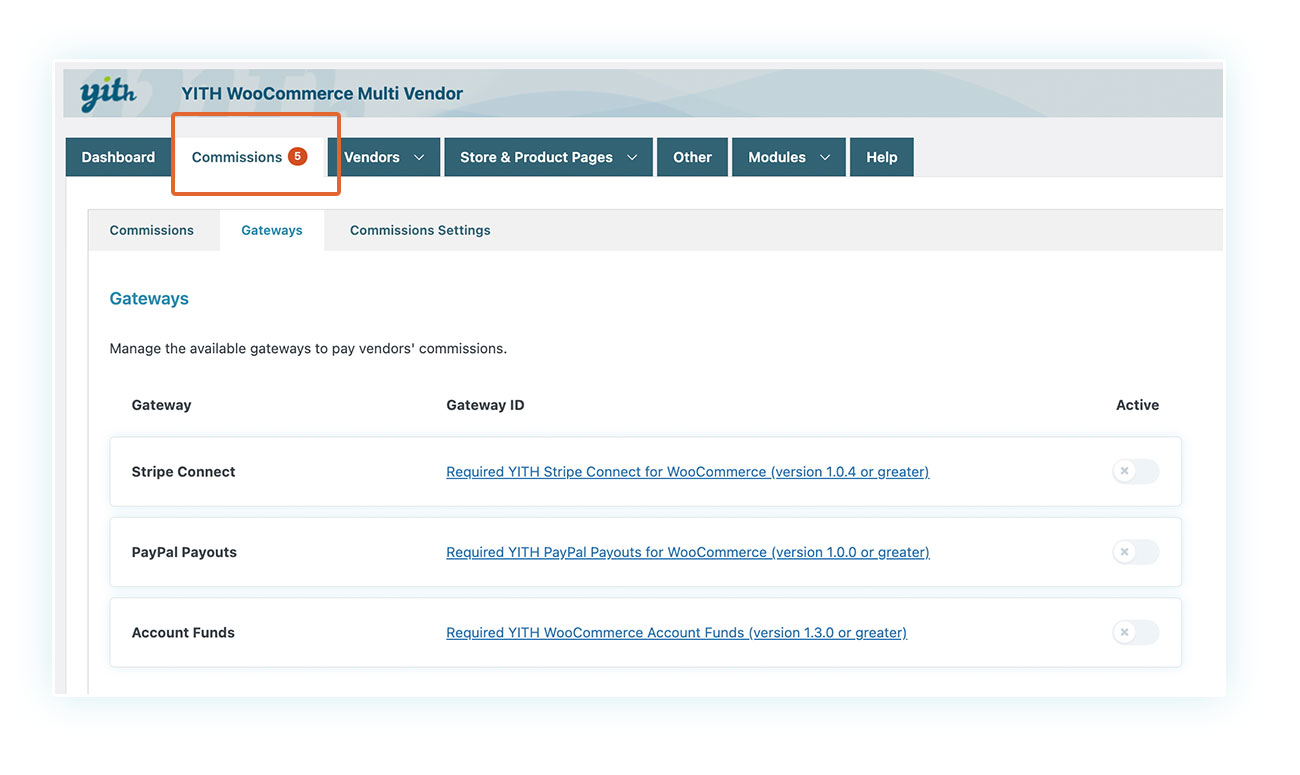
4) Payment settings
When we talk about payments, we can be referring to two different matters: the payment options available to customers or the process to pay commissions to vendors.
Although standard payment options such as bank transfer and cash on delivery are available using WooCommerce, the situation is quite different when it comes to a marketplace setting.
In fact, it is necessary to use a payment gateway that allows automating the payment distribution between the owner of the multi-vendor website and the vendor.
For this, you can choose between three options:
You can integrate each of these methods using the respective plugin.
On the Commission Settings tab, you can opt to keep a specific percentage out of the sales made on your marketplace. For instance, if you set 90%, you will receive 10% of the sale cost.
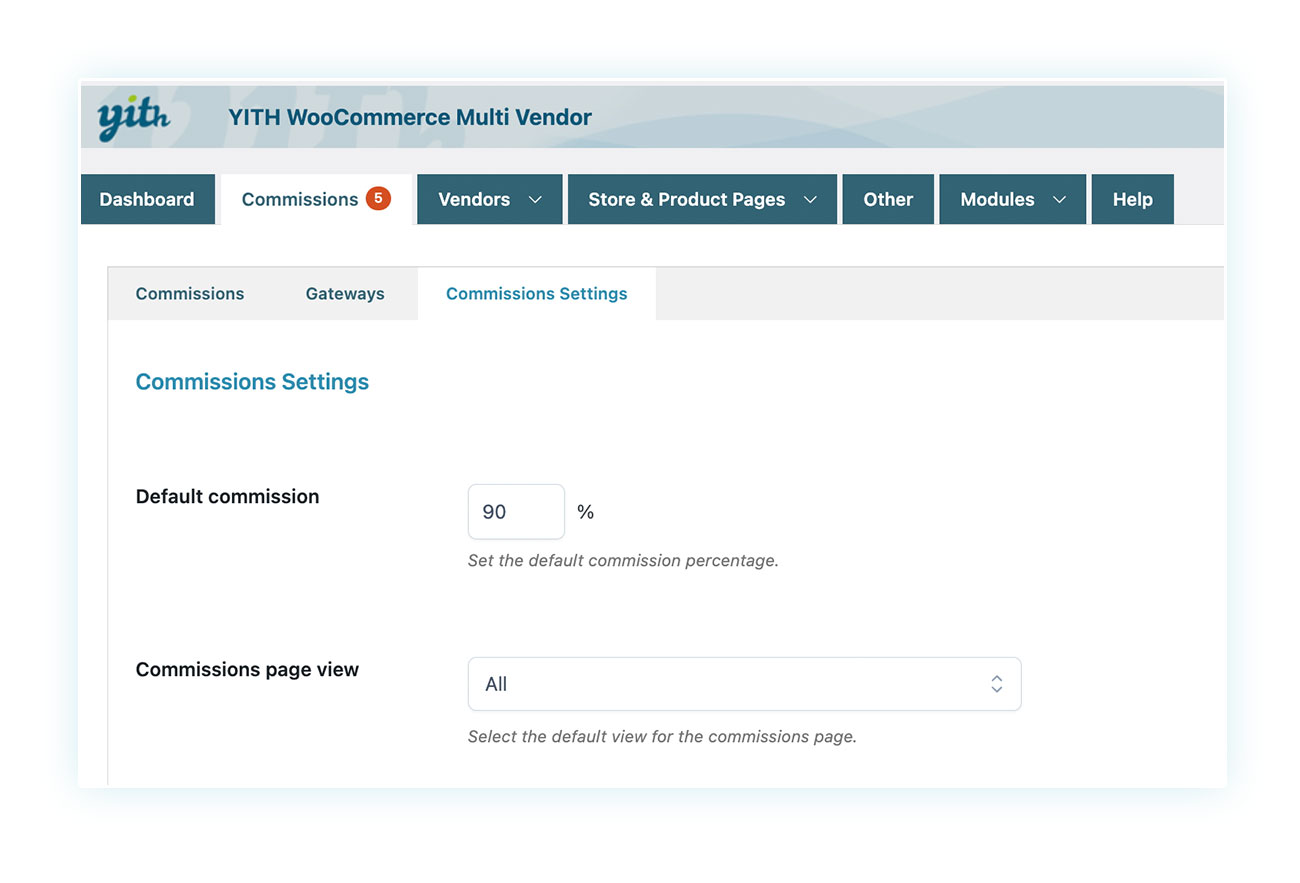
When it comes to coupon codes, you can decide if the percentage should be subtracted from the original cost of the item or the reduced rate, as well as directly paying out commissions at the time of purchase.
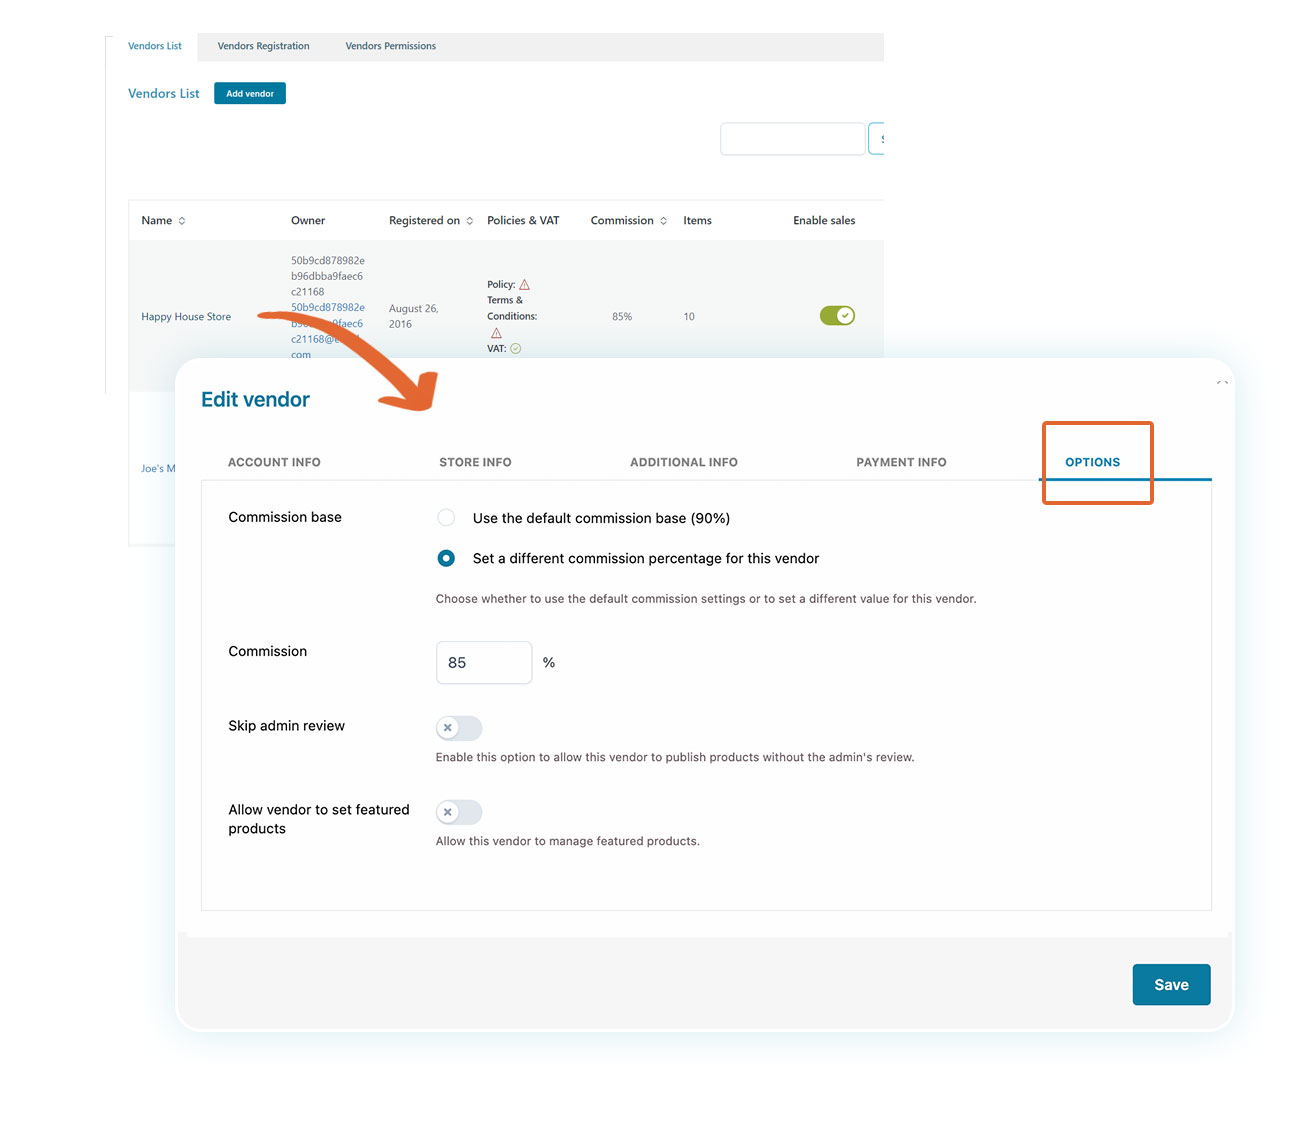
If you’d like to set a different commission percentage for each vendor, simply select the vendor and edit the percentage on their individual options.
5) Shipping settings
When it comes to shipping, it’s usually the seller who takes care of packing and shipping the products.
That’s why, if this is your case, you can enable the “Vendors shipping” option from the “Modules” tab. This enables vendors to completely manage the shipment of their own products and the related costs.
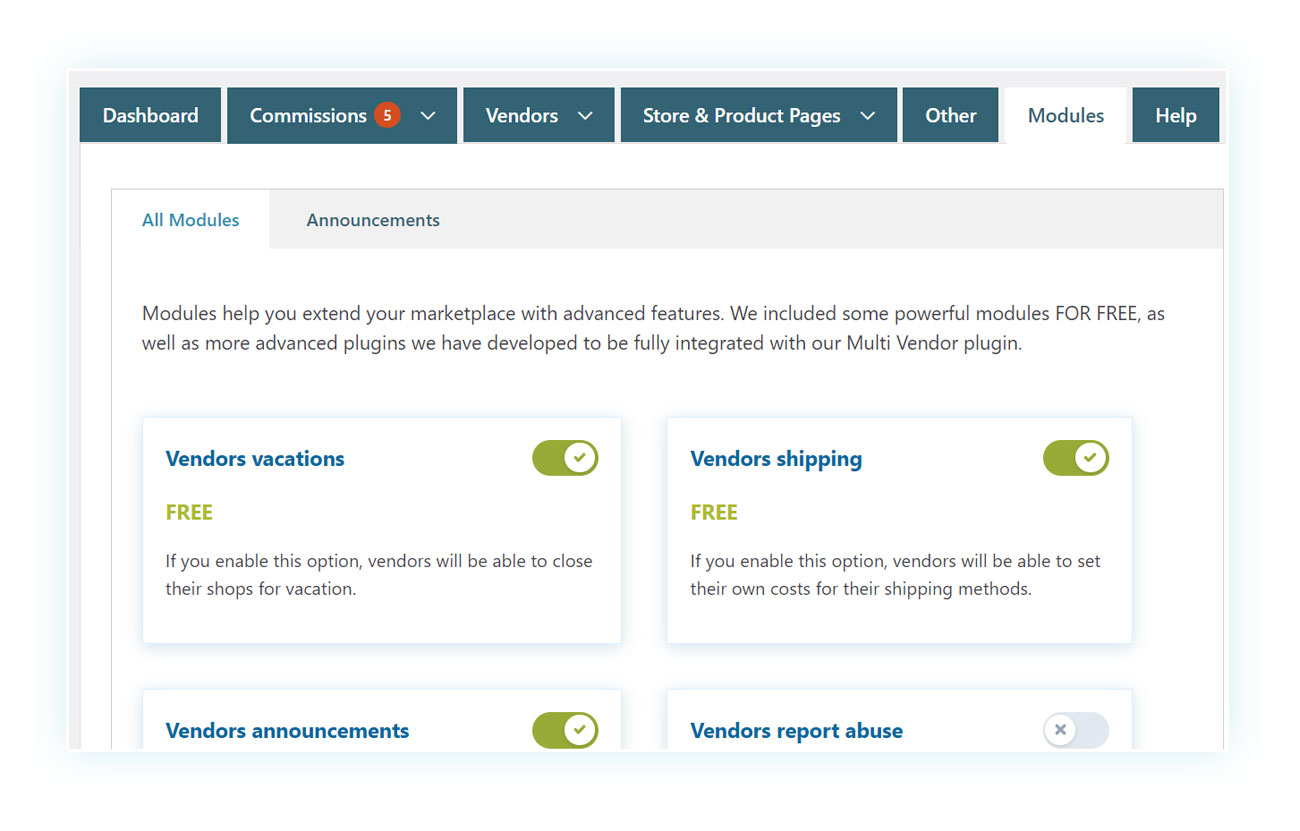
A lot of vendors on Amazon opt for the Prime program, however, some may charge shipping fees if they need to cope with expenses.
6) Registration of vendors
You have now established the payment system and given the responsibility of delivery to your vendors. The only important move left to make is to let the vendors sign up.
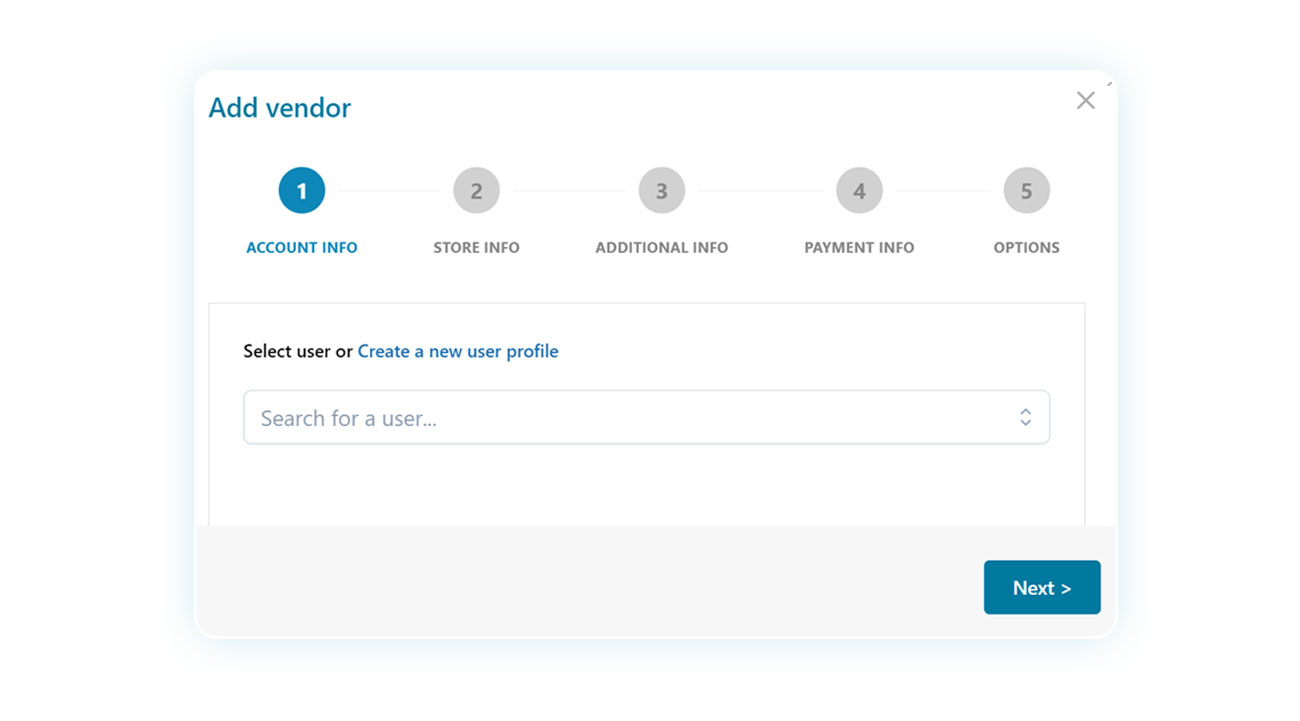
If you want to add specific vendors to your marketplace, you can do the vendor registration yourself. Another option is to grant them permission to sign up directly on your multi-vendor website.
To give someone the vendor role, start by selecting the Vendors tab and clicking on “Add vendor”. After that, you can assign the role to an existing user on the website or create a brand-new one.
The next step is building a special page that allows users to join and set up their individual shops. You’ll need to create a new page and then head over to Vendors > Vendors Registration.
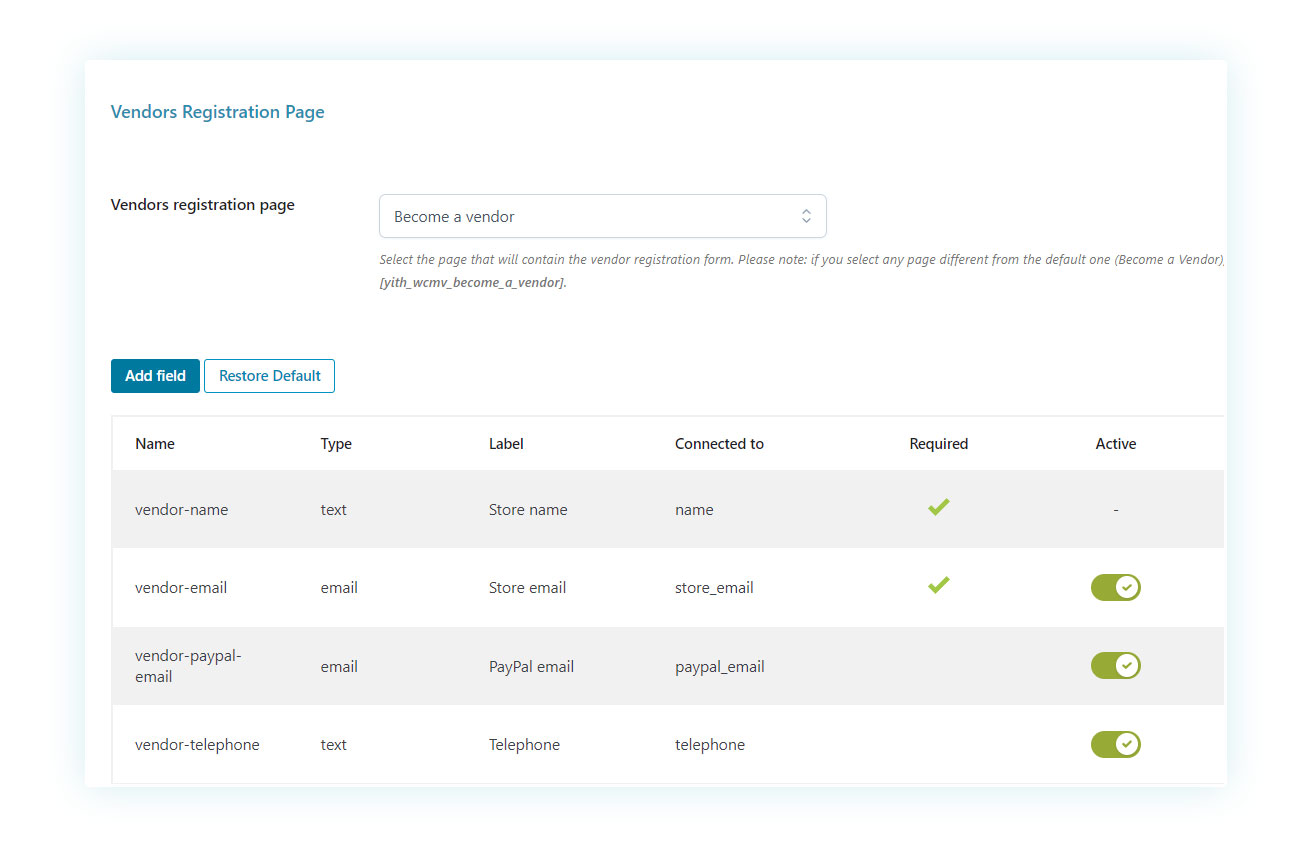
On this page, you have the option to select which fields are necessary for registration and customize them accordingly.
Fun fact: you can also develop multi-vendor marketplaces where vendors are required to pay a fee each month instead of a percentage of their income (or a combination of the two). To make this possible, you must integrate a few plugins like YITH Membership, which will restrict access to the vendor registration page allowing only those who buy a certain product to access it, and YITH Subscription, which will turn that product into a regular subscription.
FAQ
How to manage vendors in a store with multiple vendors?
While vendor management used to be more complicated, now, the YITH WooCommerce Multi Vendor / Marketplace plugin simplifies the process by giving you a convenient dashboard within WooCommerce so you can quickly check the status of your portal and make timely decisions.
How do you manage sales and customer reviews in a multi-vendor store with WooCommerce?
The plugin allows vendors to have control over their own reviews and shows an average rating on each vendor’s personal page.
Does WooCommerce support a multi-vendor functionality?
No, WooCommerce does not include any default option to transform a traditional online store into a marketplace, but using a plugin like YITH WooCommerce Multi Vendor / Marketplace is enough to obtain such a portal.
What’s the best multi-vendor plugin for WooCommerce?
Even though there are other options available, YITH WooCommerce Multi Vendor / Marketplace stands out for its years of consistent development and improvements. Moreover, it seamlessly integrates with numerous other plugins, both from YITH and external providers like Aelia’s currency changer. This plugin is definitely worth considering for your business needs.
How to manage a multi-vendor website?
One of the most common concerns when creating a marketplace is having to manage the sale of products from several sellers at the same time. Fortunately, the shop owner doesn’t have many tasks, except to check that the multi-vendor site works properly, act as an intermediary in case of disputes, and verify the correct payment of commissions.
What are the next steps to promote and grow your multi-vendor marketplace in WooCommerce?
A marketplace is a great selling platform, however, it is important to promote it in order to maximize its effectiveness. Highlight its features such as the wide selection of products and the secure system that safeguards customers; and encourage vendors to do the same.
Conclusion
Combining WordPress and WooCommerce can result in a variety of online stores, and a multi-vendor marketplace is among the most interesting ones you can create. Don’t be scared by the thought of creating one, as WooCommerce usually requires only a single plugin to make it a reality.
If you want to start a successful multi-vendor store, WooCommerce and YITH WooCommerce Multi Vendor / Marketplace make up the perfect combination.