Table of contents
- What is WooCommerce and how to use it?
- Why is WooCommerce the best choice for online stores?
- Getting started with WooCommerce
- The WooCommerce setup wizard
-
How to set up WooCommerce
- Choosing a WooCommerce theme
- How to configure the WooCommerce home page
- How to set up the shop page on WooCommerce
- How to set up the checkout page on WooCommerce
- How to set up the shopping cart on WooCommerce
- How to set up shipping on WooCommerce
- Establishing Shipping Zones on your WooCommerce store
- How to set up payments in WooCommerce
- How to configure email options in WooCommerce
- How to set up taxes in WooCommerce
- How to add products to your shop
- Start adding products to your WooCommerce shop
WooCommerce is a simple and very popular solution for creating a WordPress eCommerce store in just a few steps. In this article, we will learn about the first steps to follow, what plugins to install, and how to set up your website and immediately start selling your products.
Before learning how to create a WooCommerce store, let’s find out what this tool is about.
What is WooCommerce and how to use it?
Anyone who has ventured into selling products online has probably heard of the WooCommerce plugin, but what is it? Launched in 2011, it’s an open-source tool designed to turn your WordPress website into an eCommerce (i.e., an online store).
WooCommerce is one of the many solutions available for selling online, the one that has the largest market: at the moment 23.4% of online stores are based on this plugin, and more and more individuals and businesses are using it for web sales.
In this article, we are going to learn why WooCommerce has been chosen by most sellers and why you should do the same for your online store, starting from an idea up to a complete eCommerce website.
Why is WooCommerce the best choice for online stores?
What is the reason behind the massive success of this plugin? Unlike other platforms, WooCommerce, as an extension of WordPress, comes with many positive aspects of this platform, which can be summarized as:
- Ease of use – WooCommerce was created to be set up and used by the average user, without needing advanced computer skills.
- Convenience – WooCommerce is a free and open-source tool, thus enjoying regular updates and improvements from the community.
- Flexibility – An eCommerce built with this tool can be enriched and customized thanks to the many plugins available, allowing it to be completely modified according to your needs.
In this way, anyone can easily become the author/creator of their online store with WooCommerce. Of course, these are just three reasons why this software is so popular. Do you want to learn more? Check out this article to find ten reasons to have an online store with WooCommerce.
Getting started with WooCommerce
Having seen the reasons to choose it, it’s time to understand how to use it. As it was mentioned earlier, the WooCommerce plugin is characterized by its simplicity of use and configuration.
Most WooCommerce guides start with the installation of WooCommerce itself, but we wanted this guide to be as complete as possible.
There are three previous steps in creating your site:
- Buy a domain – This step is often linked to the next, but creating a site begins with identifying the name of the eCommerce website and the web address at which it can be reached. At this point, you will need to decide on the name of the site and check the availability of a domain (.com, .it, .org, etc.).
- Buy a hosting plan – Once you have located the domain, you need to purchase (although it would be more accurate to say “rent”) space on a hosting company’s server. During this purchase, you can often buy the domain directly from the same provider. We will not go into detail about the best web hosting providers, but we encourage you to pay attention to the location of the servers (the closer they are, the faster the site will load).
- Install WordPress – This is a step that can be taken in different ways: some providers offer WordPress installation as part of their services, while, in other cases, you will have to do it manually. The process is fairly straightforward, during which you will need to log into your site’s control panel (often in the form of cPanel) and install WordPress, configuring the admin’s username and password for access.
- Install WooCommerce in your WordPress site – To install WordPress is essential as WooCommerce itself is a plugin for this platform.
To do this, log into your WordPress website, scroll down the sidebar on the left to “Plugins”, click on “Add New” at the top, and in the search bar at the top right, type “WooCommerce” and search.
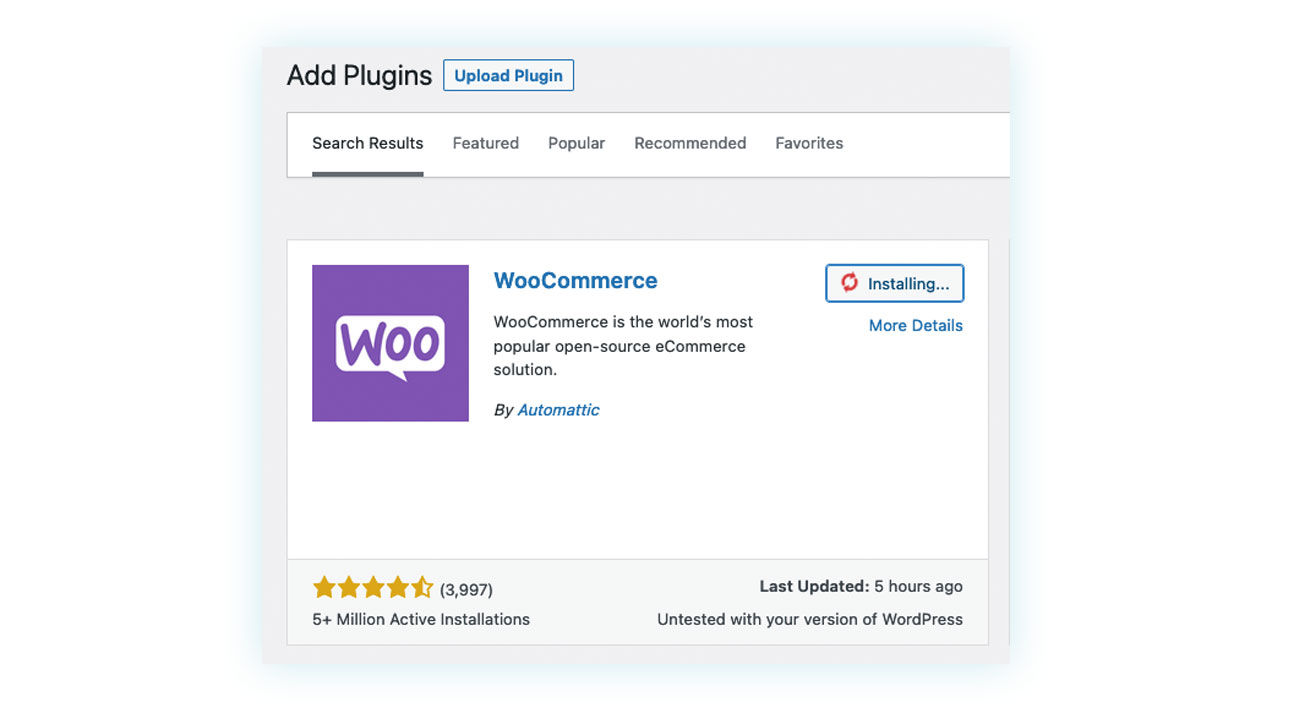
The WooCommerce plugin will appear among the extensions with an “Install Now” button that will become “Activate” after installation.
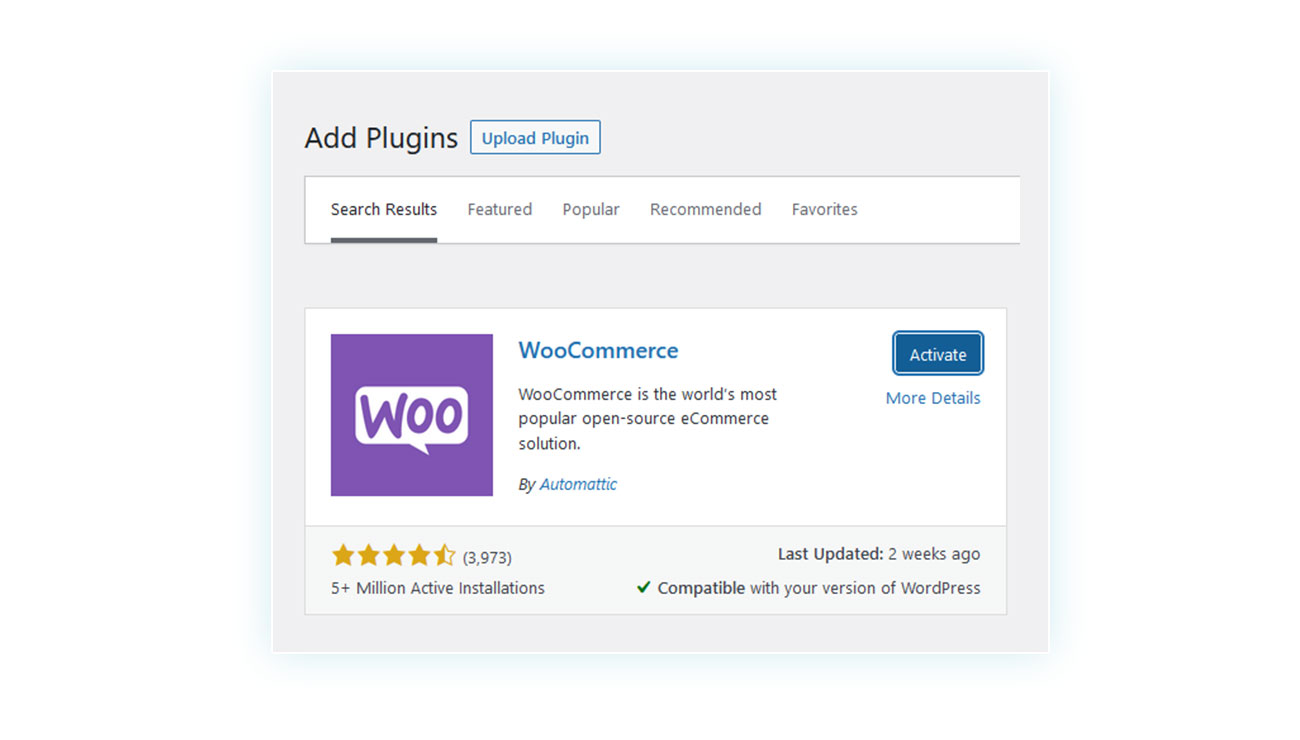
Once done, the setup wizard will be activated, which will help you in the first steps of creating a WooCommerce store.
The WooCommerce setup wizard
The configuration wizard is the first step in creating an online store with WooCommerce and is a five-step process where the user is guided to enter important information for creating the shop. In this section, we will go through each step to assist you in the first settings of your new eCommerce website:
1) Enter your shop details
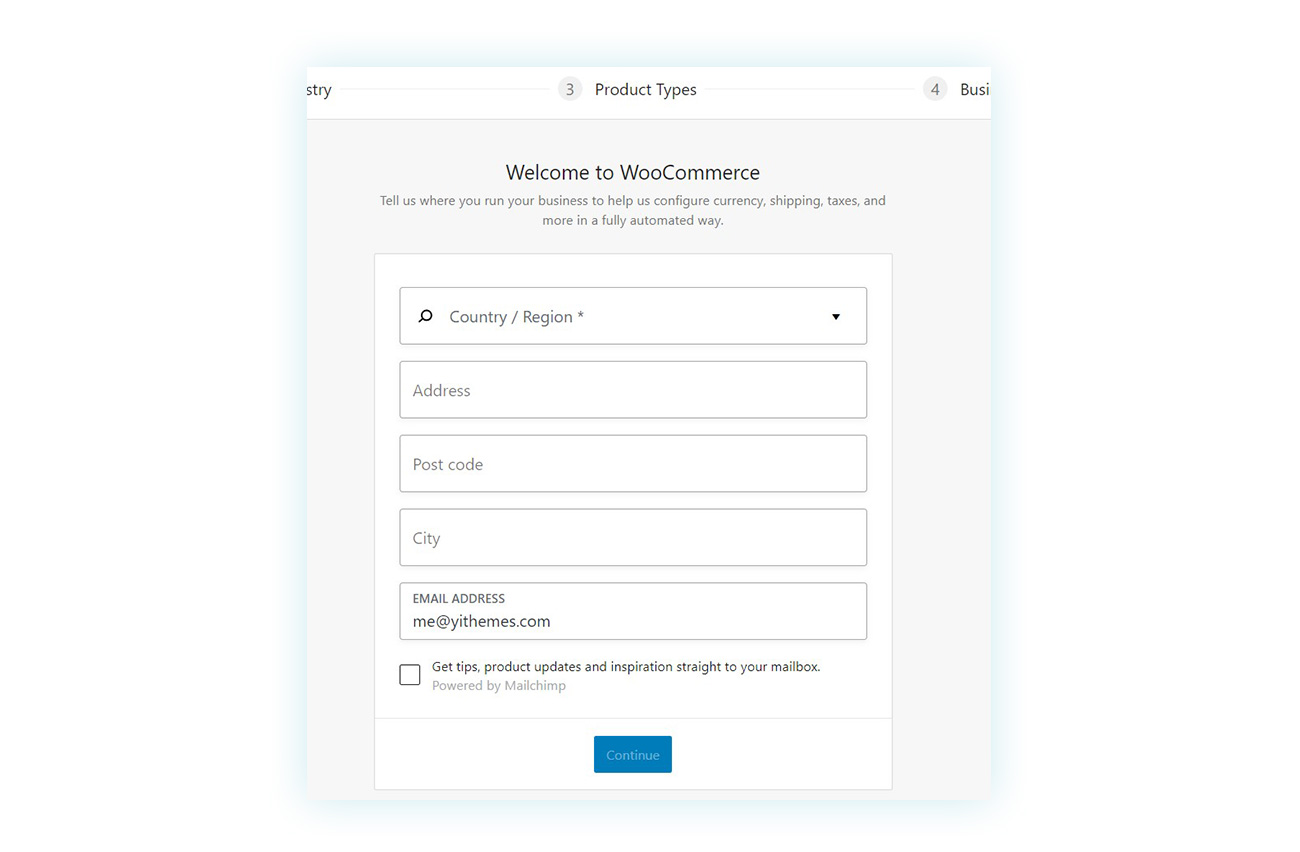
In the first step of the setup wizard, you will have to enter information about the physical shop (if any) or its owner. This information is divided into five points:
- The country (where you will have to choose country and province)
- The address
- The Post code
- The city
- The email address
2) Choose the industry in which your shop operates
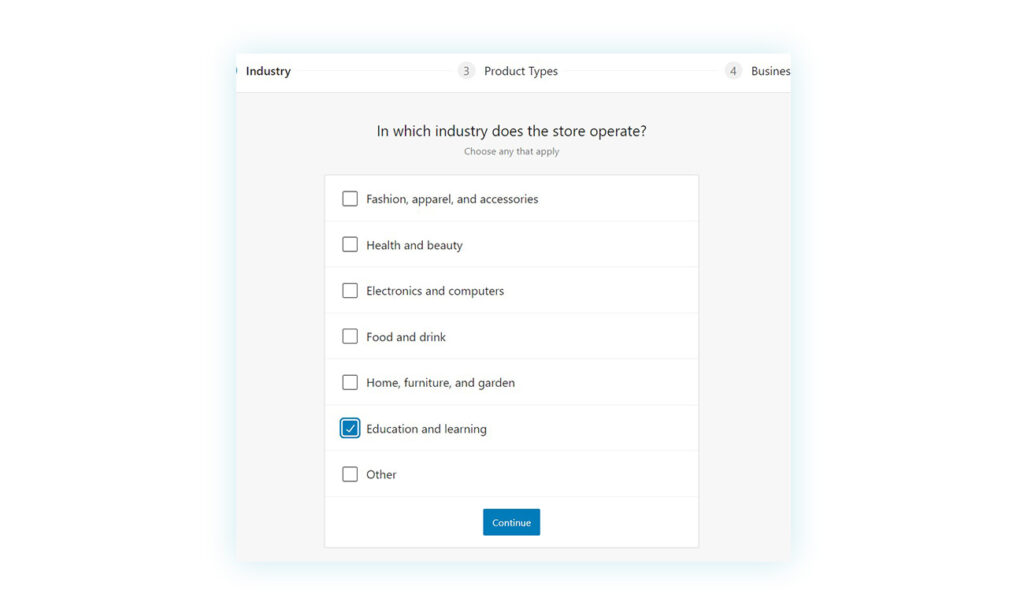
The second step is to identify the type of online store you are creating. You will be able to choose between:
- Fashion, apparel, and accessories
- Health and beauty
- Electronics and computers
- Food and drink
- Home, furniture, and garden
- Education and learning
- Other
It is important to note that you can select more options if necessary.
3) Choose what type of products you will sell

In the third step of the setup wizard, you will have to select what type of product you are going to sell. These are divided into:
- Physical products – products that will be shipped, delivered, and/or collected.
- Downloads – products that can be downloaded online or will be sent by email.
- Subscriptions – a type of sale that involves a recurring payment.
- Memberships – payment of a recurring fee in exchange for a status that gives access to goods and/or services.
- Bookings – for those who want to rent properties and vehicles or for those who want to allow appointments.
- Bundles – for selling several products or services together.
- Customizable products – for the sale of products or services that can be customized by the customer according to their needs.
Except for the first two types, all the others require the installation of a dedicated plugin and are, therefore, associated with a monthly or annual fee. Even if you are interested in these services, we still advise you to wait and set up these WooCommerce extensions later. This will give you a better understanding of what you need, the results you want to achieve, and whether there are more suitable alternatives to those suggested by default by WooCoomerce.
4) Enter the company details
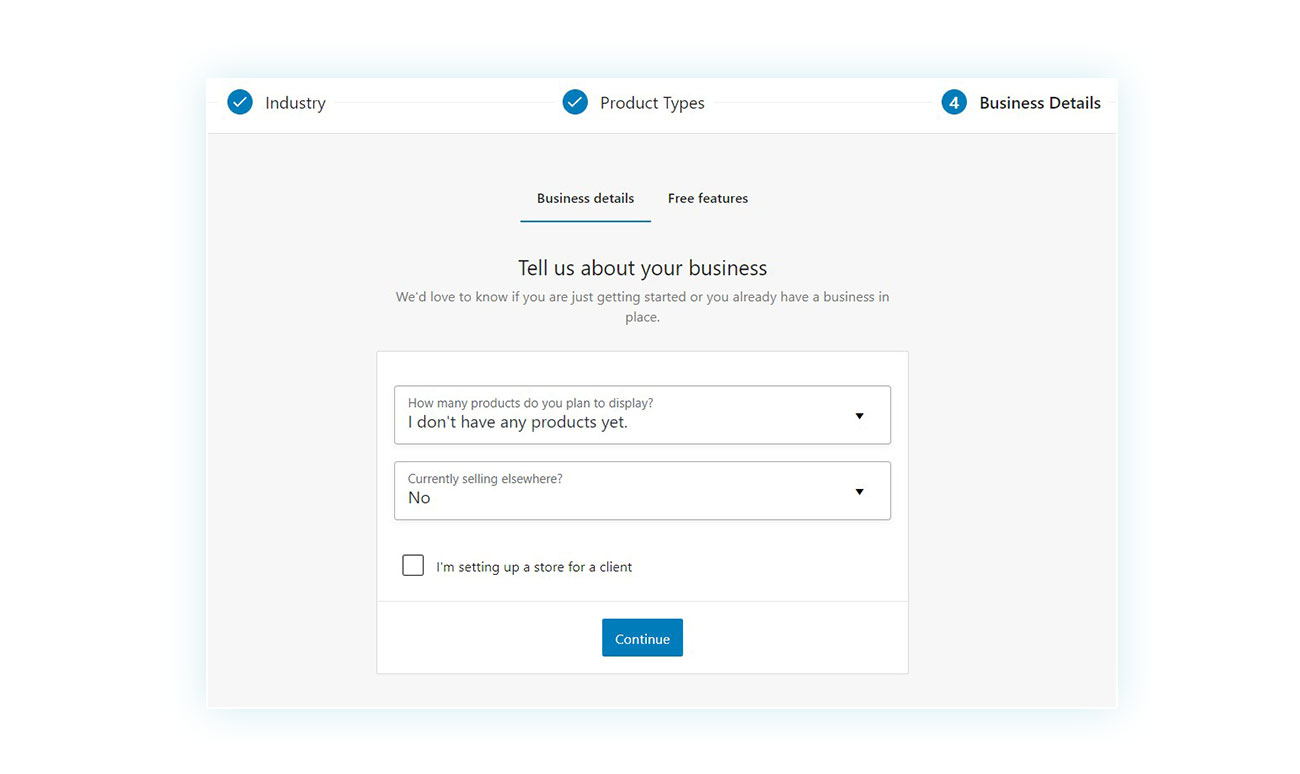
The fourth step only has two fields to complete. The first one is about how many products you plan to show in your online store and the choices are:
- I don’t have any products yet.
- From 1 to 10
- From 11 to 100
- 101 to 1000
- More than 1000
Of course, this is only an estimated value, it is not necessary to be precise at this time.
In the second step, you will be asked whether you currently sell elsewhere, to which you can answer with:
- No
- Yes, on another platform
- Yes, I own a different shop provided by WooCommerce
- Yes, in person at physical shops and/or events
- Yes, on another platform and in physical shops and/or events
You can also indicate whether you are currently creating a shop for a customer.
Once you have completed both fields, you will access the second tab in this section, where you will be allowed to install plugins immediately and obtain additional functions on the shop.
Again, you can wait and install the plugins or different solutions later on after checking which one is the best for your shop’s needs.
5) Choose the theme for your online shop
The last step of the WooCommerce setup wizard involves choosing a WooCommerce theme. While plugins are extensions that add functionality to the site, the theme is the visual part. It represents the graphics and how your shop will look to the public.
The theme is a function of WordPress itself, so you may have already chosen a WordPress theme before installing WooCommerce. In that case, it may be appropriate to install a different theme so that it is compatible with the plugin.
The configuration wizard allows you to choose between free and paid themes. Usually, free themes have fewer functions and customization options, but they may be the best choice at the moment. There’s plenty of time to search through the variety of themes on the market and choose the one you prefer.
(A cool fact: at YITH we have created two free themes, “Proteo” and “Wonder“. Both have a versatile and modern layout and give the possibility of importing demo content so you don’t have to start from scratch).
Once you have chosen your theme, you will have completed the WooCommerce setup wizard.
Restarting the Configuration Wizard
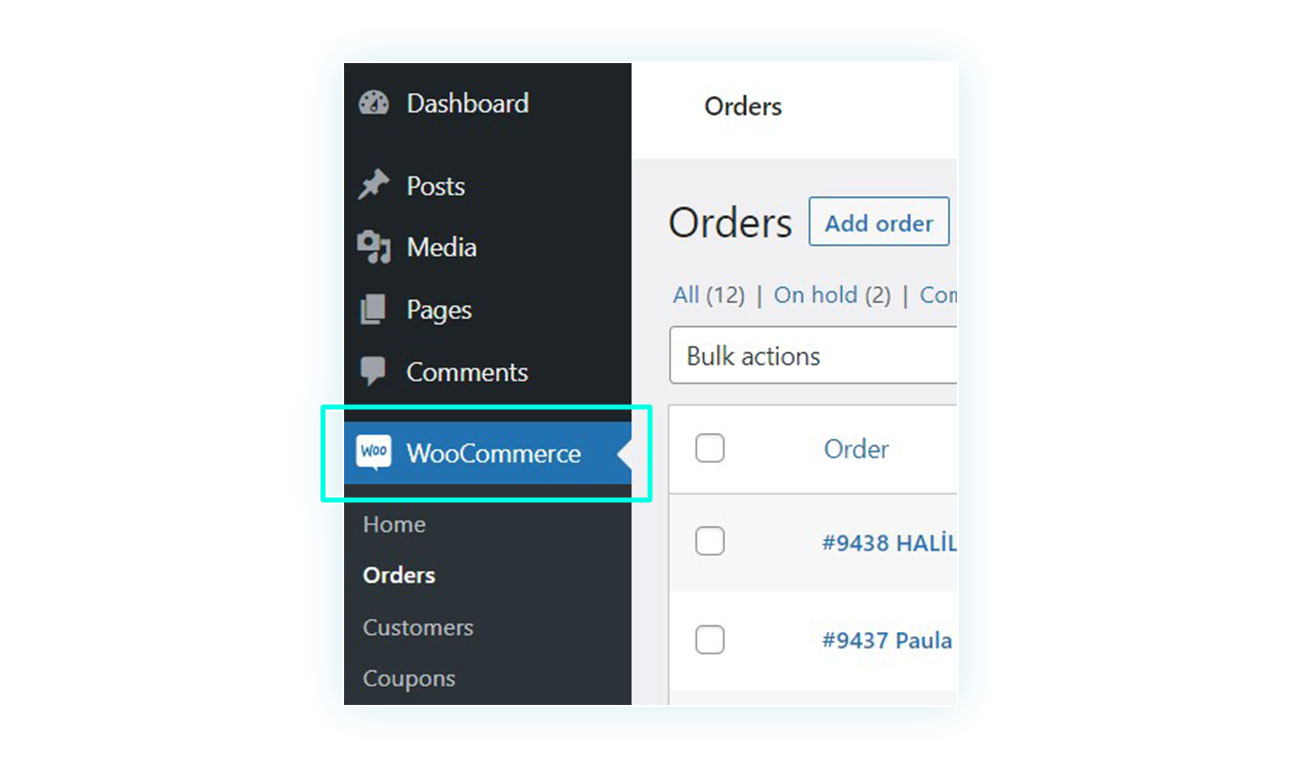
In case you close the configuration wizard by mistake, don’t panic: you can restart it by going to any WooCommerce page in your sidebar (like Orders).
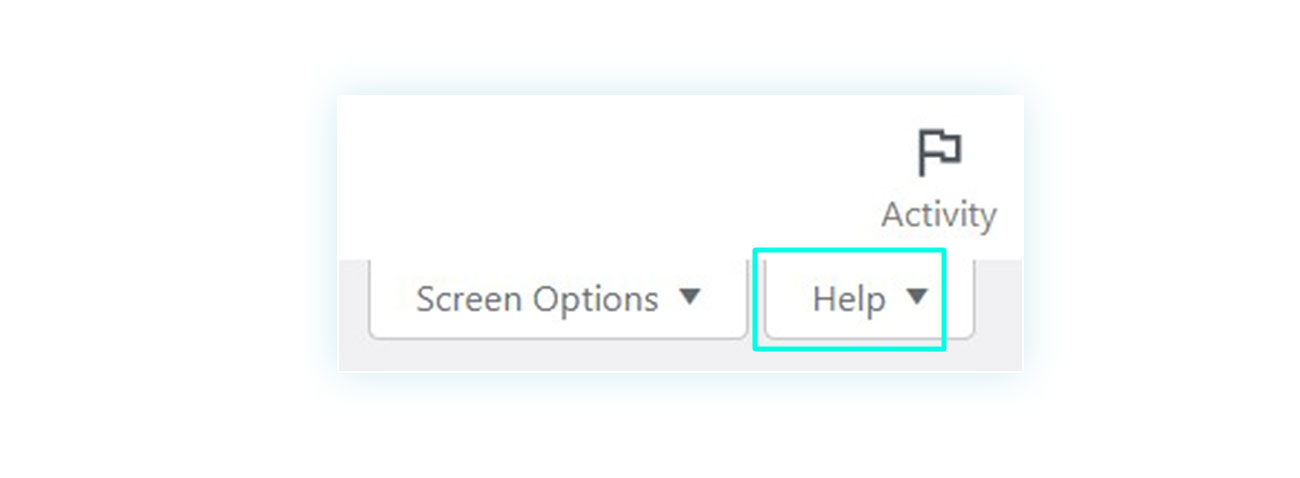
Once there, click on the “Help” tab in the top right corner.
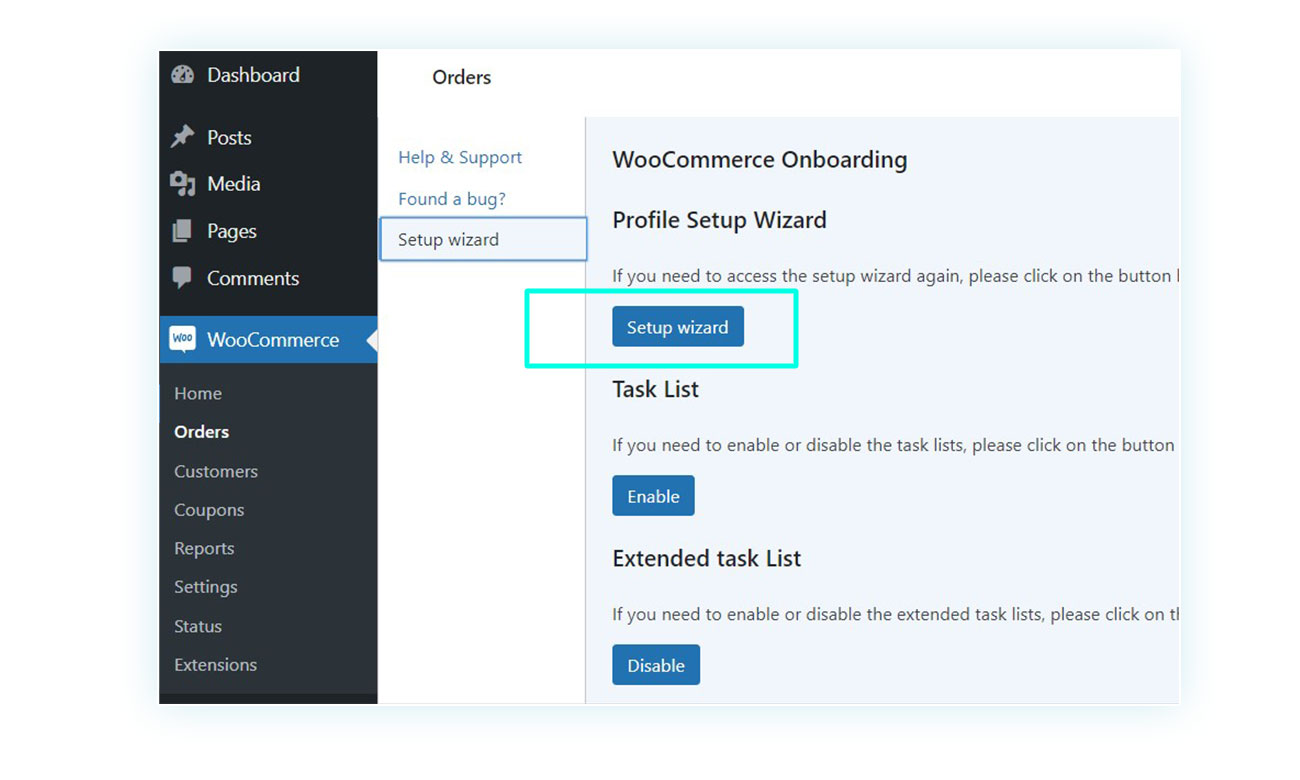
Now all you have to do is click on “Setup Wizard” on the left and click the blue button again to start it up.
How to set up WooCommerce
Earlier, we set up our platform, but what we entered was only the most general WooCommerce shop information. Next, we are going to look at all the steps needed to put your products up for sale and start your online business.
Choosing a WooCommerce theme
Among our tips above, we suggested choosing a free theme so that you can then purchase the one that best suits your style and the needs of your shop. But, after choosing, how can you install your theme? Is it necessary to use the configuration wizard again? Of course not, just follow the steps below:
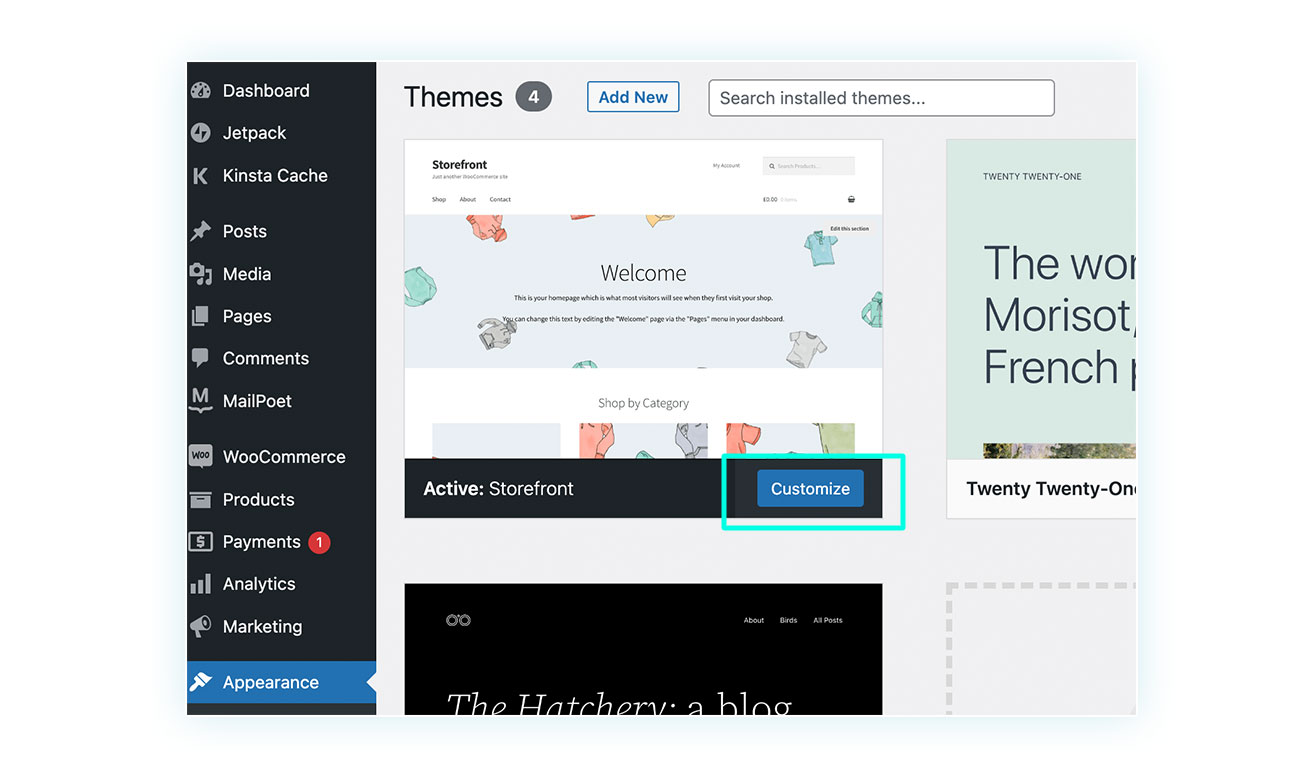
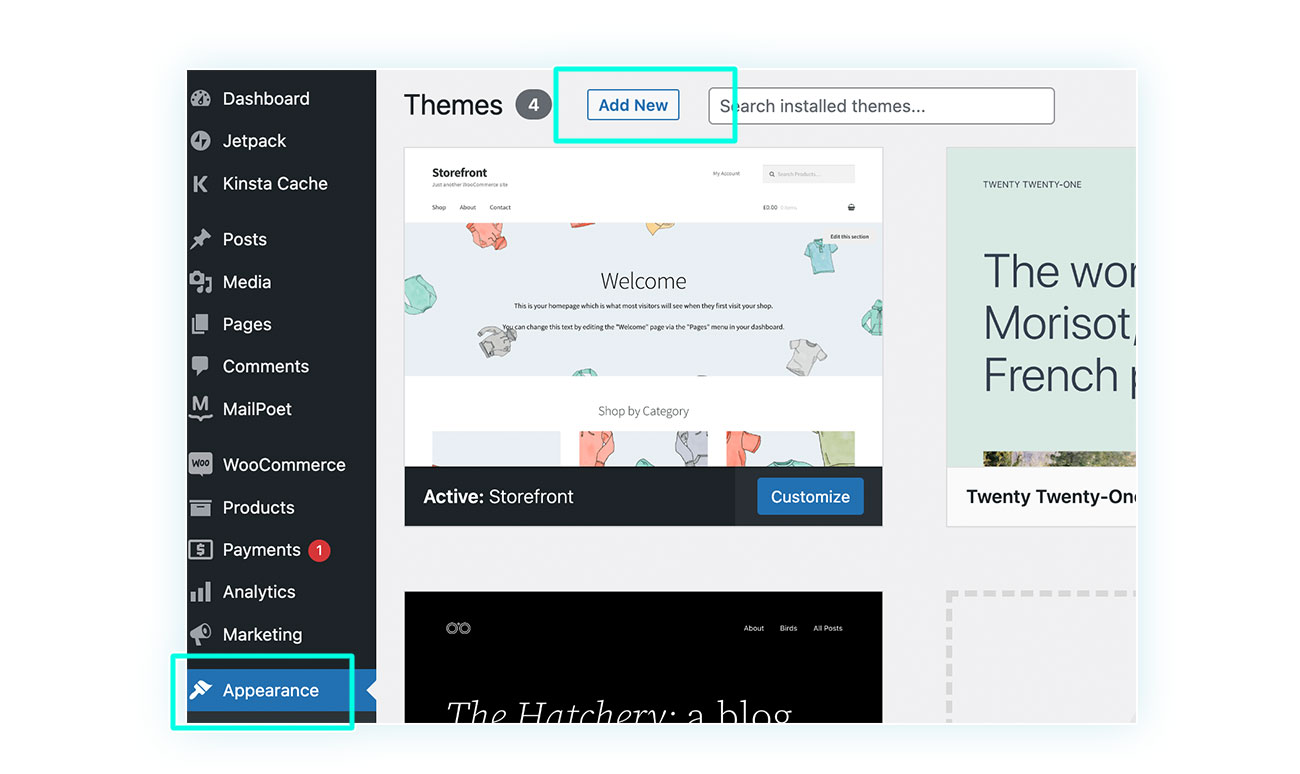
- In the sidebar, click on the “Appearance” button, this will automatically open the “Themes” section.
- In the newly opened section, click on “Add new” at the top.
- You will be offered a selection of thousands of free themes, but if, for example, you want to upload a theme that you have downloaded or purchased elsewhere, all you have to do is click on “Upload theme” at the top.
- You can now select the .zip file of the theme to upload it to your WordPress site.
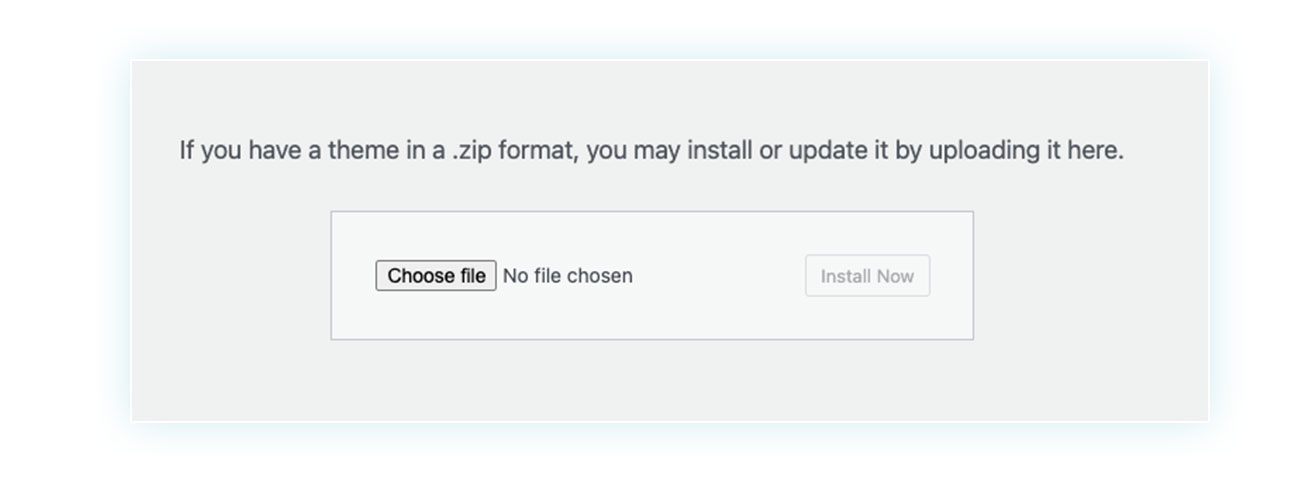
Important: In case you can’t find the file in .zip format (i.e. a compressed file), please check that you did not unzip the file when downloading it.
How to configure the WooCommerce home page
Now let’s go into a little more detail: how do you set up a home page for your eCommerce store? The home page, as you probably know, is the first page that appears when you arrive on the site and is one of the most important pages of your shop.
WordPress, by default, displays the latest articles written in the blog on the home page, but this is unsuitable for an online store, which is why you need to change it.
In the past, a template could be selected when creating a page, but today, this option is often considered obsolete because it does not allow much customization of the page.
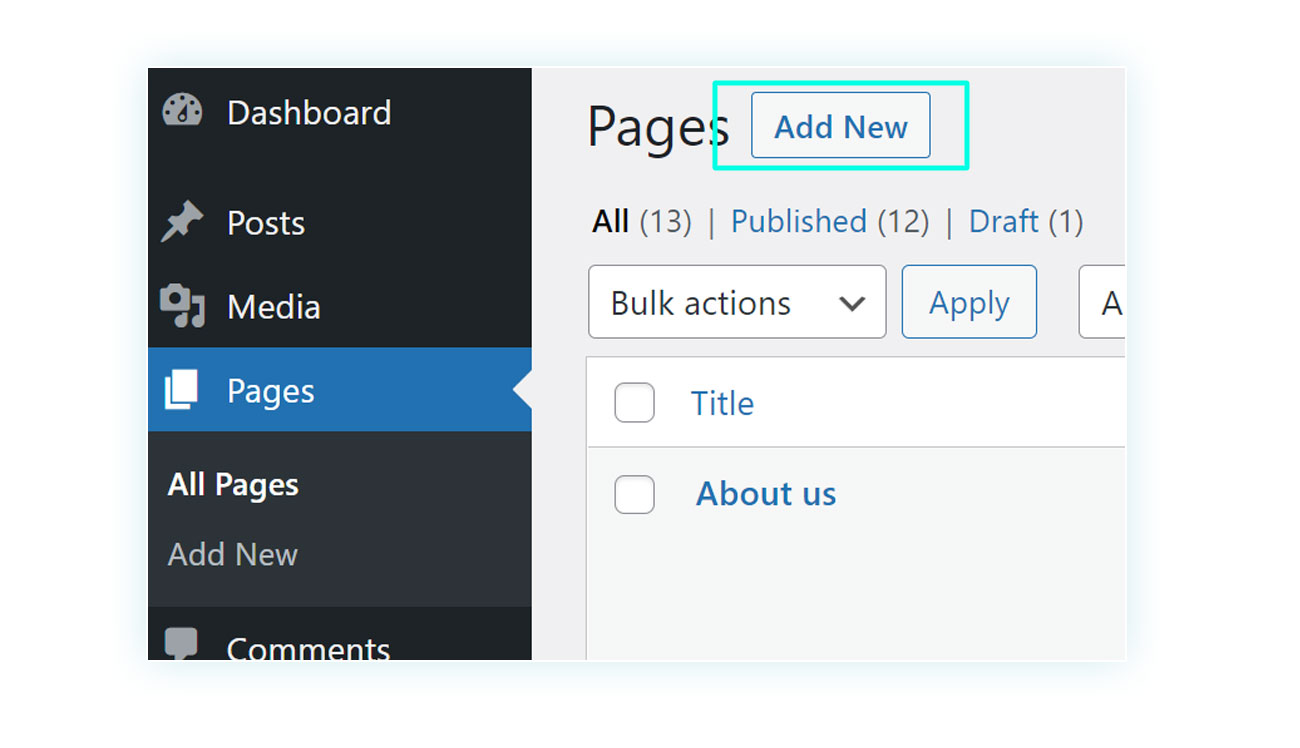
Therefore, the first step in setting up the home page is to create this page. To do this, go to “Pages” in the sidebar and click on “Add New”.
You will then be able to practice with the new block system that allows you to edit content intuitively.
Once you have created your preferred page, all that remains is to set it in the system so that it is displayed to all visitors.
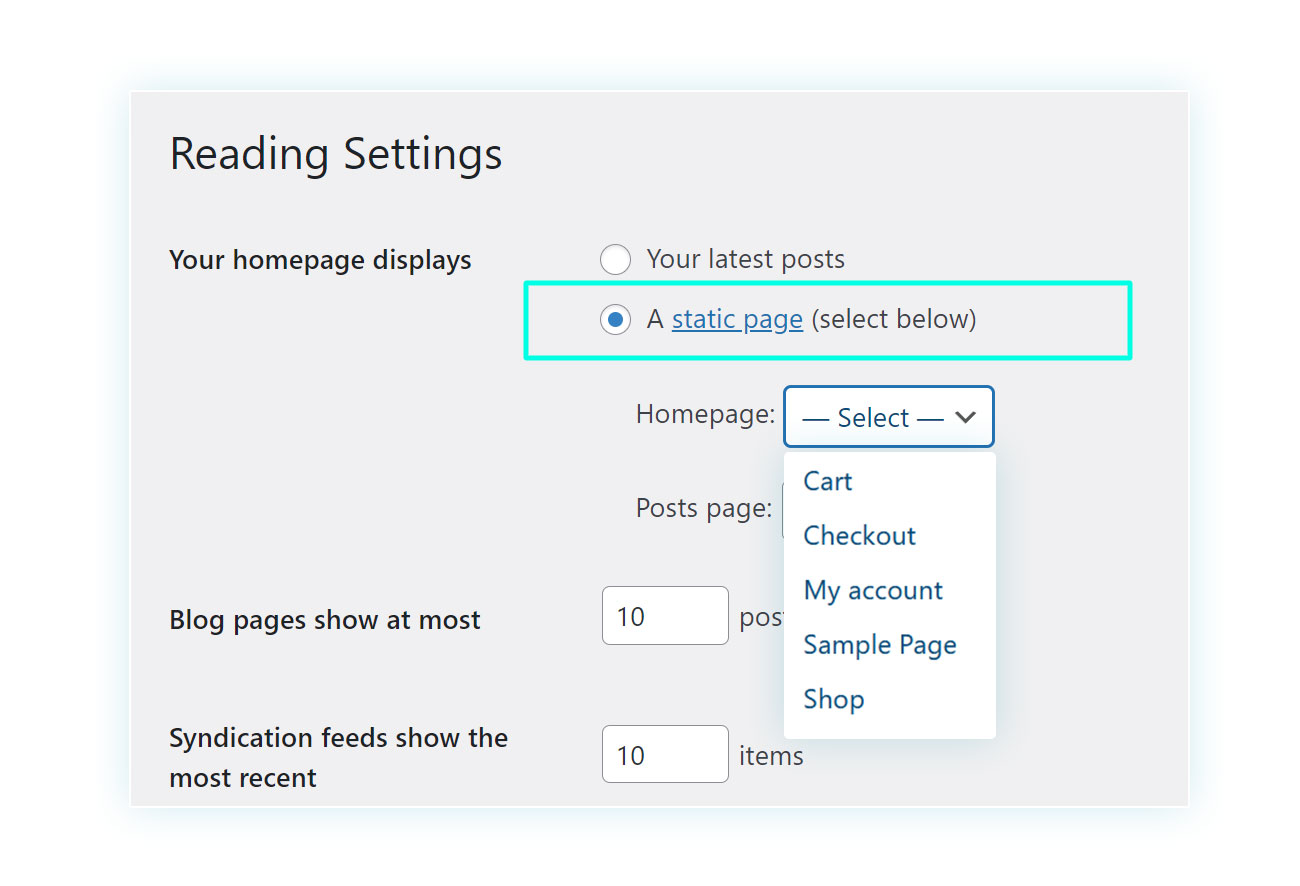
To do this, go back to the sidebar, and, at the bottom, select Settings > Reading.
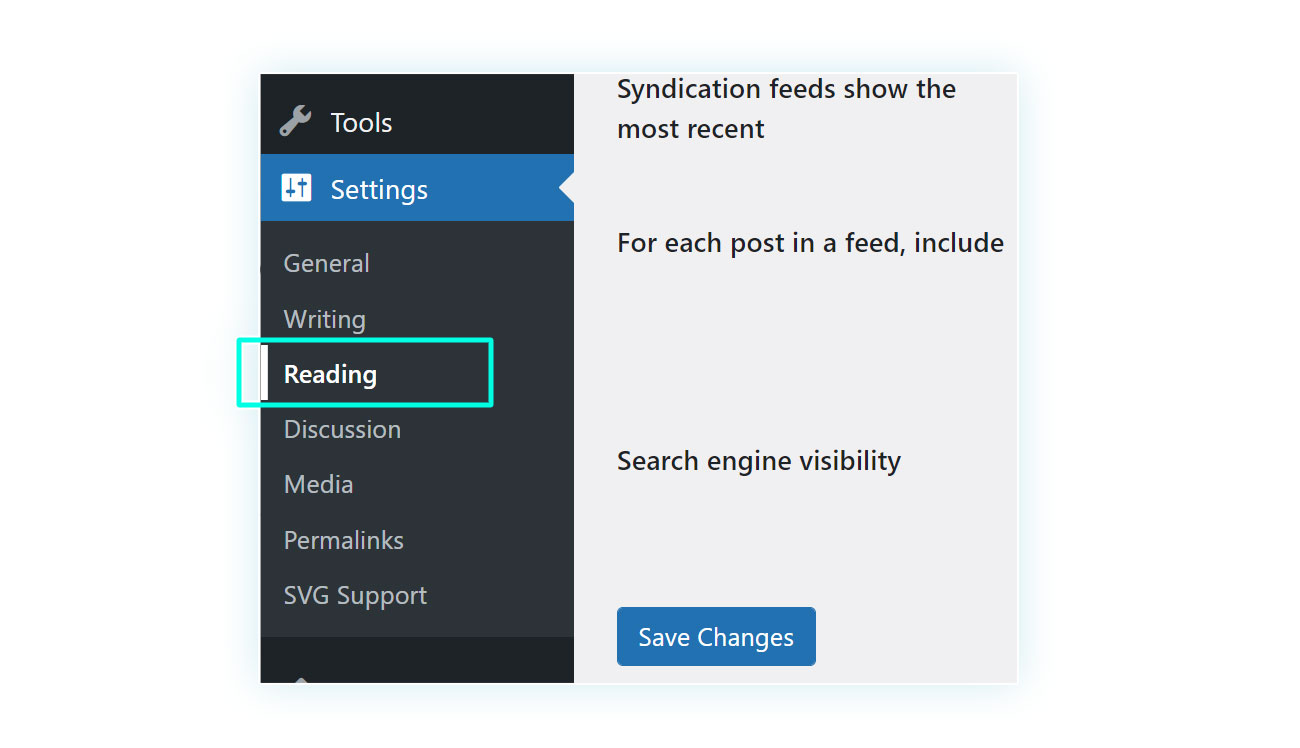
On the page that opens, in the section “Your homepage displays” select “A static page” and then select your page from the dropdown menu below.
How to set up the shop page on WooCommerce
Just like the home page, the shop page is also created automatically, but you may want to change this or set another page.
First of all, what is the shop page? Is the main page of your eCommerce store, where all products for sale are displayed. If you want to set up a different one in this location, all you have to do is follow these steps:
- Go to the “WooCommerce” section of the sidebar.
- Click on the “Settings” section.
- Go to the second tab, the one called “Products”.
- On the first page of this tab, called “General”, you will find the possibility to change the shop page from a dropdown menu.
The procedure is very similar to that of the home page, so it should be quite easy to follow (in fact, it is not uncommon for the shop itself to become the home page of your eCommerce store).
But, while setting up a page as a shop is not difficult, creating the page and customizing it requires a little more work.
In general, it is possible to say that the page can be customized in two ways: the first is through a change of internal structure, and the second is through the appearance of the site.
In the first case you can, once again, use the block system to customize the page, while in the second case you will have to go to the sidebar, and click on Appearance > Customize to see all the editing options available to you.
How to set up the checkout page on WooCommerce
We can follow the same process used for the shop page to set up the checkout. By “checkout”, we mean the payment page that customers will visit after selecting the products they wish to purchase.
Again, it is a basic page created by WooCommerce, but you may want to have a custom page that performs better and increase conversions.
In this case, all you have to do is create the page and then set it up in the WooCommerce settings by following these steps:
- In the sidebar select “WooCommerce”.
- In this section go to “Settings”.
- Scroll through the various tabs until you reach the last one called “Advanced”.
- In the first section, you will be able to select the page you prefer to have as your checkout.
How to set up the shopping cart on WooCommerce
This is the last section of the trilogy we have just seen. Remember: we are talking about a page created automatically by WooCommerce.
The shopping cart, as you probably know, is a temporary page that contains all the products added by the customer and is later emptied once the purchase is completed.
In case you want to set another page as the shopping cart, all you have to do is follow the instructions in the previous point, as this setting is located directly above the checkout page.
How to set up shipping on WooCommerce
Going in order of what has been covered so far in the guide, we have seen how to create an online store with WordPress and WooCommerce, how to set up the shop page, the payment page, and the shopping cart. Before you start receiving the first orders, let’s see how to configure WooCommerce shipping options so that they are automatically applied at the time of purchase.
To do this, you must once again select “WooCommerce” in the sidebar and click on “Settings”. But this time you will need to move to the third tab, the “Shipping” tab.
This section is divided into three other categories, which we will see later.
Establishing Shipping Zones on your WooCommerce store
The first thing to settle in terms of shipping is the geographical coverage. You may have tried to make an online purchase from a shop and, when you entered your address, one of two things usually happened:
- The shipping price changed, adapting it to your country.
- Shipping became impossible if there was no coverage for your address.
These are the results you want to achieve with shipping zones: having an updated shipping cost based on your address (shipping abroad, for example, costs more than shipping locally) and deciding which areas of the world are not covered by your service.
WooCommerce already gives you two options within this category, namely:
- The country related to your shop details, for example, Italy
- Locations not covered by your other zones
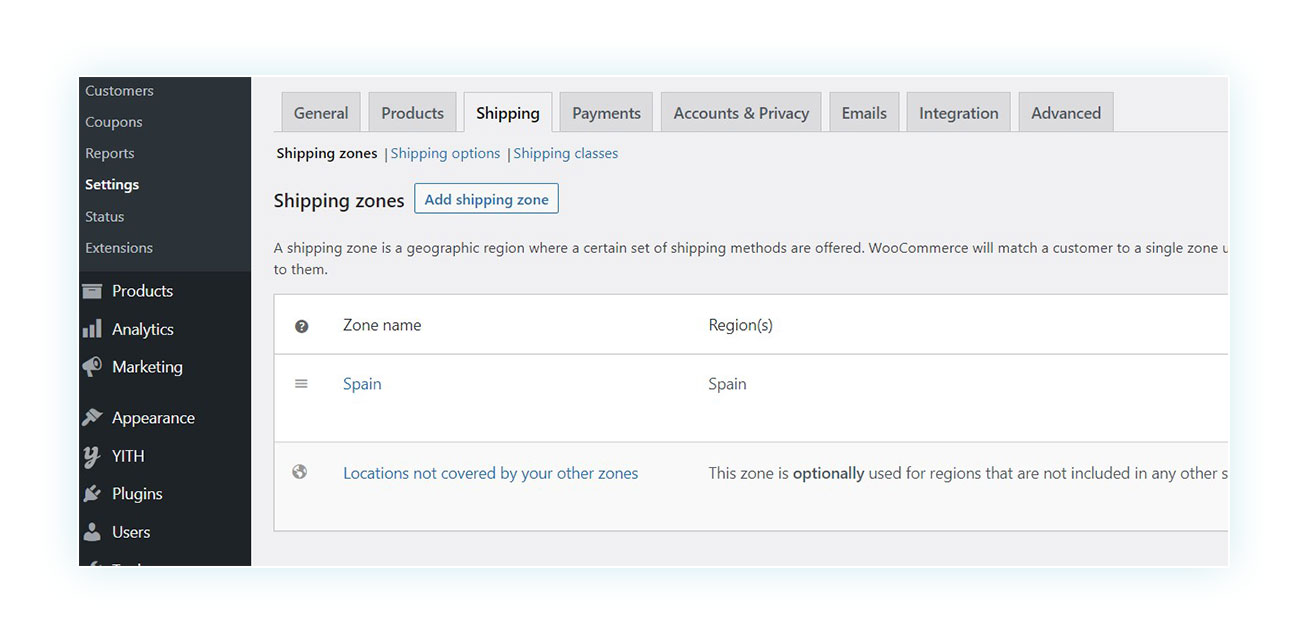
In this example, this specifies the shipping cost for Italy, the country where your shop would be (which is free in the basic version), and the lack of methods for the rest of the world.
If this already meets your needs, you won’t need to change anything, but if instead, you want to set a shipping cost (i.e. within the same country), you have to click on the country name.
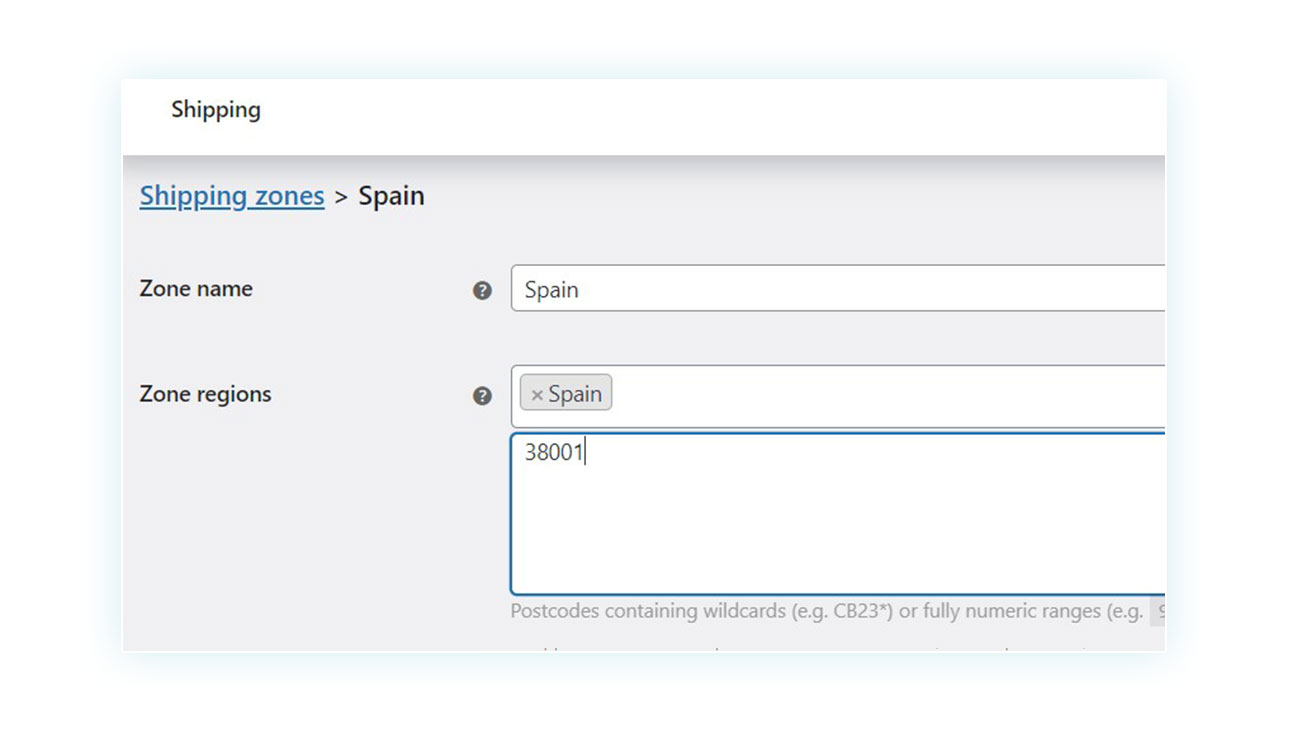
This will open another page, where you can change the name of the zone (if you want it to appear differently to customers) and you can specify which regions are covered by this zone.
For example, you might want to ship to Europe, in which case you could call the zone “Europe” and decide in the zone regions all the countries included in this type of shipment.
You can also limit shipping locally by specifying the postcodes of the zones covered.
Once you have decided on the zone, you can specify the shipping cost. If you are not interested in offering free shipping, you should deactivate this option and then click on the “Add shipping method” button.
You will then be asked to choose one of these options:
- Flat rate – In case you want to charge a fixed fee as shipping cost (e.g. 10€).
- Free shipping – If you do not want to charge your customers for shipping, this can be the case if you sell downloadable products.
- Local pickup – If this is available for your business, you could add this option for local purchases.
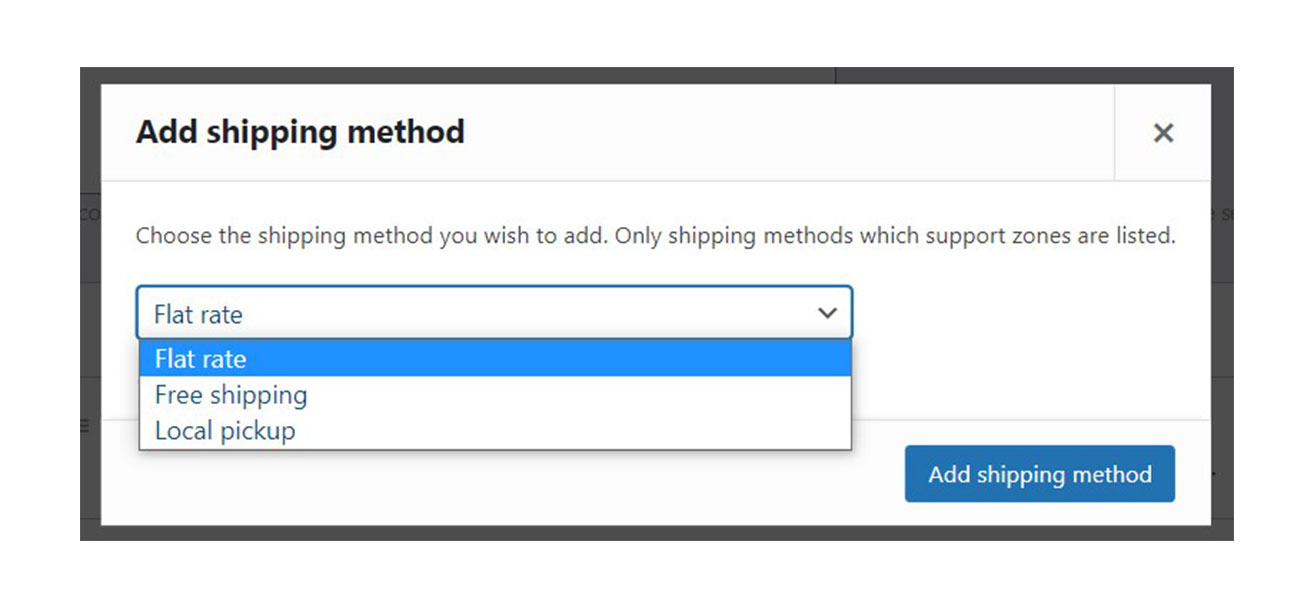
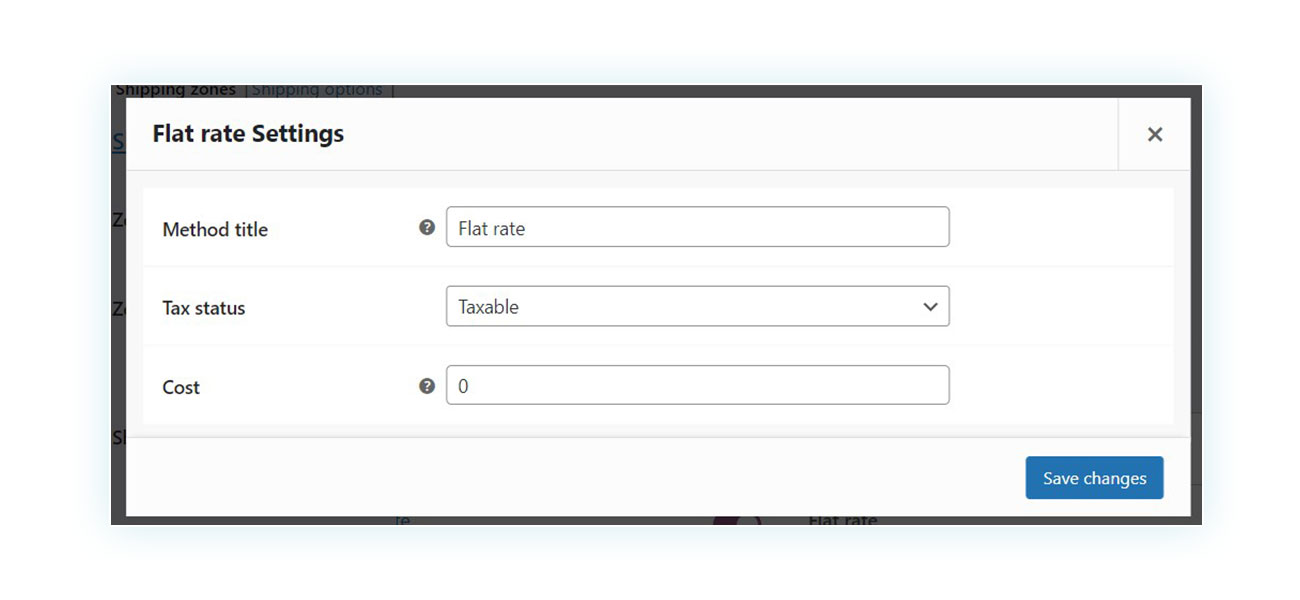
If you choose “Flat rate”, you will need to click on “Edit” below to select the name of the method, whether it is taxable or not, and what it costs.
Repeat this operation to create as many methods as needed. If you wish to create complex shipping systems (e.g. based on weight or number of items), you will need to use one of the dedicated plugins available online.
WooCommerce shipping options
Shipping options are included in the second section and are general settings that affect shipping.
The first part is called “Calculations” and allows you to choose when the system calculates the shipping costs and show them to the customer. You can choose whether to show them during the shopping cart or wait for an address to be entered.
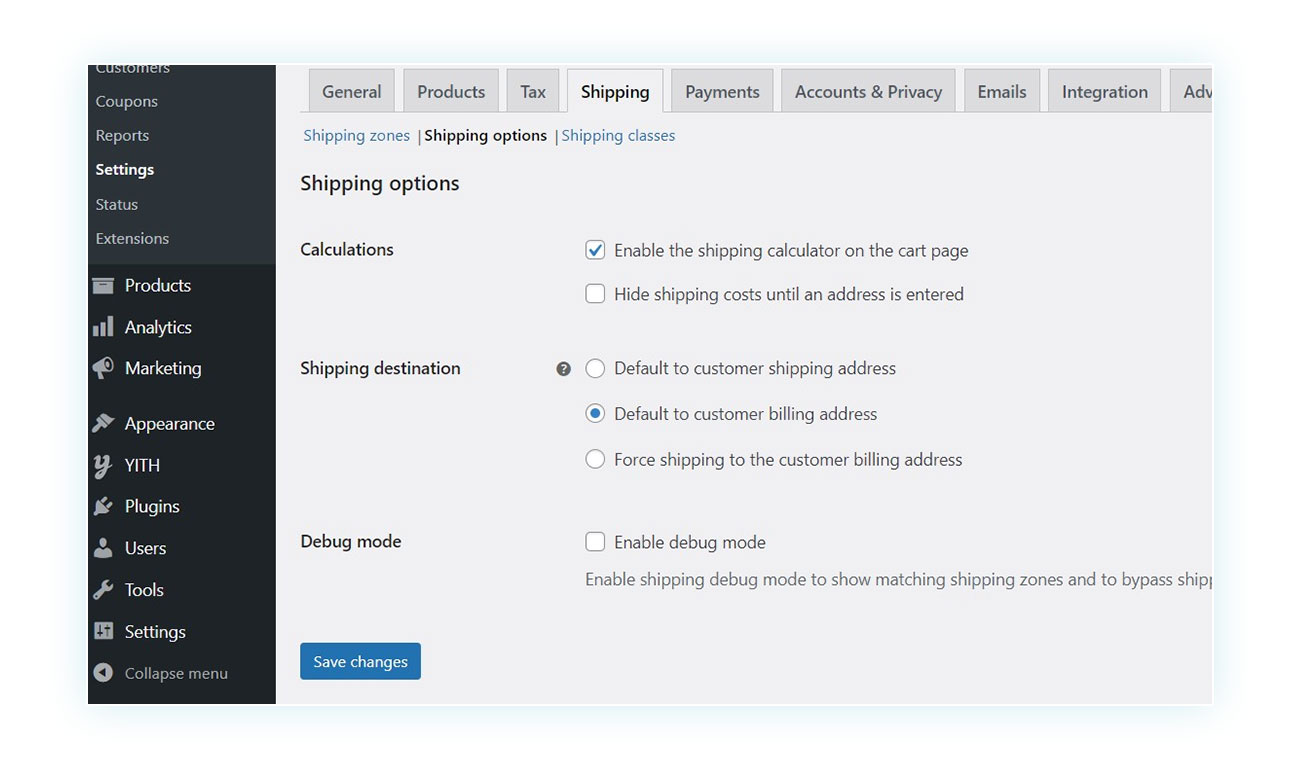
This choice depends on both your sales strategy and the shipping system you have adopted (if the costs vary by zone, you will have to wait for the customer’s address).
The second part is called “Shipping destination”, where you can set which address will be used as the basis for shipping by the system, between the billing address and the customer’s shipping address.
Finally, there is the “Debug mode”, in which you are not interested yet.
WooCommerce Shipping Classes
Shipping classes occupy the third category and may be slightly more complex to understand. They are generally not used by many sellers but are very useful. Classes are used to indicate that a product belongs to a specific category, this will have an impact on the shipping.

A class, for example, could be “Fragile” or “Fresh Food”. These are classes that need to be remembered at the time of shipping because of the specific arrangements they require.
How to set up payments in WooCommerce
Once shipping has been set up, it’s time to talk about one of the topics of most interest to sellers: payments.
Setting up the correct payment method in your shop is essential to both facilitate the purchasing process for your customers and receive the payments easily.
To check which payment method is available in WooCommerce, go to WooCommerce > Settings > Payments.

The methods already included in the system are:
- Direct bank transfer
- Check payments
- Cash on delivery
Any of these can be configured (by adding your data, such as IBAN and personal information), but it is clear that these methods for setting up the checkout in WooCommerce are not enough for the optimal operation of your online store.
Most purchases take place without using these methods: according to Statista, 45% of online payments take place via digital systems (read here how to set up PayPal on WooCommerce), while 22% take place via credit card and 12% via debit card.
By only offering bank transfers (which take up 7% of your turnover), you are foregoing a huge number of sales.
This is why it is strongly recommended to use plugins that allow you to add the most popular payment methods to WooCommerce. On YITH, you can find for example the Stripe plugin to allow credit card payments and the (free!) PayPal Express Checkout plugin to accept PayPal payments.
How to configure email options in WooCommerce
Emails in WooCommerce may be a less intuitive section than the previous ones, but they are just as important: in this section, we find all the automatic emails that are sent to the customer and seller following a purchase on the site.
You can find these messages in WooCommerce > Settings > Emails, where you will see a list of the emails that are currently sent. By clicking on “Manage”, on the right, you can customize the text of the WooCommerce emails.
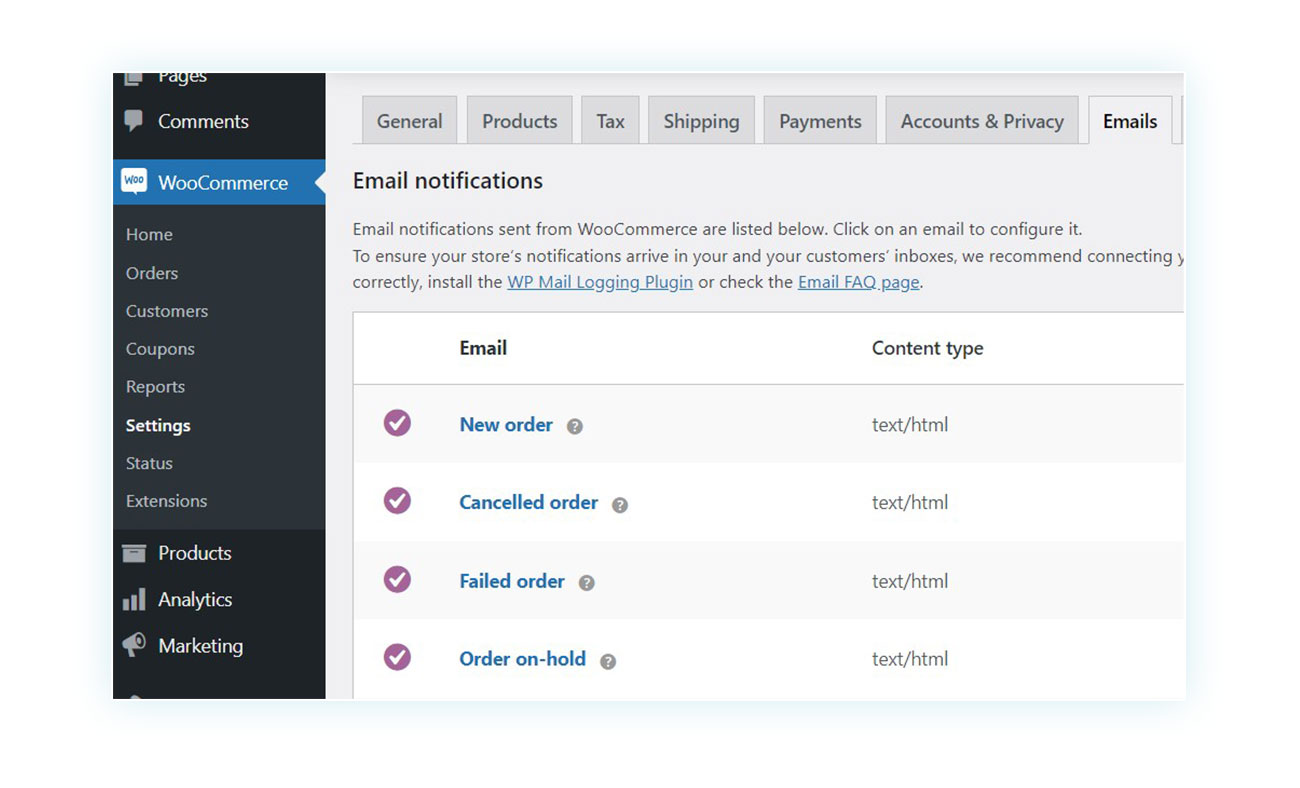
At the bottom, you will also be able to define the name of the sender of the communication (e.g. “Marco’s Shop”), the email address of the sender, the header image, the footer text, and configure the email template.
Speaking of contacting customers, with WooCommerce you can add registration options to enhance the user experience on your online store.
How to set up taxes in WooCommerce
Since we are setting up an eCommerce store, we must not forget about taxes. When configuring taxes in WooCommerce, we will have to perform a two-step process.
First, go to WooCommerce > Settings > General. Once there, scroll down and you will find the “Enable taxes” option, which you will need to activate before saving the changes at the bottom of the page.
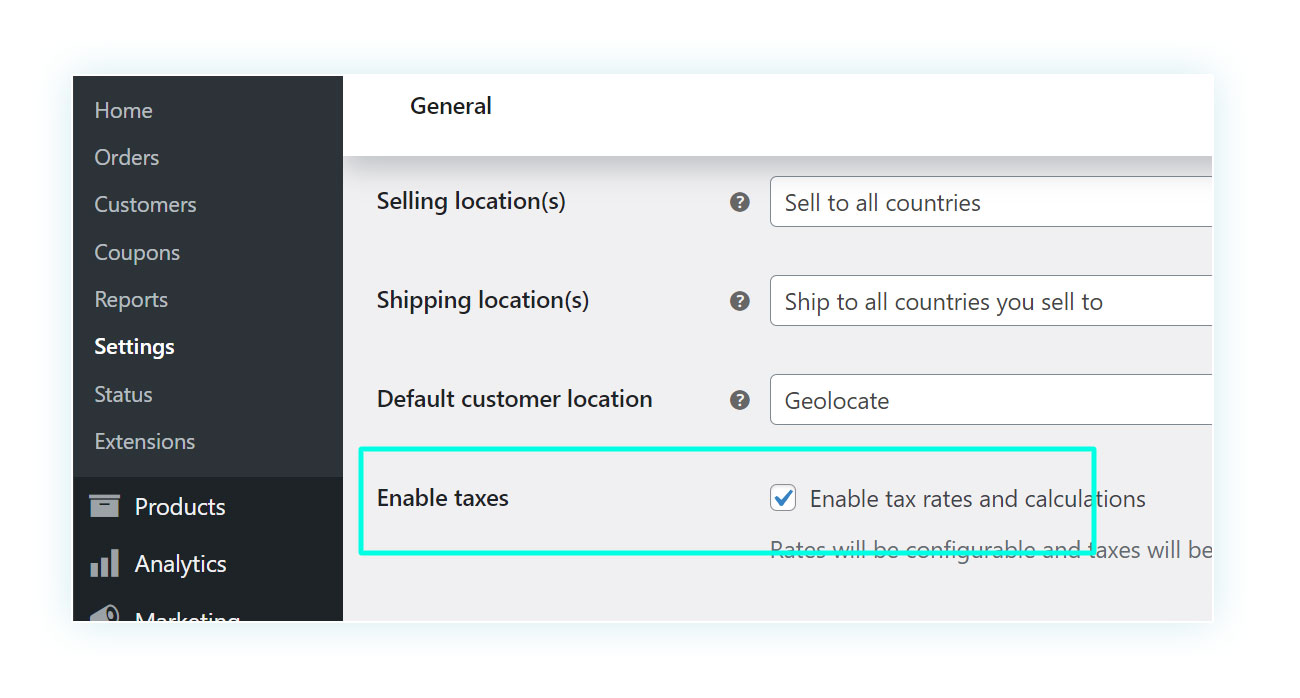
After saving the changes, the “Tax” tab will appear in the WooCommerce settings, click on it to discover the settings.
If you’re wondering how to configure taxes, these are the options:
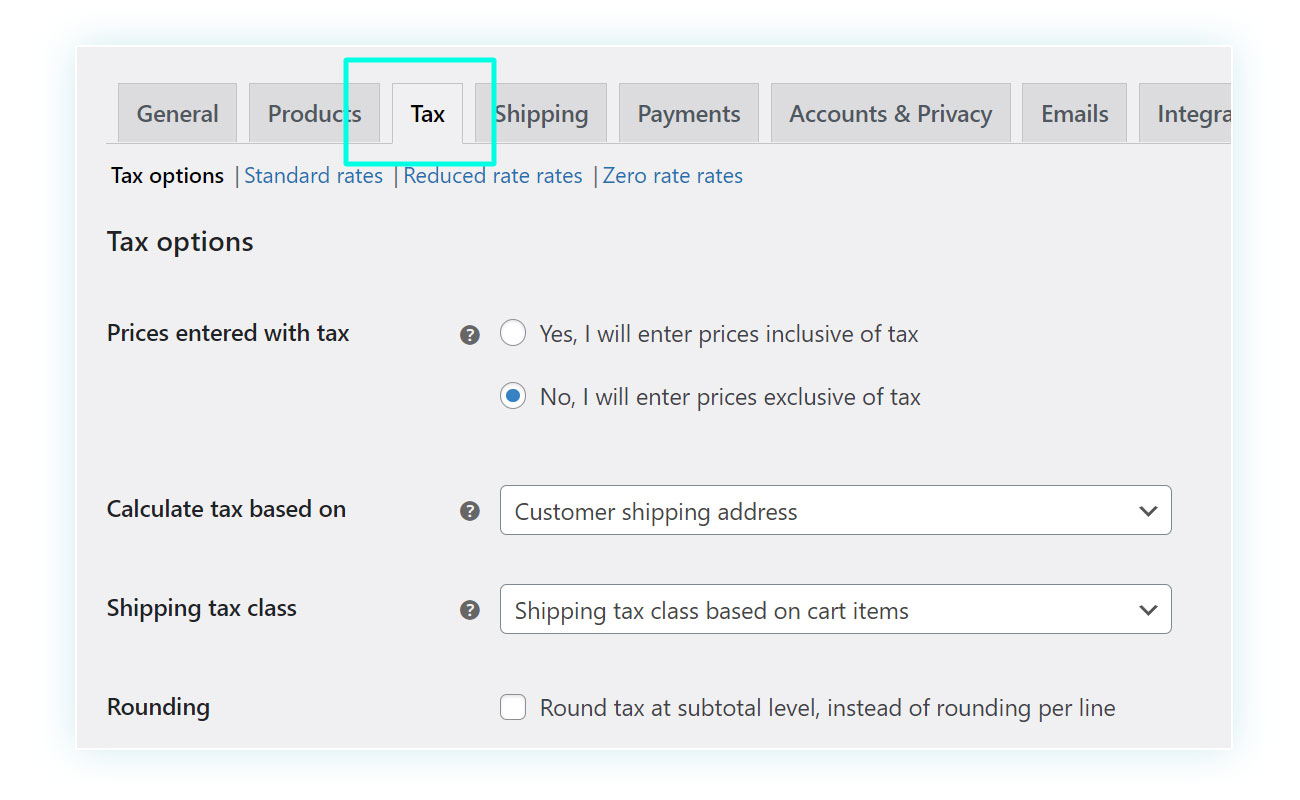
- Prices entered with taxes included – You can choose whether the prices shown in the shop already include taxes (as is the case in Italian shops), or whether these will be added later (as it is for American shops).
- Calculate tax based on – You can choose whether to calculate taxes according to the customer’s address or according to the address of the shop/owner.
- Rounding – You can choose whether to round taxes in the subtotal, instead of per product.
And much more. Once you have configured the general options, you can move through the “Standard rates”, “Reduced rates”, and “Zero rates” sections to create the different taxes to be applied to the various products.
If the tax in question is VAT, for example, this will have a different amount depending on the type of product.
How to add products to your shop
At this point in the guide, you should have an online store ready to sell your products, so all left is seeing how to add products to your catalog.
Before creating a product, however, let’s find out how to add attributes and how to set up categories. The former allows you to filter the products in your shop according to characteristics (such as size and color) while the latter allows you to divide the products according to types (such as trousers, shirts, pajamas, etc.).
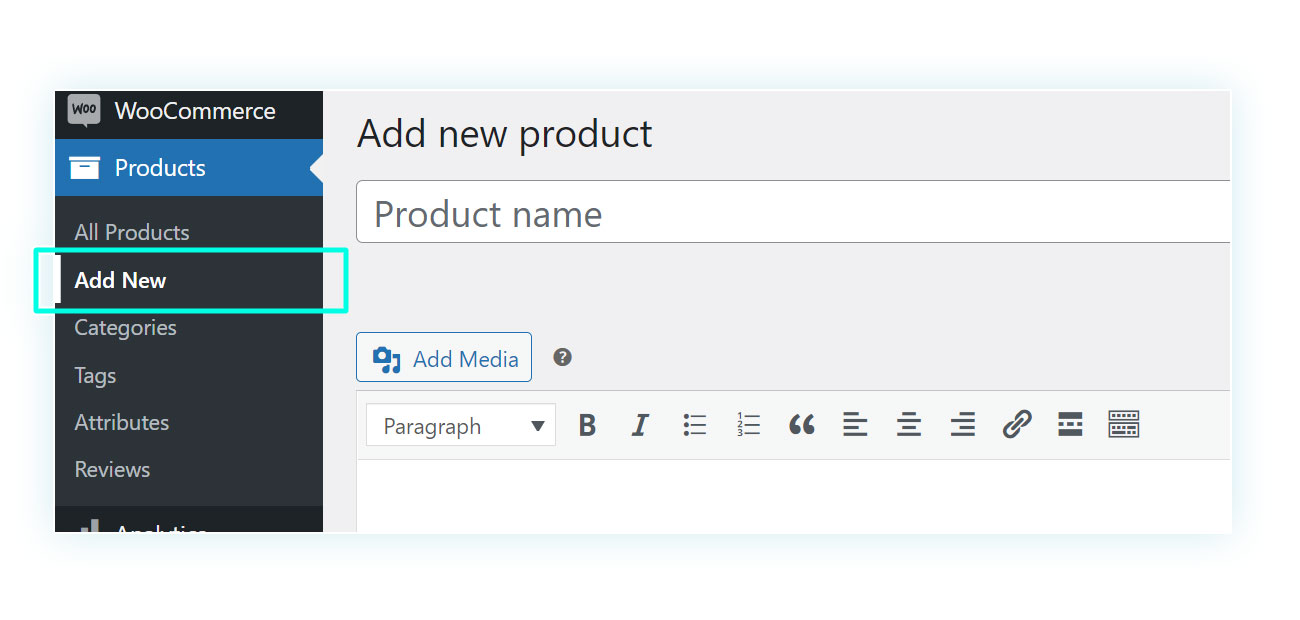
To do this, go back to your sidebar and go to Products > Add New.
For those familiar with WordPress, creating a product on WooCommerce is very similar to creating an article or a page.
Starting at the top, you will have to give the product a name. In the section below, you can add the description that will be displayed to customers in your online store.
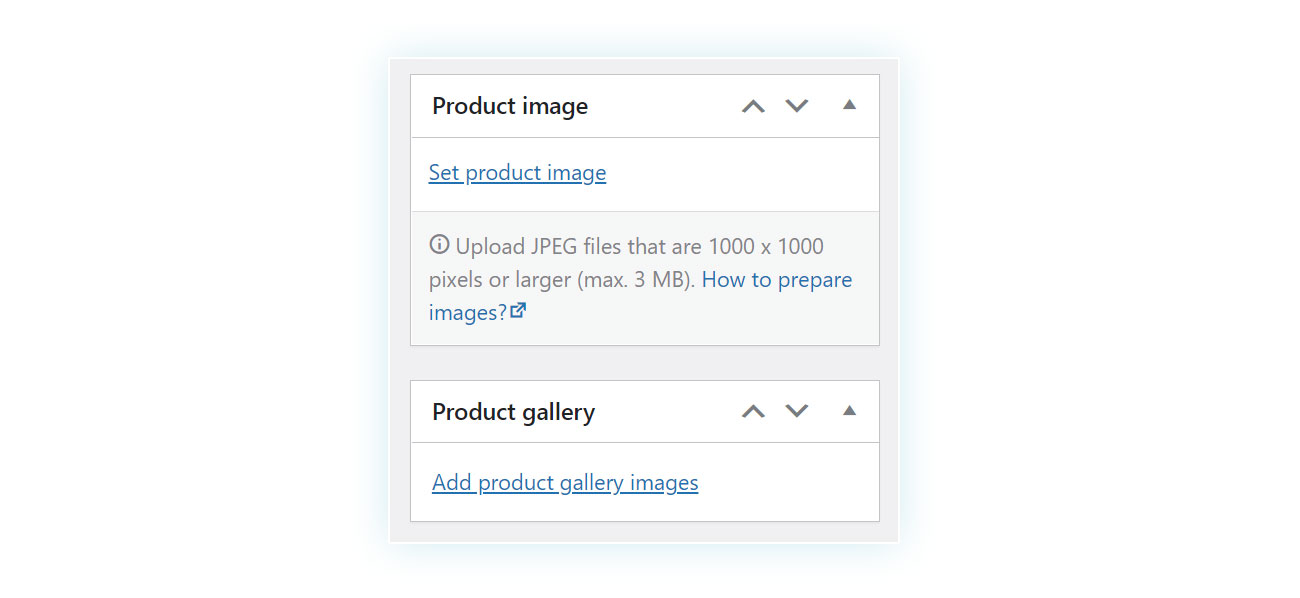
On the right side of the page, you have the option of placing a product image (which will be the main image displayed), gallery images (if you want to show a variety), and choosing its category, in case you sell different types of products on your eCommerce store. It is important to be careful with the chosen images, for sales purposes, the image is just as important as customer reviews.
Finally, at the bottom of the page, you will find the product’s technical information. This includes:
- Product type (which we will see in the next section)
- An option to add a digital/downloadable product
- Regular price
- Sale price (in case you want to offer a discounted price)
- Tax status and type of tax rate
- Number of items available, for stock management
- Shipping class
- Linked products and more
Finally, you may be interested in how to import your products into your eCommerce store (in case you already have them available in a digital format) or how to export them if you are creating a second shop or a backup.
Start adding products to your WooCommerce shop
You now know exactly how to create your online store with WooCommerce and how to add your products.
It is important to list the various types of products in WooCommerce. These include:
- Affiliate products – are sold on another platform that issues a percentage to its affiliates.
- Variable products – items that can vary according to certain characteristics, such as sizes and colors.
- Grouped products – products that are sold together.
Regarding the payment methods we saw above, countless plugins allow for specific and additional functions, so don’t be afraid to explore if you feel like a function is missing in your online shop.